Hang in There, Mommy

From the Heart title

Being a mom is challenging.  Being a mom to more than one child is more of a challenge.  But if you’re living life with an autoimmune disease, being a mom is a blessing and can also be a curse.  Wikipedia has some great (research backed) information about autoimmune diseases, which are interestingly among the top ten leading causes of death in women under age 65.  There are over 80 different kinds of autoimmune diseases, with varying results for the body.

I have Rheumatoid Arthritis.  But in the process of getting that diagnosis, I heard several doctors mention several different possibilities – most that were far worse in their long-term affect on the body.  Since receiving my diagnosis, I have met three moms in particular that live with a couple of those other options that I didn’t end up having, but heard in the diagnosis process.  All three of them had some things in common that I strive to live out in my daily life.  I’m going to share them with you here so that if you are a mom who has recently been diagnosed and are learning to live again, or if you’ve been living with a diagnosis and you’ve recently become a mom, you can hopefully gain some knowledge from the experience that each of us has to share.

(Props to Chelle, Haley, and Heather right now – and thank you each for how much you taught me… without even knowing it!)

Be Real.

Your kids need to know that sometimes Mommy just hurts.  (Note: Monitor how much you complain – you don’t want your child to become a chronic pain complainer… esp if your autoimmune disease is one that can be hereditary – you need to know if your child really is experiencing pain.)  But don’t hesitate to explain why we can’t do something right now.  Tell them how you feel.  Don’t just say “I can’t carry you right now.”  Tell them that when you’re in a flair, it’s very painful to take each step, and you need to make sure to not put any extra weight on your feet today.  Suggest another activity instead.  If you think your child is just craving your attention, suggest to snuggle together with some books on the couch, or watch their favorite tv show with them, etc.

Explain so they don’t complain.

If you’ve got a doctor or physical therapy appointment and the kids have to go too, explain what the doctor is going to do for you today.  “Because Mommy has this disease, it means that Mommy needs to visit xyz clinic to get help to feel better and be a stronger Mommy.  (i.e.: I’m a better Mommy for you when I feel good and confident with my body and its abilities.)  It’s important that you help me through this appointment to help me be a better Mommy.  My body wants to be able to help you, but I need to get some help from xyz doctor in order for that to happen.”  Doing this doesn’t mean they won’t complain.  Because they are kids.  But if you are working to instill a caring heart, understanding will come soon enough, and with it, more patience on their part.  (Still bring along your entire bag of tricks to keep them occupied – they are, after all, human children!)

Use every moment as a teaching moment.

I’ve heard Haley talk about how she has had to train her children to freeze and listen to her voice – life in a wheelchair with MS restricts her abilities to run after a child who might run into the street, etc.  But isn’t that a positive thing?  They have learned from an early age the importance of listening.

Chelle showed her son her X-rays when her leg broke due to a fall caused by her Lupus, and he began to take interest in the human body in a whole new way because it was no longer just in books and online – he could truly see inside his Mommy’s leg… and right there in Kindergarten he began to declare he was going to be a doctor.  Time will tell if he decides to follow that dream, but either way, she took advantage of that teaching moment.

Don’t wallow.  Let your kids live.

It’s SO easy to want to sit on the couch and just feel sorry for yourself.  But something Heather told me when in the middle of her treatments, blood transfusions, surgery to insert a port, and just general illness that comes with her Limes disease has stuck with me.  Her parents-in-law were paying for the whole family to go to Disney World.  And I was basically in shock that they were going.  I mean, seriously, they could have just backed out gracefully and everyone would have understood.  But Heather told me when I asked “so why are you going?”… “Because I want my kids to live.  Their lives don’t revolve around my pain.”  Wow.  That is something that I strive to remember every day.  She had to hang out at the hotel often, or find a place to sit down frequently, but her kids got to enjoy time with their beloved cousins and spend time at Disney World because she was willing to not wallow in her own pain and discomfort so they could live a little.

Cherish the good days.

One of the real curses of Rheumatoid Arthritis is that it comes and goes.  You can be fine and perfectly normal for several months, and then one really good storm front can set you off on a flair that lasts for days or even weeks.  Or an illness can.  Or a change in estrogen levels can.  Many autoimmune diseases are similar in this.  It’s easy to get lulled to sleep until all of a sudden your disease flairs up and reminds you just how weak you are.  So cherish the good days.  When you feel great, REALIZE it!   And appreciate it.  Celebrate life just by being active when you can be!   Run and play with your kids outside.  Roll in the grass.  Pack a picnic and go to the park to sit on a blanket with your legs crossed.  And help them to realize to cherish it as well – verbalize how good you feel today and what a blessing it is that you aren’t in pain right now so you can easily do all these fun things.

Learn to let go.

You aren’t in control.  And this is never more clear than in the middle of an autoimmune crisis.  Autoimmune diseases are not given to the faint of heart – God certainly provides the strength necessary to conquer every day.  But He can also use them to make a totally self-reliant person let go… give in… and accept help.  Whether someone offers to bring a meal to your family, or offers to keep your kids during a dr. appointment, DO NOT EVER SAY NO.  Learn to let go of the control that you feel you need to have over your life and your circumstances.  God provides people to help you get through the tough times – ACCEPT THEIR HELP WITH GRATITUDE!

Look for the JOY!

One of the songs on a kids worship cd that I recently purchased for Becca is called “I Choose Joy.”  And in that song, Justin Graves so aptly sings “I choose joy – in the good times and the bad.  I choose joy – when I’m happy or I’m sad.  Joy is not a feeling, it’s living your life glad.  I choose J-O-Y, I choose joy.”  Mama, let me tell you how very hard it is to choose joy.  But choosing joy is looking for the little tiny moments.  On a day when you are overwhelmed with pain and you’ve had to walk the entire grocery store with two kids and a full cart, it’s hard to choose joy.  It really is.  And in those moments, I pray that God will send you a friend like my friend Naomi, who will randomly send you a couple pictures of her kids playing outside and tell you that she has found peace, and encourage you to find it as well.  Because in that moment when I received that message last week, God hit my heart with an arrow, and a few minutes later that arrow had sent it’s love all through my whole being.  I looked down at Becca as we created an awesome train track, and my voice caught in my throat.  I realized how blessed I am.  I found my peace.  I found my joy.  Right there in that moment with her.  Always look for the joy.  Always choose joy.

IMG_5519

Don’t forget to LAUGH in the sunshine!

It goes right along with finding joy, and choosing joy… but truly, laughter is the best medicine, and more people are Vitamin D deficient than any other vitamin.  Whether you are in a wheelchair, have hypersensitive skin that can burn easily, have chronic asthma and horrible allergies, NO MATTER WHAT plagues you daily, GET OUTSIDE and LAUGH in the SUNSHINE!  Your kids need to see you having fun.  Chelle often talked about (away from Tyler’s presence) how hard it was to be there for his soccer games, but how she would never want to be anywhere else.  She had to wear a large hat and super strong sunscreen, but she was there.  She wanted him to know how much she loved him and supported him, and she said she loved the moments between games when he would come to her lawn chair and excitedly tell her “did you see ___?” and “I did ____!”  She said that she loved laughing with him, and seeing him laughing with his friends.  Even when she had her broken leg, she was there for his games – rain or shine.  She always said they had such awesome bonding moments outside together.

And last, but not least…

Be honest with your spouse and ask for help.

There will be times when you want to hide your pain.  There are times that I hide mine.  I don’t want him to think I’m whining and complaining all the time.  But you need to be honest with him.  You need to tell him when you are having severe pain, and you need to ask him to help with things that you know you just absolutely can’t do right now.  It is hard to give up and give in, but remember that when it comes to your health, and the health of your marriage, it’s important to keep honesty central in your relationship.  God has given you this man as a helpmate for a reason, and don’t ever forget to be honest with him.  Keep this in mind – if you aren’t telling him what’s going on, he can’t read your mind, but he can read your body language… and he might read it all wrong and think something far deeper is going on when really it’s just surface pain and you not being willing to ask for help with household chores.  If you are overwhelmed and you need some time away from the kids, TELL HIM THAT!  The rest is up to him.  And hopefully he will support you and provide that time that you need.  I have learned from Haley that it’s important to tell Cody when I need a break – just like she talks to her hubby and tells him when she needs time away.  And it’s amazing how much better I feel and how much stronger our family is when I’ve had a little time away by myself!

So if you are struggling with an autoimmune disease and trying to figure out how to juggle that and a family, hang in there.  And know that you aren’t alone.  Build up a support system around yourself of other moms who have autoimmune diseases so that you have someone to contact on a bad day who truly understands, and also, build up a support system around yourself of folks who can help you when you need help.  Remember that there’s always a Mommy who is hurting worse than you are today.  Pray for her.  Even if you don’t know her.  And hang in there, Mommy.  You can do this.  You are stronger than you think.

blog signature


Joshua 1:9:

  “Have I not commanded you? Be strong and courageous. Do not be afraid; do not be discouraged, for the Lord your God will be with you wherever you go.”IMG_6184

Just a Reminder

After repeatedly receiving what I would only label as “hate mail” from one particular reader several times over the course of the last several months, I decided to finally reply to that person – in public.

Please remember that a blog is a blog – it’s a person’s (in this case mine) feelings, journals, activities, records.  If you don’t like what you read, don’t read it.

Negative comments will not be approved to show up on the page, because this blog isn’t about negativity.

I’m a REAL person.  I’m a mom.  I work from home.  I often have a dirty house.  My kids are far from perfect.  But yes, I do have a background in early and elementary education that yes, DOES make me an expert in that area, and thus I feel led to SHARE what I do with others who might be looking for inspiration, but might not know where to start.  If you don’t need inspiration, or don’t want to hear from an experienced educator, then there’s no reason for you to read my blog.

I have now replied to you.  I’m not taking away my blog.  I’m not changing my website address.  This is my personal space – my online home.  If you don’t like it, don’t visit.  And you don’t need to comment again.  You have made your feelings ABUNDANTLY clear.

Please take your negative self somewhere else.

I love and appreciate so much all of the positive feedback I receive from readers – via comments here, via emails, and also via my Facebook page.  So thank you so much to all the positive posters who share – please continue to do so!  I love to see your kids enjoying activities that I’ve inspired, and to know that I’ve helped you in some small way.  Each of you is an amazing parent, and I appreciate you so very much.

blog signature

Measuring with Duplos

marvelous math header

I’m excited to share that our Tuesday Mini-Series for April is “Marvelous Math!”  We do so many fun math activities that I just never have time to share them all on STEAM Thursdays… so this month every Tuesday will have a different fun math activity!  I definitely have a little math lover growing up under my nose… so I’m learning to really encourage that by doing some fun activities with her!  I hope you’ll enjoy this month of Tuesdays!

Quite a long time ago, I was super super active on Pinterest.  Like an every day, multiple hours a day user.  So I have a vast library of pins (over 4100) that make an awesome resource for me when I’m willing to take the time to sift through and find what I’m looking for.  (That’s why sometimes I just tell you – I know the idea came from someone else, but I just can’t find the source.)  Well, so anyway, a couple weeks ago, I sat down and sifted through my Lego Learning board, where I saw this idea from Anna at The Imagination Tree (I love her blog!).  I stored it away in my brain, and shared it with a dear friend.  So one day when I had very little inspiration to do anything with “school,” I texted Naomi and said “tell me what I should do!!!  I’m lost!”  And she gave me some ideas.  Measuring with Duplos was one of them, and it was perfect for that moment.

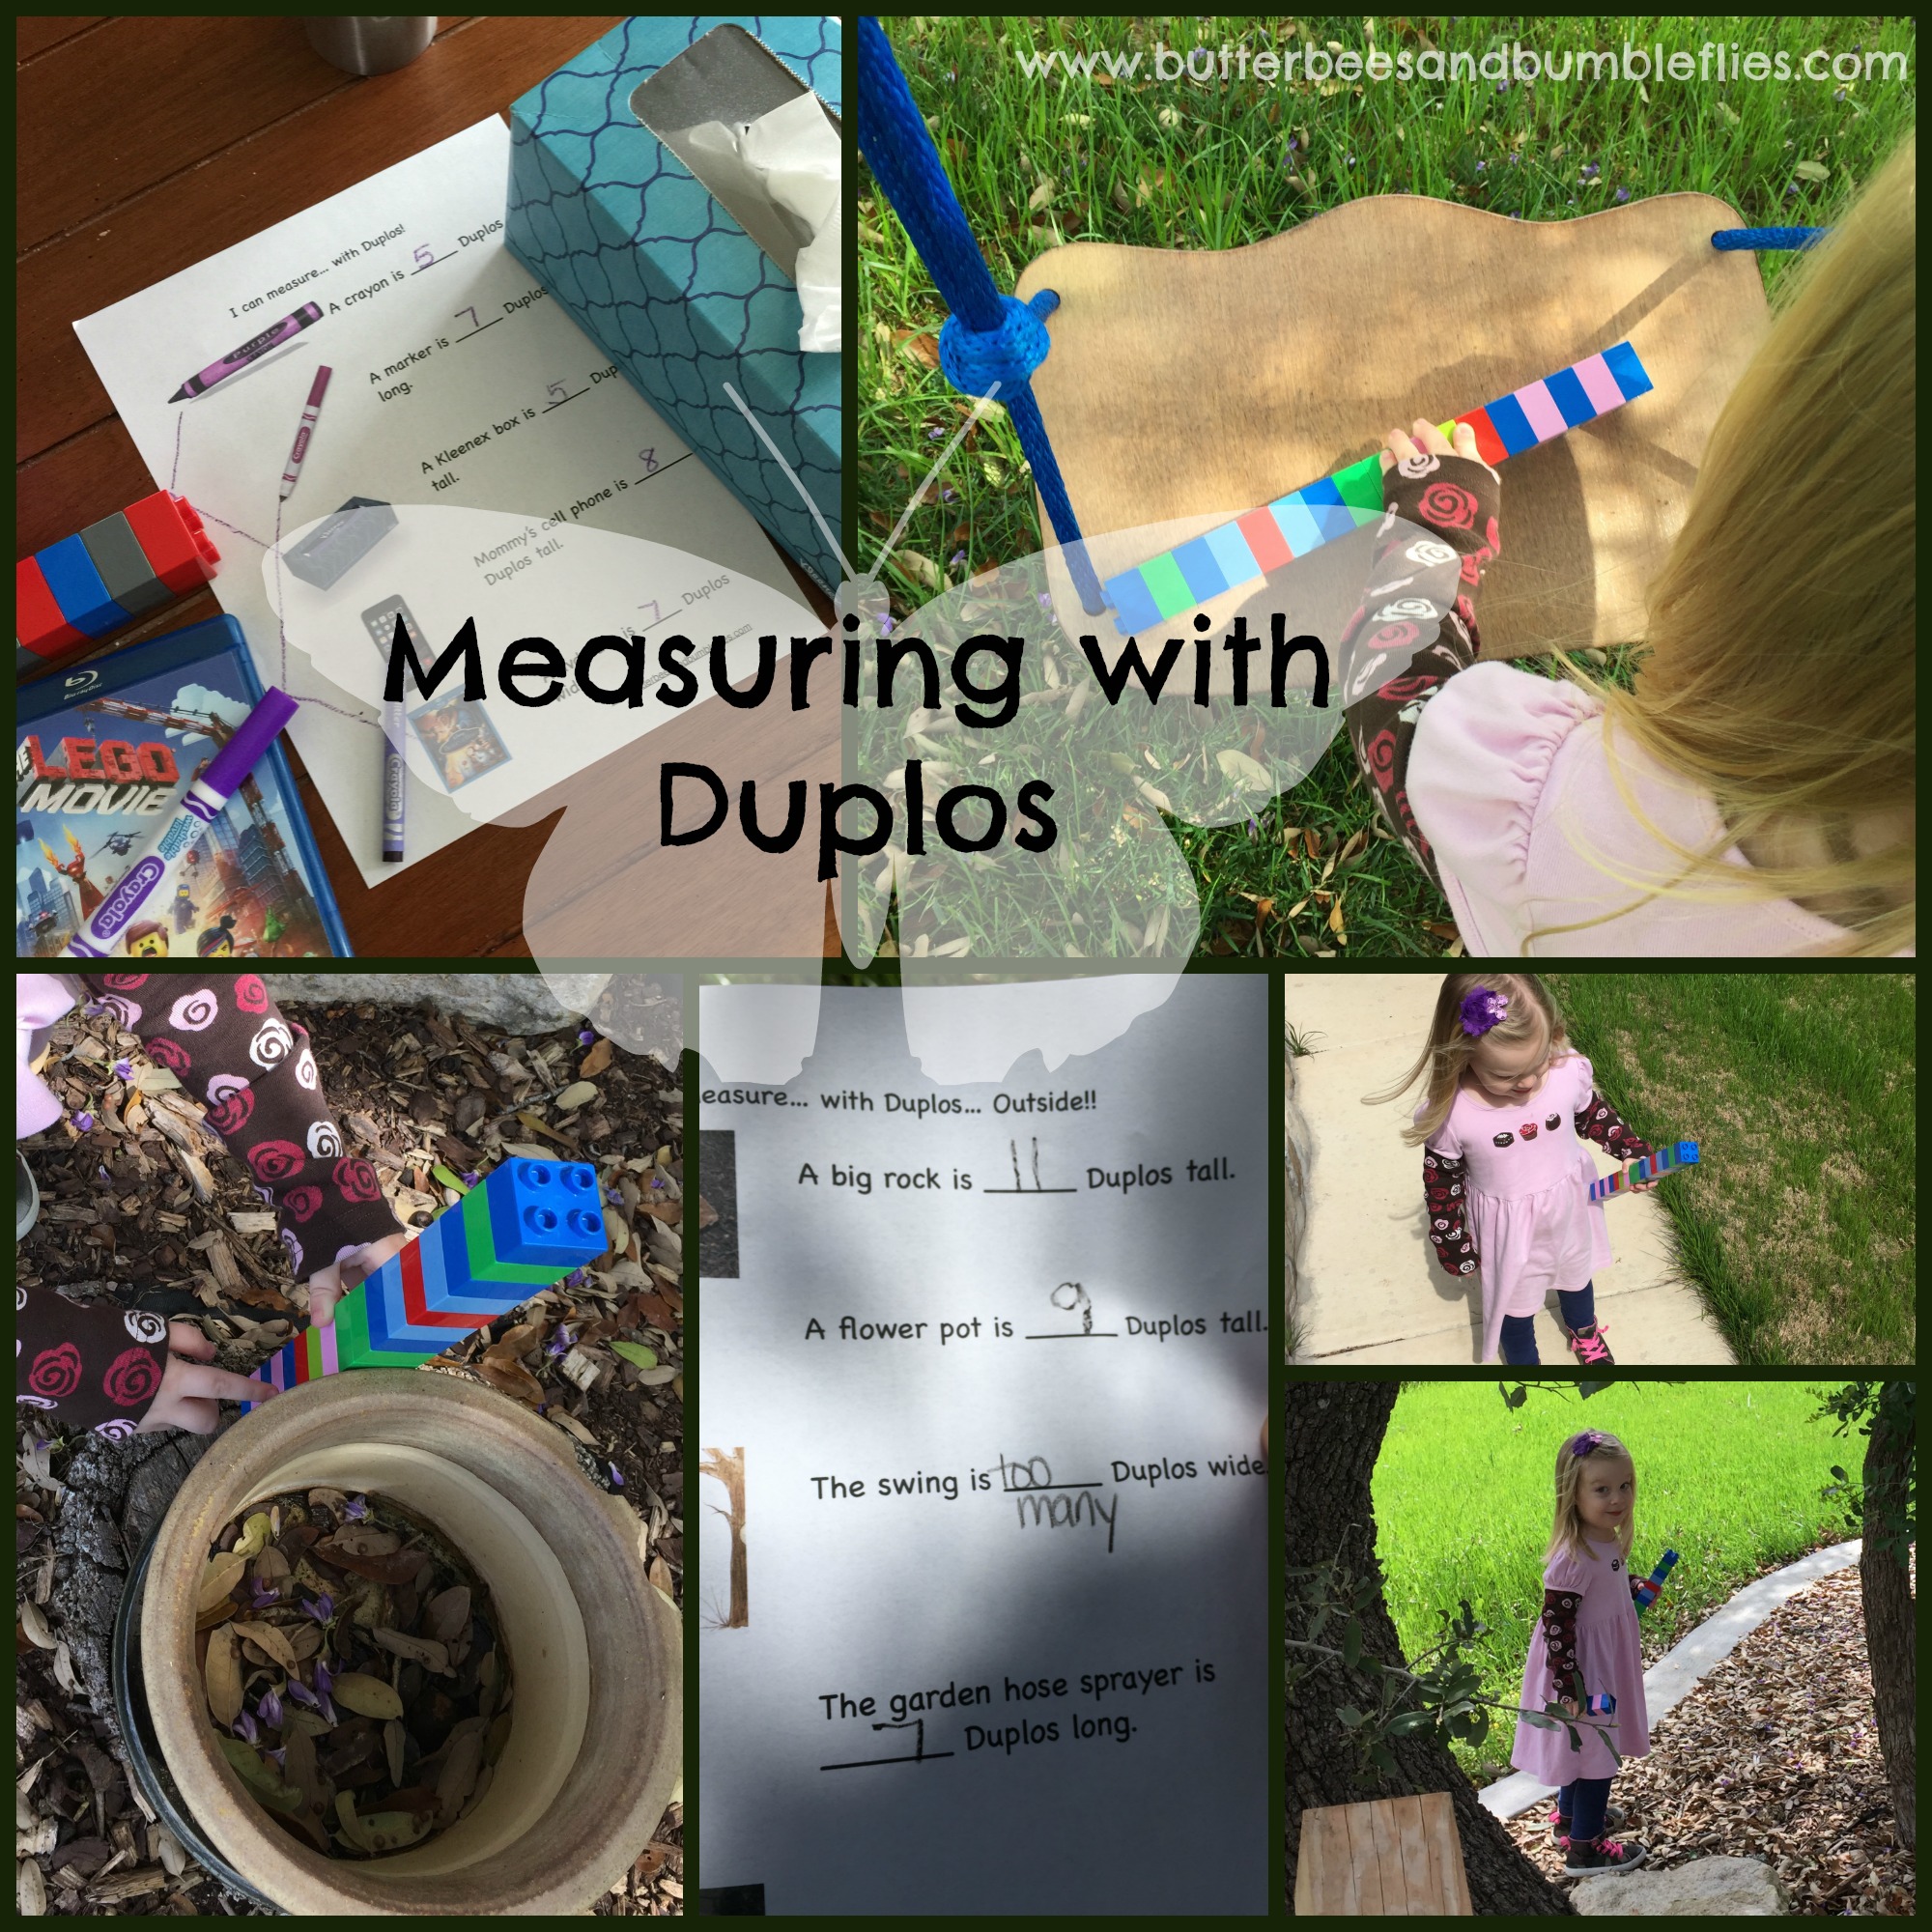
So, I whipped up a little worksheet for us to record our findings on, gathered up some items for us to measure, and the activity began!  Becca had so much fun with her Duplo ruler, that she kept wanting to measure more and more!  So, I made another recording sheet – this time to take a longer ruler outside to measure things in our yard.  She LOVED getting outside, and was soon trying to measure all kinds of things that weren’t on our recording sheet.  So, I created another recording sheet for her using more household items found in our kitchen.  And we went to town once again.  I’m telling you, folks, this girl LOVES to measure!  She’ll be ready for a real ruler very soon.

apr 7 measuring with duplos


She was so funny about measuring the swing, though.  I purposefully put something on there to measure the width… that I knew was longer than her Duplo ruler.  I wanted to see what she would do.  She got frustrated.  And just told me to record “too many” as to how many Duplos wide the swing is… We have since talked about other things that are longer than her ruler and how to place her finger or another object to mark where the end of the ruler is, and move it to continue counting.  That’s still a concept that is fairly challenging for her.  We’ll continue to work on it!

The best part about all of this?  I’m sharing my recording sheets with you!  Obviously, feel free to record your own, and please share with us in the comments what your kids love to measure!

Click here to download the FREE PDF document with three recording sheets.
Please note – all of the photos used on these recording sheets were just copied over from Google images.

Did you like this activity?  Please pin the photo to your own Pinterest boards, share this post on Facebook, etc!  I do these things with Becca to enhance her learning, but I share them with you to hopefully inspire you and your kids to keep learning!  If it does inspire you, please pass it on and inspire someone else! 🙂

Creating an Obstacle Course for Baby

baby bees header


Grayson is crawling.  EVERYWHERE.  He is into EVERYTHING.  There’s really not a whole lot I can do to slow him down except put up a couple of gates!  HA!  But, since my Big Butterfly seeks a lot of sensory input, I’m always trying to think of new ways to engage BOTH kids.  (Which really isn’t a bad thing!)  They have both really enjoyed using our bean bag, blankets, chair and couch cushions, and pillows to create a crawling obstacle course!  (And the bean bag really slows Grayson down!  He has to work hard to get off of it!)

apr 6 obstacle course


It’s also a great activity for feeling different textures (thus my boy is shirtless).  I noticed when Becca went across the “osticle” course the first couple of times, she was continually rubbing her hands on the different textures.  She absolutely LOVES our couch and chair – they do have a really cool texture – I agree!  So this is a fabulous activity for ANY child with proprioceptive sensory needs!

But it also presents my Baby Bee with a challenge to climb down and up – all in a relatively safe environment where he isn’t going to fall directly onto the hardwood floor.  It took him a good five minutes to get up and down across the whole course.  And then he was off to his next task – he found his Sister’s purse and started chewing on it!  HA!

Setting up an obstacle course like this is a fabulous way to work on those gross motor climbing and crawling skills that are so important to develop in your Baby Bee.  Ironically, I had already planned this post when Jamie from over at Hands On As We Grow shared one of her posts from a while back when she made a couch cushion obstacle course for her Baby Bee.  You’ll want to check out her post – it gives some great ideas for once your crawler has conquered the “basic” obstacle course like I made.  I love her idea of stacking the cushions up to make “stairs” and also adding some balls into the course to chase around and encourage movement and participation!  We’ll be using those ideas in the future as Grayson gets better at climbing, for sure!

Getting Started with Art

art

I recently was asked by a friend who follows my blog how to get started doing art with her twins – who just turned two.  I gave her a few ideas, but I feel like because I was distracted, my brain didn’t fully process the question until I got home (from her twins birthday party – wonder why I was distracted? ;)… So I thought I would take the time to create a post that answers her question – and maybe some of yours, too!

So how do you get started?

apr 3 getting started with art

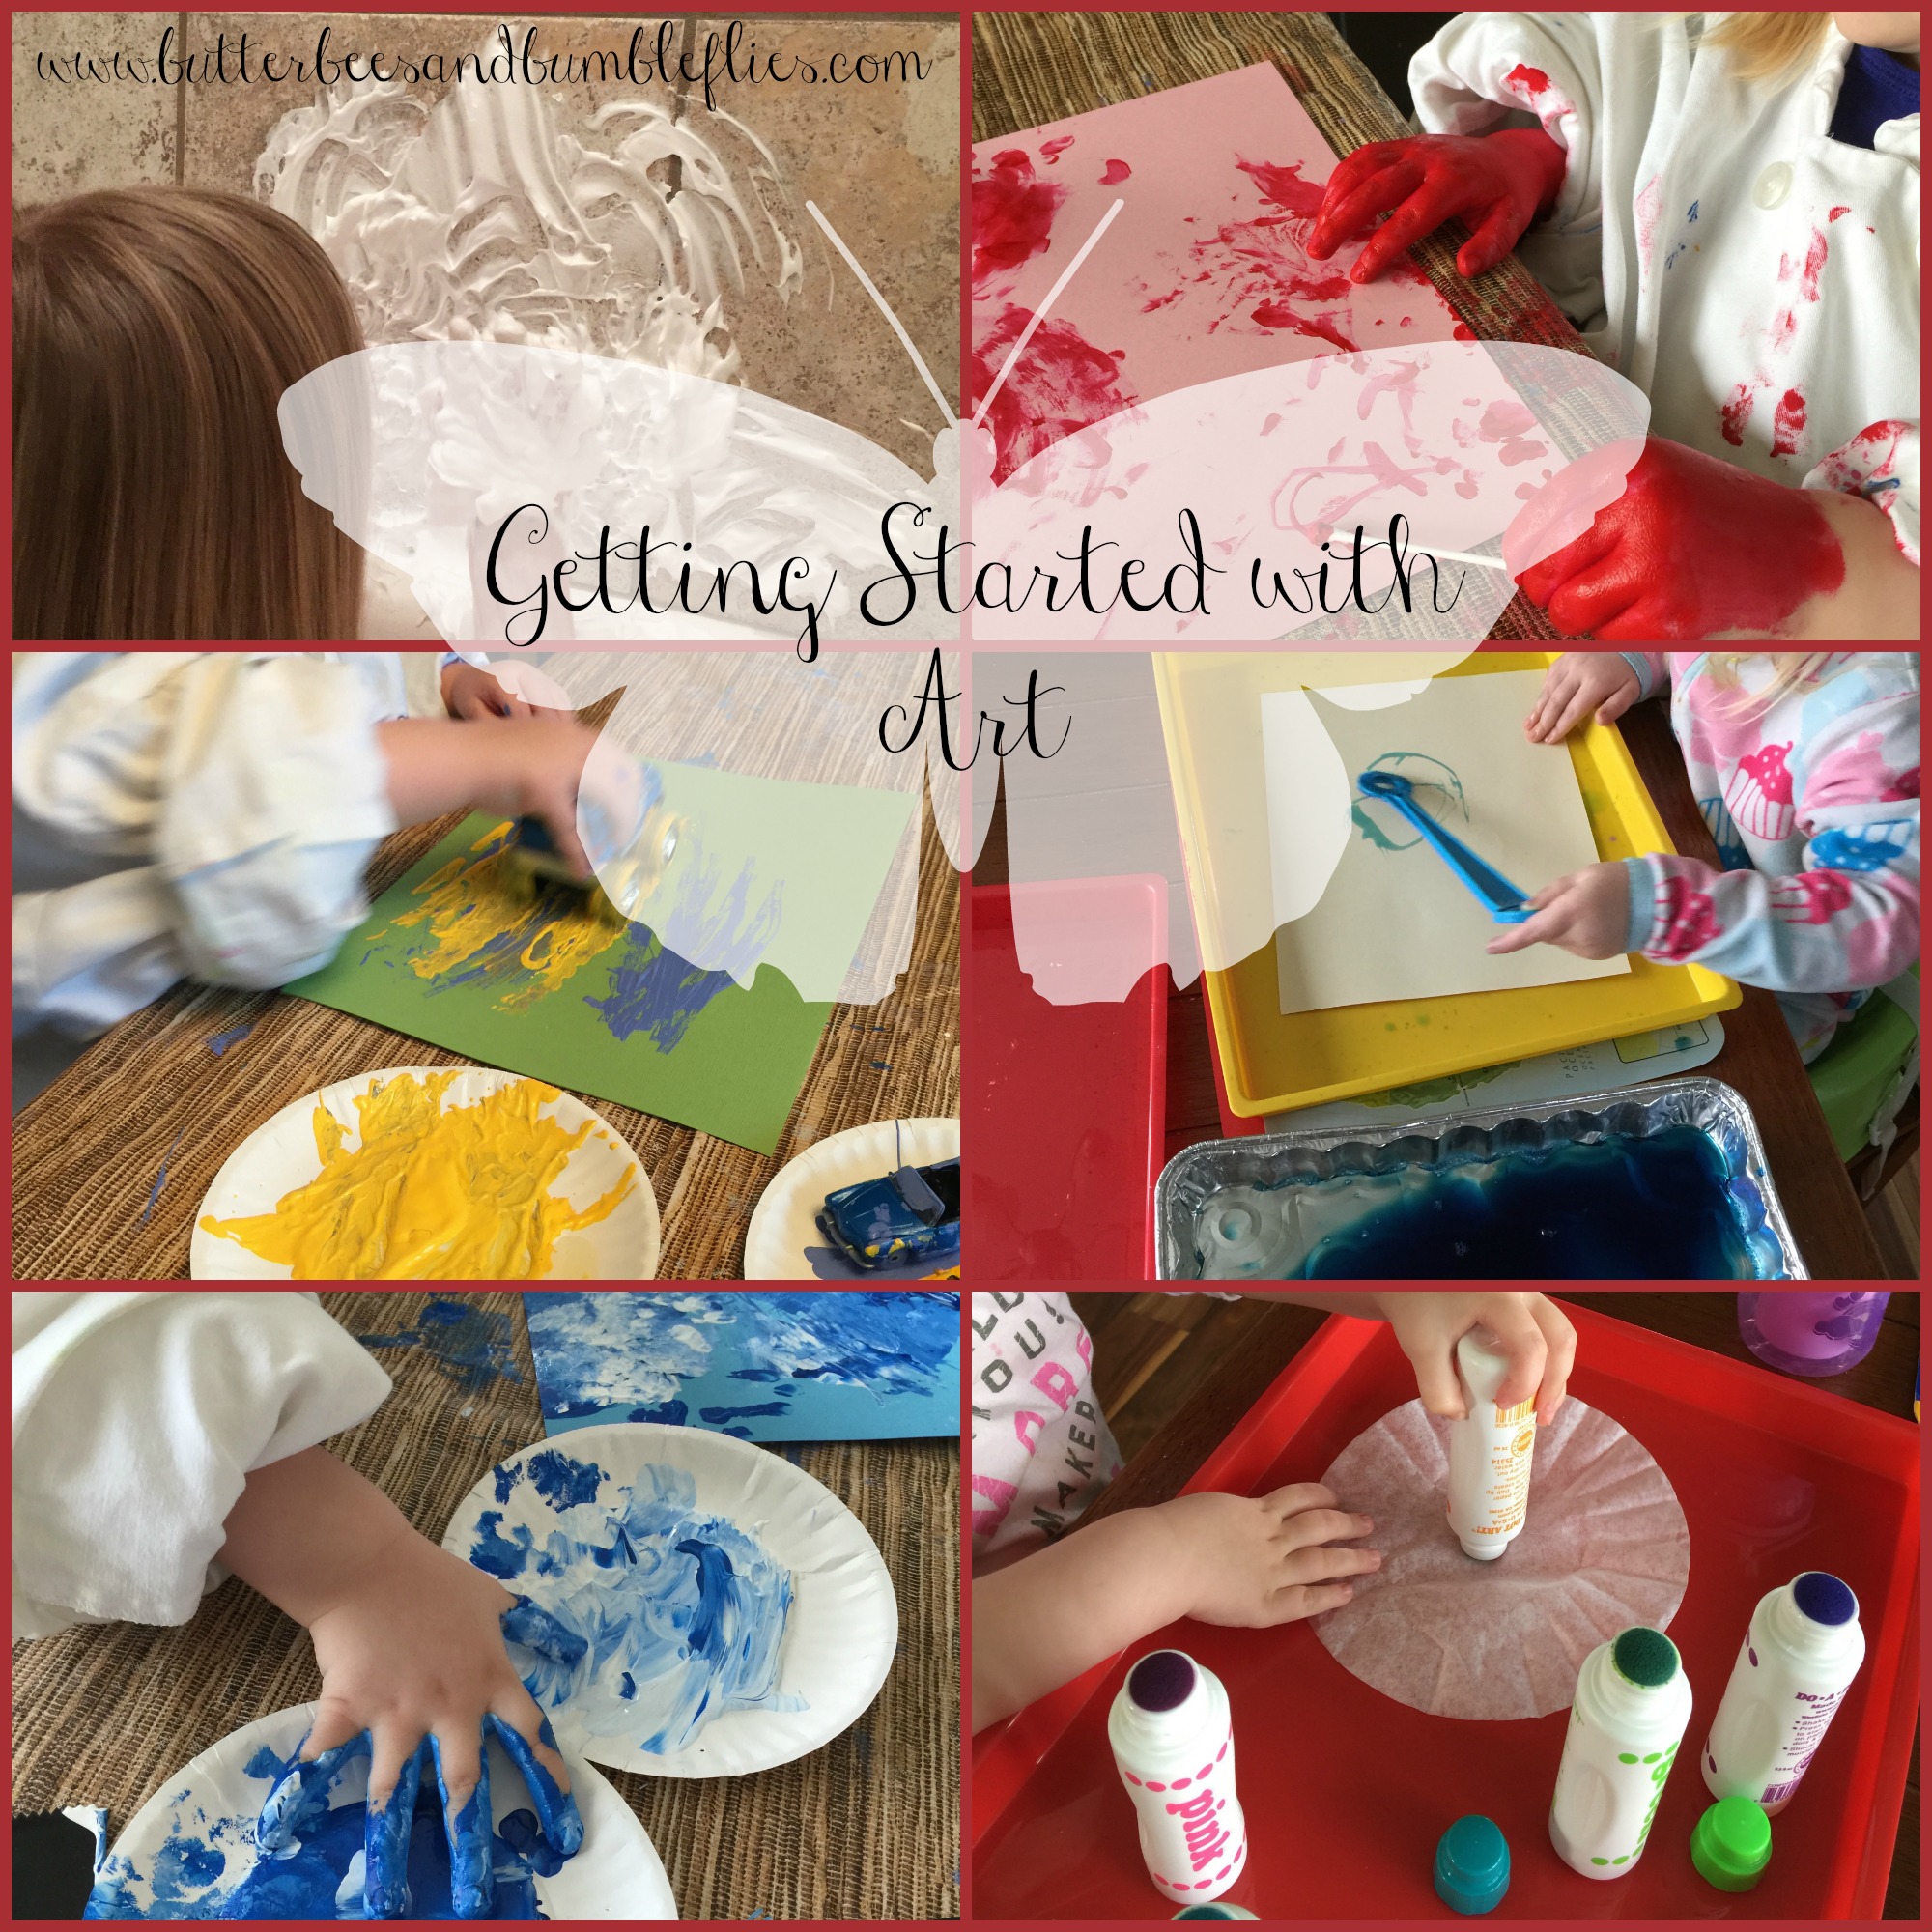
Well, if you’re timid like I was, a fabulous way to start with a child of ANY age is to start in the bathtub.  Because its easy to clean out, and then you just have to take off and throw away a diaper – instead of worry about what gets on their clothes.  Start with finger paints, or even finger paint soap:(ALEX Toys Rub a Dub Paint in the Tub Finger Painting Kit aff link – thank you!)  A few things to remember – your child will paint himself.  Entirely.  Head to toe.  Whether the first paint you use is fingerprint soap in the tub or not…  OR you’ll encounter the other extreme – some kids dip their fingers into finger paints, and they don’t like it AT ALL.  It’s a texture that just feels super weird and they don’t like it.  They don’t want to be messy.  So be prepared for one of these two drastic responses… and if you’re prepared for the extremes, maybe your child will fall right in the middle and only paint with their fingers on the appropriate surface. 🙂  Every child is different!  But, I always recommend starting in the tub to see how your child will respond.  (Especially if you have two children – one may love it, and the other might not.  Try introducing it to them separately if you can so that the response of their sibling doesn’t influence their own initial feelings about it.)

Another great tub activity that never gets old is playing with shaving creme in the tub.  You can squeeze it into a pile, like a pile of paint, or spray it all over the tub and your child – but if you’ve never done it before, go with a pile til you know if they are going to agree with the texture or not.  If you have a child who enjoys different smells, try dumping a pouch of Kool-aid around on top of the shaving creme to make good smelling, colored shaving creme! 🙂

If you’re starting art with a child who doesn’t like finger paints or getting their hands dirty, another great option is Crayola’s Color Wonder markers and paper:  (Get started with Crayola Color Wonder 10 Mini Markers and Crayola Color Wonder Drawing Paper-30 Sheets – aff links, thank you)  They also have a wide variety of coloring sheets with your child’s favorite movie and tv characters.  These are also a fabulous way to introduce markers before allowing any child to use regular markers – because they TRULY only write on the special paper.

Or, if you’re already ready to dive in to start painting at the table, here are a few supplies I recommend having on hand:
-A large plastic tablecloth that can get lots of paint on it.  We have one that is for picnicking – has the fabric backing to it – so it’ll last through all of our projects, and we can just let it dry, fold it up, and put it away for the next time we need it.  Check out any of my posts, and you’ll see it – the unsung hero of art in our house.  HA!  (But seriously ya’ll… get a table cloth!)
-Dixie cups / cheap paper plates for putting paint in/on.
-A really good variety of textured card stock paper – I prefer textured because it grabs the paint and holds on, and is thicker than regular card stock.  I recommend watching Michael’s and Hobby Lobby for sales or purchasing a paper pack with a coupon.
-A set of paint brushes in a variety of sizes and textures (again, Hobby Lobby or Michael’s is your best bet).
-A large smock or paint coat.  Becca uses my old chef’s coat from when I sold Pampered Chef.  It’s huge, which is perfect because it covers all of her, and it also doubles as a science lab coat.  With a child that I know will end up painting her hands, and possibly getting it elsewhere head to toe, I want to make sure she is covered so that I can just relax and have fun with her!
-Paint.  I recommend having a couple of different kinds.  Crayola makes some fabulous finger paint, but we really prefer to use acrylic paints.  They wash off of skin easily, and they are great to manipulate with cars, brushes, corks, foam, bubble wrap, etc.  They also dry really well and make fabulous art prints.  I am still in search of good liquid watercolors that we like that don’t cost a fortune.  But remember – you can do some fabulous process art without very many supplies – grab a couple bottles of paint to start, and you’re good to go.  Expand as you go.
-Also begin saving things – wine bottle corks, empty used Ziploc bags (not used for food), aluminum foil that can be reused for art, egg cartons, toilet paper and paper towel rollers, old partially used sand paper, food pouch lids, coffee or formula cans, etc.  Make a storage space in your home for these supplies because you never know when you’ll see an art project or craft activity here that uses those supplies! 🙂

*-*Keep in mind for your Baby Bees (who put things in their mouths) – another fabulous way to introduce basic process art is to use “paint” that you already have in your pantry/fridge – ketchup, mustard, and mayo are great edible options that won’t hurt baby when he puts them in his mouth.  HOWEVER, you may want to think twice before giving them condiments as a first paint – do you want them to view food as art materials, or just as food?  Keep in mind that this is a highly debated topic in the world of preschool and baby art – I’m just throwing it out there as an option.  We personally have not chosen to allow our kids to use edible art supplies, though I do make my own play dough, so it technically could be eaten without causing harm – though it tastes super salty.  To me, food is food and art supplies are art supplies, and I don’t want to teach my kids that they can eat art supplies – because many of them are NOT safe.  However, we do use lots of edible manipulatives for other non-art STEAM activities, and simply discuss the fact that this is not for eating in this activity, or set a limit to how many can be eaten (esp marshmallows… we do a lot with marshmallows).  Totally up to you and your personal preferences if you want to do this or not.  I would have been remiss if I hadn’t mentioned it as an option for your Baby Bees as a way to get them starting art earlier.  Keep in mind also that you can do Ziploc bag painting with them if you prefer to keep the paint mess out of their mouths at their current age/stage.*-*

The important thing to remember when starting to do art with your child is this: a CRAFT worries about the end result.  ART is all about the process it takes to get to whatever conclusion that is found.  You do NOT have to be “crafty” to do art!  ANYONE can create art.  And all you need to do is check my Art Page to find a ton of fabulous ideas of simple activities to do.  Keep in mind that with process art it’s not important for the child to see an end product as an example.  Don’t feel like you need to make up a sample beforehand.  In fact, DON’T show them an end product.  Let them create and enjoy – and what they come up with will be their own unique artwork – not a copy of someone else’s design.  I love to participate in the process and create my own artwork, or work together with Becca on a sheet.  Most of our painting projects use up 4-5 sheets of card stock because we each do two sheets, and do one together.

Once your child gets older and are very used to free art work, give her a few step by step crafts to start honing those skills as well, but be sure she knows how to enjoy process art before trying to force a craft on her.  (Note: this is a fairly new theory that I’m seeing become a trend in preschools across the US – and it is a FABULOUS one!  I don’t know why I didn’t see this in the past!  Crafts are important – because it’s important that children learn how to follow directions to create an end product, but ART is something entirely different that is also VERY important!!)

Two art blogs that I follow that I highly recommend to you are The Artful Parent and Red Ted Art.  Both have fabulous ideas for process art, and also for lots of crafts.  So beyond just checking out what we do here on Fridays (and occasionally other times as well), definitely do check out these blogs as well, because they have been doing this a lot longer than I have, and are often the inspiration for my projects!  They also both have Facebook pages that you can follow if you are interested.  Jean especially is good about sharing photos from throughout their projects on her Facebook page for The Artful Parent.  And I love the videos that Red Ted Art shares of crafts on their Facebook page.  (I’m not affiliated with these folks in any way – I just genuinely enjoy their posts.)

I hope that you’ve found this post helpful, and that you’ll follow my Friday “Fun with Art” series to get more ideas of activities you can do to bring art to life in your home with your kids – no matter their age!  Also be sure to follow my Facebook page to get more ideas that I share from other bloggers.  🙂