Sausage Spinach Pasta

sausage spinach pasta


One of the things I think a lot of moms struggle with (I know I surely can’t be alone in this!!) is planning quick, somewhat healthy meals that are filling and, did I mention – QUICK?  The season we are in right now, it’s better for Cody and I to eat dinner after the kids go to bed on weeknights.  So that often results in us eating easy food for dinner.  Pop open a can of soup or make sandwiches, or heat up some ramen… or bake a pizza.  I’ve really been trying to step out of that box and cook more in the evenings.  I’m also trying out several new recipes in the crock pot to help make the evening prep quicker.

This pasta dish has evolved over time.  Originally inspired by a covered dish that a friend brought to us after Grayson was born, and then modifications inspired by something I saw on an episode of Chopped (I love Food Network when I actually get a few minutes to myself to watch mom tv!)… it has become one of our favorite, quick go-to meals.  And I love how flexible it is – I can use any pasta I have leftover in the pantry, or buy something new.  At first I made this only with penne, but now I think I’ve made it with pretty much everything except spaghetti, and ya know, I bet it’d be fabulous on fettuccine or spaghetti, too!

Here’s what you need to make it:

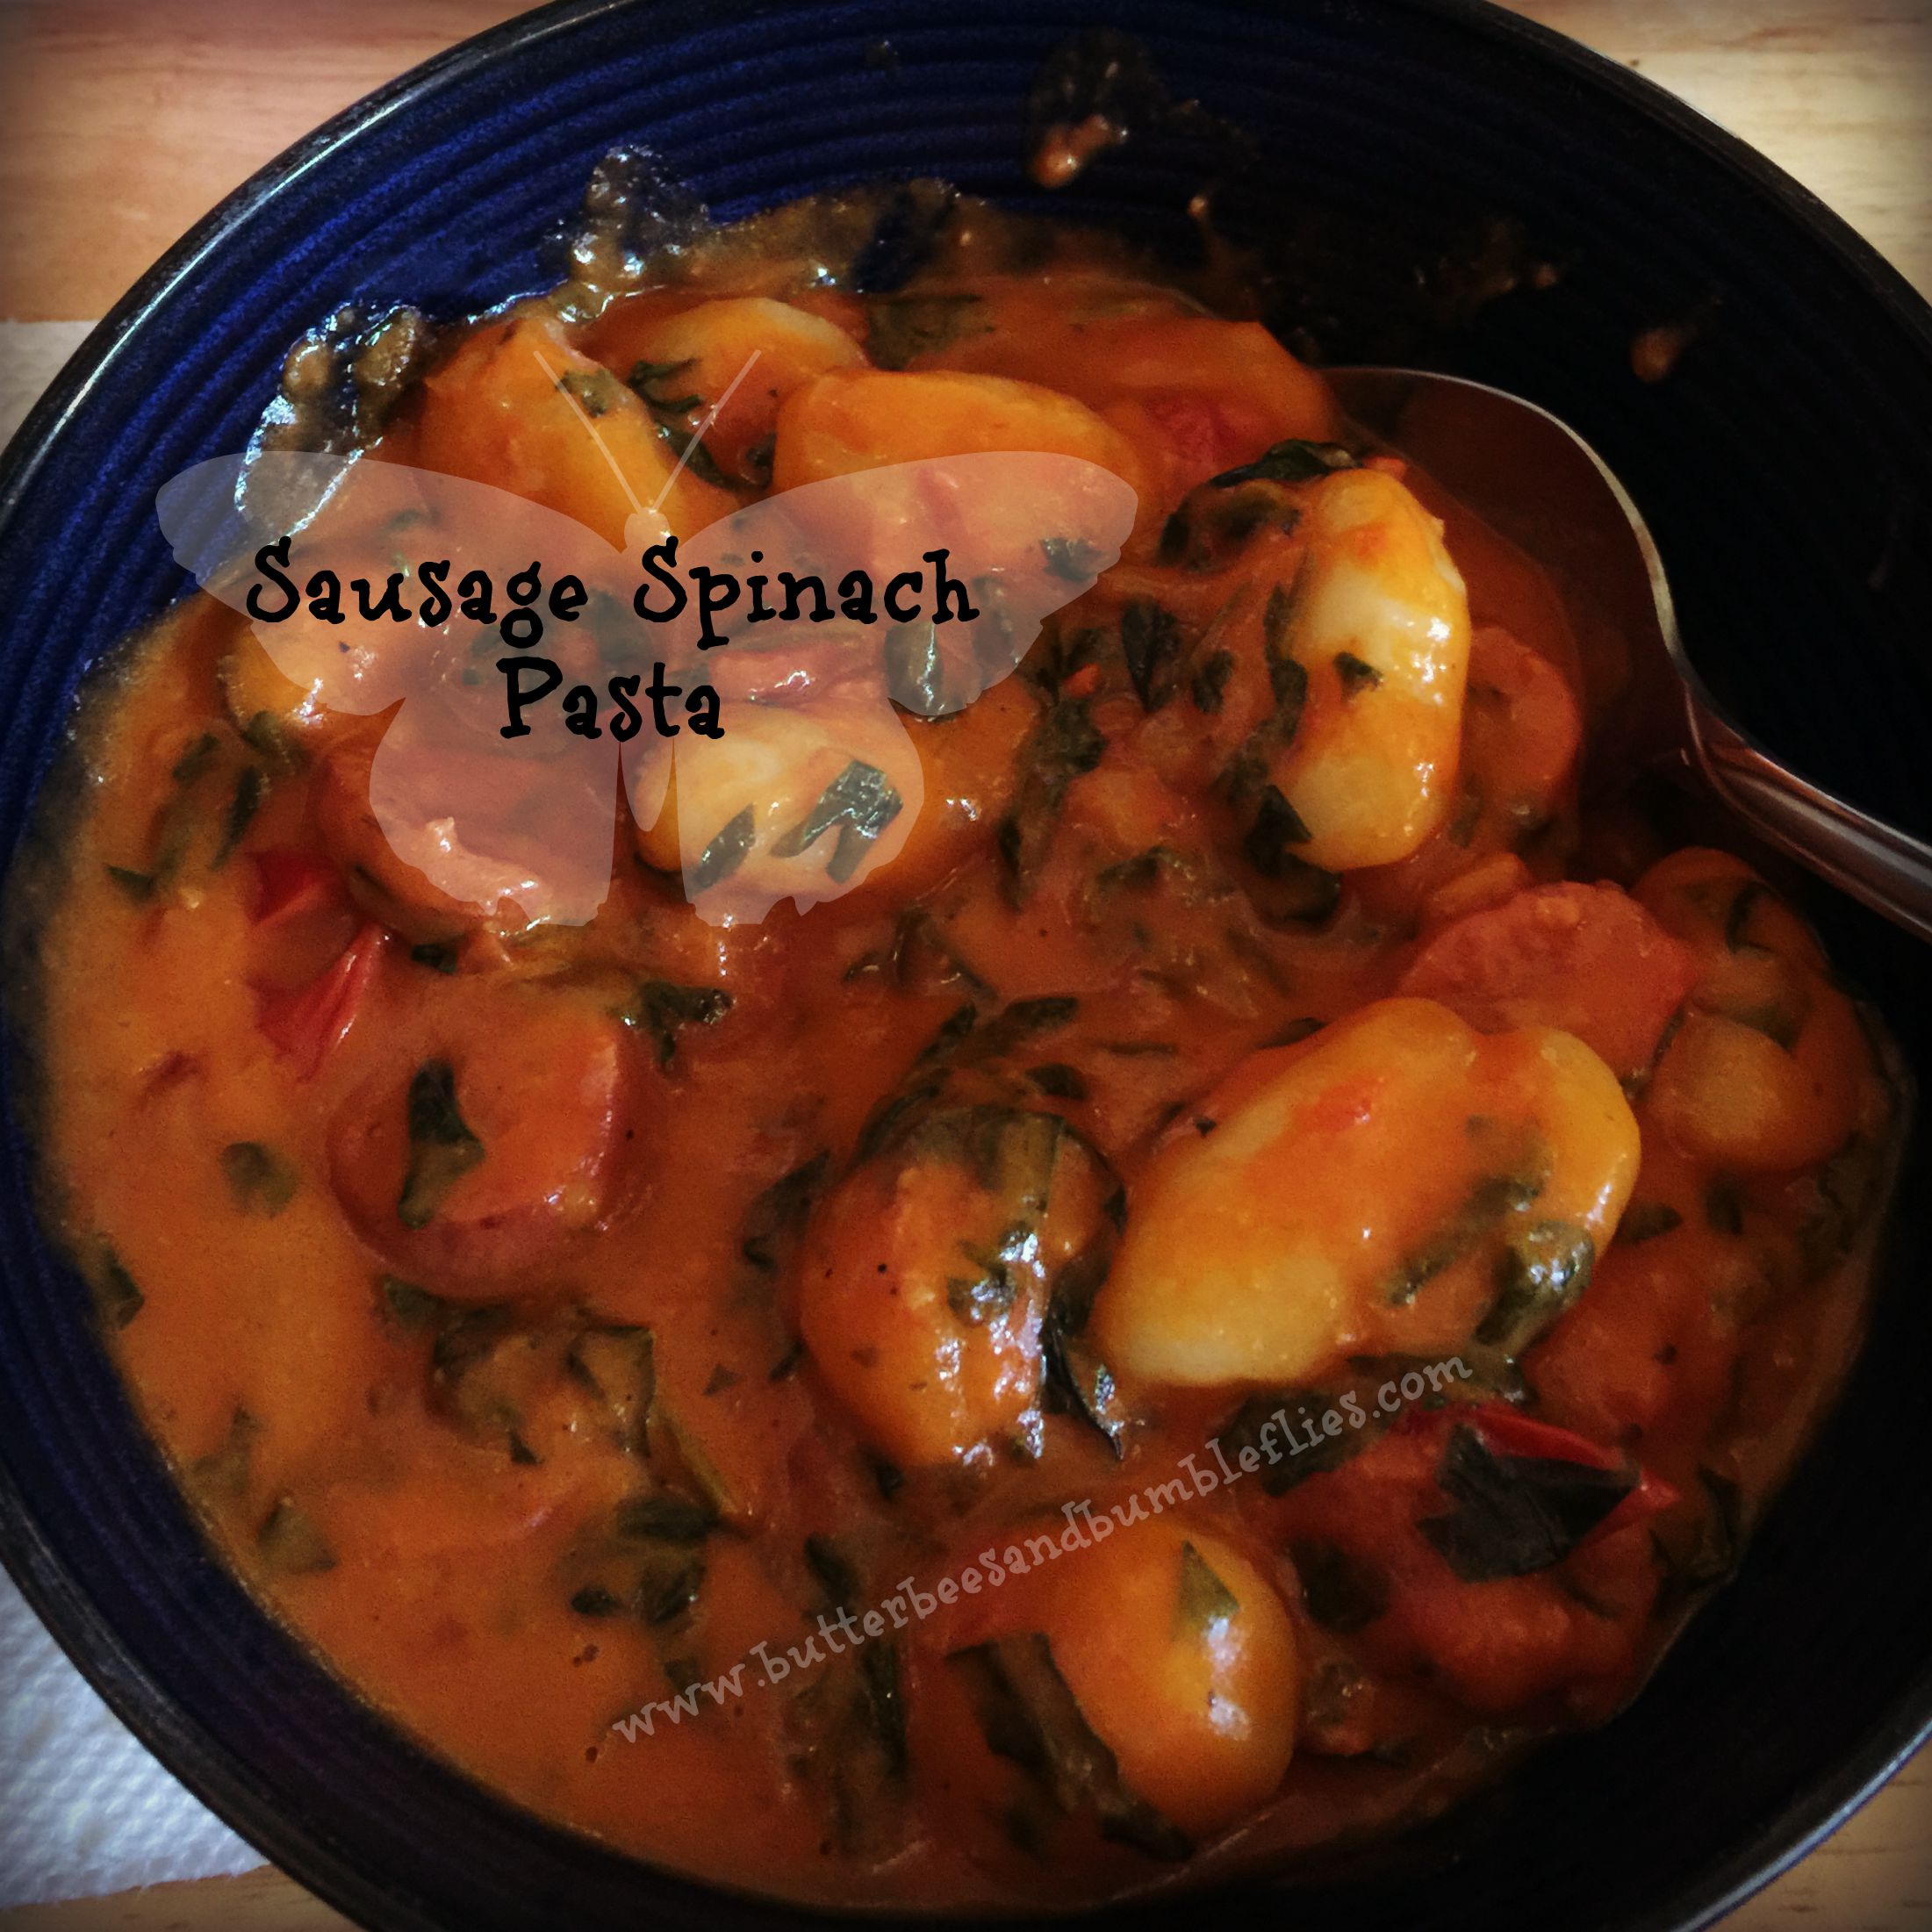
Your favorite kind of pasta (picture with potato gnocchi)
1 jar Vodka Creme Sauce (I buy the Bertolli brand – not sure where to find it?  Here’s their website: http://www.villabertolli.com)
Smoked Sausage links (I buy whatever’s on sale – either Hillshire Farm or Ekrich – we prefer the beef skinless)
1 pkg Cherry Tomatoes
Bag of Spinach
Olive Oil
Salt/Oregano/Garlic to taste

Slice your smoked sausage, and sauté with a small amount of olive oil in a large 12″ skillet.  Slice the cherry tomatoes in half – you can use more or less tomatoes to meet your personal tastes – I usually use quite a few.  Toss them in the skillet with the sausage.  Reduce the heat to low (I have settings 1-10 on my cooktop and I always turn down to 3).  Chop your spinach (rough chop) and fold it in to the sausage/tomato mix.  Stir together well.  Add your salt/garlic/oregano to taste as you prefer.

Meanwhile, you will have cooked your pasta – here’s where you need to know your pasta.  Gnocchi (as pictured) takes 2 minutes in boiling water, so I certainly don’t start it at the beginning.  But if you are using a hard pasta like penne or farfalle, you’ll need to start it boiling earlier.  The trick here is to cook it to an almost still hard al dente.

Add your jar of sauce to the sausage/tomato/spinach skillet, and add your pasta.  Turn it all the way down to a low simmer, and stir well.  Use about 1/4 cup of the pasta water to pour into the sauce jar.  Shake it well and pour into the skillet.  Stir well, cover, and let sit until you are ready to serve.  Test your pasta to make sure it’s tender when ready.  If not, you can bring the heat up to get it the rest of the way done in the pasta.

The thing I love about this meal is that not only is a warm bowl of comfort food, it’s QUICK to prepare.  The whole process start to finish typically takes me about 20 minutes (or less when I do gnocchi b/c it cooks )!  And… well, it’s got some great veg in it, as well as some fabulous protein!  Flavor is a 10, for sure.  It’s become a every three weeks kinda meal… that becomes something new just by changing up the type of pasta!  Enjoy!

How To: Creating a Sensory Board for Your Baby Bee

baby bees header

In continuing my series on learning ideas for your Baby Bees… here’s a fun one that your Big Butterflies will be able to enjoy interacting with, as well!  And we’ve found that Sis really loves to show lil Bro how stuff works on his sensory board, so it’s great for all ages, especially if you have kids with Sensory Processing Disorder!

There are LOTS of ideas about how to make a sensory board – Pinterest is overflowing with them!  (Check out a few of my pins on the topic here.)
Snip20150803_7

I think for me, the most important points were size, usability, and cost.  I didn’t want to spend a ton of time and money making something that was going to take a huge amount of space and not be usable for very long.  So I looked at all of my pins and found what I liked best about each of the boards.  And then began to gather my materials.

materials ideas

I was pleased to be able to find most of what I was looking for around the house, and the rest I found at Dollar Tree!  I was really pleased to be able to make such a fun board for literally about $5 out of pocket.  I found the foam board, patterned duct tape to seal the edges, a two-texture sponge, a car wash rag, and some decorative stones at Dollar Tree.  Cody found a few items in his shop for me, and the rest I gathered from inside the house.

sensory board


One of the items I added from Dollar Tree – a star push light – didn’t end up working.  I want to get a touch light from Walmart to add to the board sometime soon.  So here’s what I ended up adding:

I used two wipes packet tops, and inside one I glued (used hot glue for everything) some of that foamy shelf liner (soft and bumpy), and inside the other I glued a piece from a metallic bubble wrap envelope (crinkly and shiny).  I cut off part of the car wash rag – it’s super soft, and has little “fingers” to run your fingers through.  It’s Becca’s favorite aspect of the board.

Cody had a gate hinge in the shop that he wasn’t using, so I glued the left side to the board, and put a velcro dot behind the right side, so it will actually hinge open, and makes a cool sound while doing so.  A scrap block of wood, also from the shop, makes a great knocking sound, and is hard and smooth.  Another item from his shop that the kids love is the gate lock.  It’s super fun to lift it up and down and make it rattle.

The decorative stones I got from Dollar Tree are great for introducing patterns – both in color and texture, and have been a great way for Becca to learn the difference in see-through and opaque.  A piece of a plastic sink drain mat is fun to rub your fingers across, because not only does it have little bumps all over it, it also has little square openings that allow you to feel the foam board backdrop as well.

The sponge is fun to play with – I just cut it in half, and was able to allow the kids to play with both sides – smooth and scratchy.  And of course, since it’s a sponge, it’s fun to punch, push, and press.  I threw on some feathers for good measure, and then two pouches: one that zips, and one that is velcro.  The velcro pouch has ten large pretend “gold doubloons” left over from Becca’s first birthday party ages ago, and the zipper pouch is super fun because I took a piece of cording Cody had in the shop, and hot glued it inside with a ring of keys attached!  So Gray can practice opening the zipper, taking the keys out, play, and then put them back in and zip it up!

I seriously spent about $5 on this board.  Then found a good height in our family room and nailed it to the wall.  Super simple, basic… nothing fancy or expensive.  Nothing too time consuming to make.  Yes, it took a little planning and forethought, but I can see this board being something they play with for the next couple of years – even though Becca is older, it’s fabulous for her need for proprioceptive input (SPD)… and when they are done, if it’s still in good shape, I can pass it along to a friend with young kids who can put it to more good use.  If not, I throw it in the trash and know that I got more than my money’s worth!

Have you created a sensory board for your Baby Bees/SPD Adventurers?  I’d love to see your ideas and add them to my pin board for others!  Please share links in the comments!!

Ode to the Diaper

Keeping true to my word that this week will focus on our baby/toddler bees, I thought what better to talk about in my “From the Heart” post than the elephant in the room… Ya know, the big stinky thing that you can’t help but notice anytime you walk into the bathroom despite whatever fabulous brand of diaper pail/bucket/deodorizer/sanitizer/room freshener you own.  The elephant… Aka the diaper.

Be they cloth, plastic for swim, Pampers, Huggies, or good ole HEB brand, they have graced our home for over three years now.  They started out small.  Tiny.  And actually kind of cute.  And they have grown.  With the children, who have also grown… But who are both still using them.  We have used regular, night absorbancy, pull-ups, slip-ons, and yes, even the aforementioned cloth in attempt to contain the waste that continually seems to flow from both of our little treasure-to-trash composting systems.

I’m not fond of diapers.  It’s so much easier to just flush the waste away.  The smell.  The wiping.  The diaper rashes.  The smell.  The constant use of diaper pail bags.  The smell.  Did I mention- the smell?

I think I might be close to freedom- from one child at least.  She’s finally seeing SOME success on the potty, and enjoying getting stickers on her sticker chart for using it.  It’s still us as parents who remember to place her on the potty, but we’re getting closer.  And I know one day I’ll look back and laugh…

Ode to the Diaper
Oh diaper, Oh dear
I smell you again, I fear.
Time to change has come once more.
And when the shelf is empty, we’ll trudge back to the store.

Oh diaper, Oh dear
I smell you again, I fear.
Can it really be that he’s already dirty?
Can she really have been THAT squirty?

Oh diaper, Oh dear
I pray your end is so near!

The Reality of Toddler Sensory Play

baby bees header

Did you see yesterday’s post about Grayson’s new animal play boxes?  Well, I couldn’t share that post without sharing this with you.  Especially if you are a first time mom… or a first time mom of a boy… or both.

I love both of my kiddos dearly.  But I knew going into this whole parenthood adventure that boys and girls learn very differently.  I can totally relate to how Becca learns, because it’s similar to how I learn.  But I must say that Grayson, while his style sometimes stretches me, is a lot more close to my love for adventure.  The kid likes to explore.  He likes to get down and dirty.  If there’s a way, he’ll find that way and make it happen.  He’s a mover and a shaker… and a BIG mess maker.  So while you might have a child who can do sensory play relatively mess free, as a parent you need to just get prepared for the messes.

And get prepared to encourage them.  Because encouraging exploration is SO IMPORTANT!  (So much so that it’s a frequent hashtag that I use on Facebook!  #EncourageExploration – use it, and share with me how your kids are exploring!)  Grayson learned far more by making this mess than if he had kept everything inside the box:

reality


Messes like this used to bother me.  That’s why I’m sharing this.  Because I want you to realize all that he learned from this exploration.

1) He explored sound and discovered that the paper doesn’t make much noise when it hits the floor, but the box is loud.

2) He figured out how to get the box lid off of the bottom of the box, and then practiced his fine and gross motor skills by attempting to put the lid back on the top.

3) He discovered that he doesn’t like the way the paper feels when it gets stuck to the bottom of his foot.

4) He practiced taking handfuls of the grass out of the box, and putting it back in.

5) Perhaps the most important lesson was the one he learned when he was all done and had been playing elsewhere for quite a while.  I called him over to me to help me clean up.  He is currently in his 61st week of life – halfway through the “wonder week” leap called “Principles.”  This is the time when his brain is finally learning how to follow rules… and he is starting to test out – what happens when I don’t obey?  As a mom, this time period is hard on me.  Becca was really really tough through this phase. Grayson is sometimes easier and sometimes more difficult – just depending on the moment.  He doesn’t like to clean up.  But, he does love getting praise (and he loves to clap for himself when he’s done something right!).  So, the cleanup required me to actually physically go and get him, and bring him over to the box.  I picked up most the grass and put it in, and had him put in the last handful.  Then he put each of the three dinosaurs into the box, and put the lid on top.  I encouraged him, bragging on what a good job he did to follow directions!  He was so excited that he did a good job and got that verbal praise and the literal pat on the back and hand clap.  That was a hugely important lesson.  The next day, when I called him over to help clean up, he didn’t come when called, but I brought him over and did the same thing, and didn’t even have to tell him to pick up the dinosaurs – he did it on his own.

Not sure what brain development has occurred for your child at their current age?  I HIGHLY recommend checking out the website/book/app with brain research by Drs. van de Rijt and Plooij.  It’s good stuff!  CLICK HERE TO VISIT THE WONDER WEEKS FOR MORE INFO!

All of this to say, learning is a messy undertaking.  Sometimes messier than others.  But it’s fun, and it’s important that kids not only be allowed to make messes, but taught to take responsibility in cleaning up their messes from and early age.  A 14 month old is ready to start cleaning up after himself – brain research proves it.  Start allowing your Baby Bees to explore, and start requiring them to help clean up, too!  Cleaning can be a super fun game and a great way to teach the concepts of “in” and “out” and “up” and “down”, as well as what is trash and what isn’t.  You might feel like your baby is still a baby, but when their brain is ready, start giving them appropriate challenges – it’ll pay off in spades down the road.  Curious about the chores our Big Butterfly does around the house to help? Check out this post that I did with the Recipe for a Successful Homemaker (of either gender).

How do your kids (of all ages) help around the house to clean up after themselves and other family members?

Animal Play Boxes for Baby Bees

baby bees header

This entire week, enjoy posts for your Baby/Toddler Bees
(under age two)!  Come back each day for new and exciting ideas for your little ones!

In my never-ending saga of attempting to find sensory activities for Gray that he won’t harm himself with, I decided to try making him his own little habitat boxes like I’d made for Becca, except with toddler-friendly items inside.  For his birthday party, (which I will hopefully eventually blog about!) I purchased a set of large safari animals, that he had been really enjoying playing with.  And Becca had some large dinosaurs she never played with any more.  I thought there had to be some solution.  And there was.  Enter tissue paper and Easter grass.

dino playbox

I had some nice photo storage boxes I had bought at one point online for the specific purpose of doing some sort of sensory bins at some time or another… and decided this was the time.  I dumped a bag of green Easter grass (the paper kind) into one and put the three large dinosaurs in it.  Not only does he love digging through the grass, he loves the dinosaurs.  He makes the cutest “ROAR” and has had the dinosaurs fight each other a couple of times.  He’s 350% boy.

safari play box


So for the safari animals, I took some green and blue tissue paper and folded it over several times (so it makes a good crinkly noise) and taped it securely all the way around inside to the bottom of the box.  Then I added the animals.  He likes to make them jump up and down on the crunchy paper, and also marches them around on the hearth quite frequently.

Both of these boxes are stored up high, out of reach, and they are activities that he plays with independently from his sister.  She has her own activity boxes, but tends to want to play with whatever he has at the moment, so I store them in a special place and let him play with them when she’s in her room.  I think he not only enjoys the activity of the sounds and textures in the boxes, it’s fun to have a special activity to play with just Mommy.

Stop by tomorrow for my post about “The Reality of Toddler Sensory Play…” and come get ready to get messy!