Activities to Fill that Last Hour…

I think every mom has their own hour of personal hell that they go through every day, and it’s a constant struggle to find something – ANYTHING that will make that one hour a little more livable.  Often, that thing becomes the tv.  I know.  I’ve been there and done that.  But I’m trying desperately to fill that last hour before Daddy gets home with something productive, something that keeps her hands busy, all while also trying to keep the baby fed and content, fix dinner, and constantly remind her why we can’t go outside – because the heat index is over 104.

So here are some fabulous ideas that I have taken from Kids Activities Blog and modified to make them my own.  (Here’s the link to her post so you can go see the original ideas!)

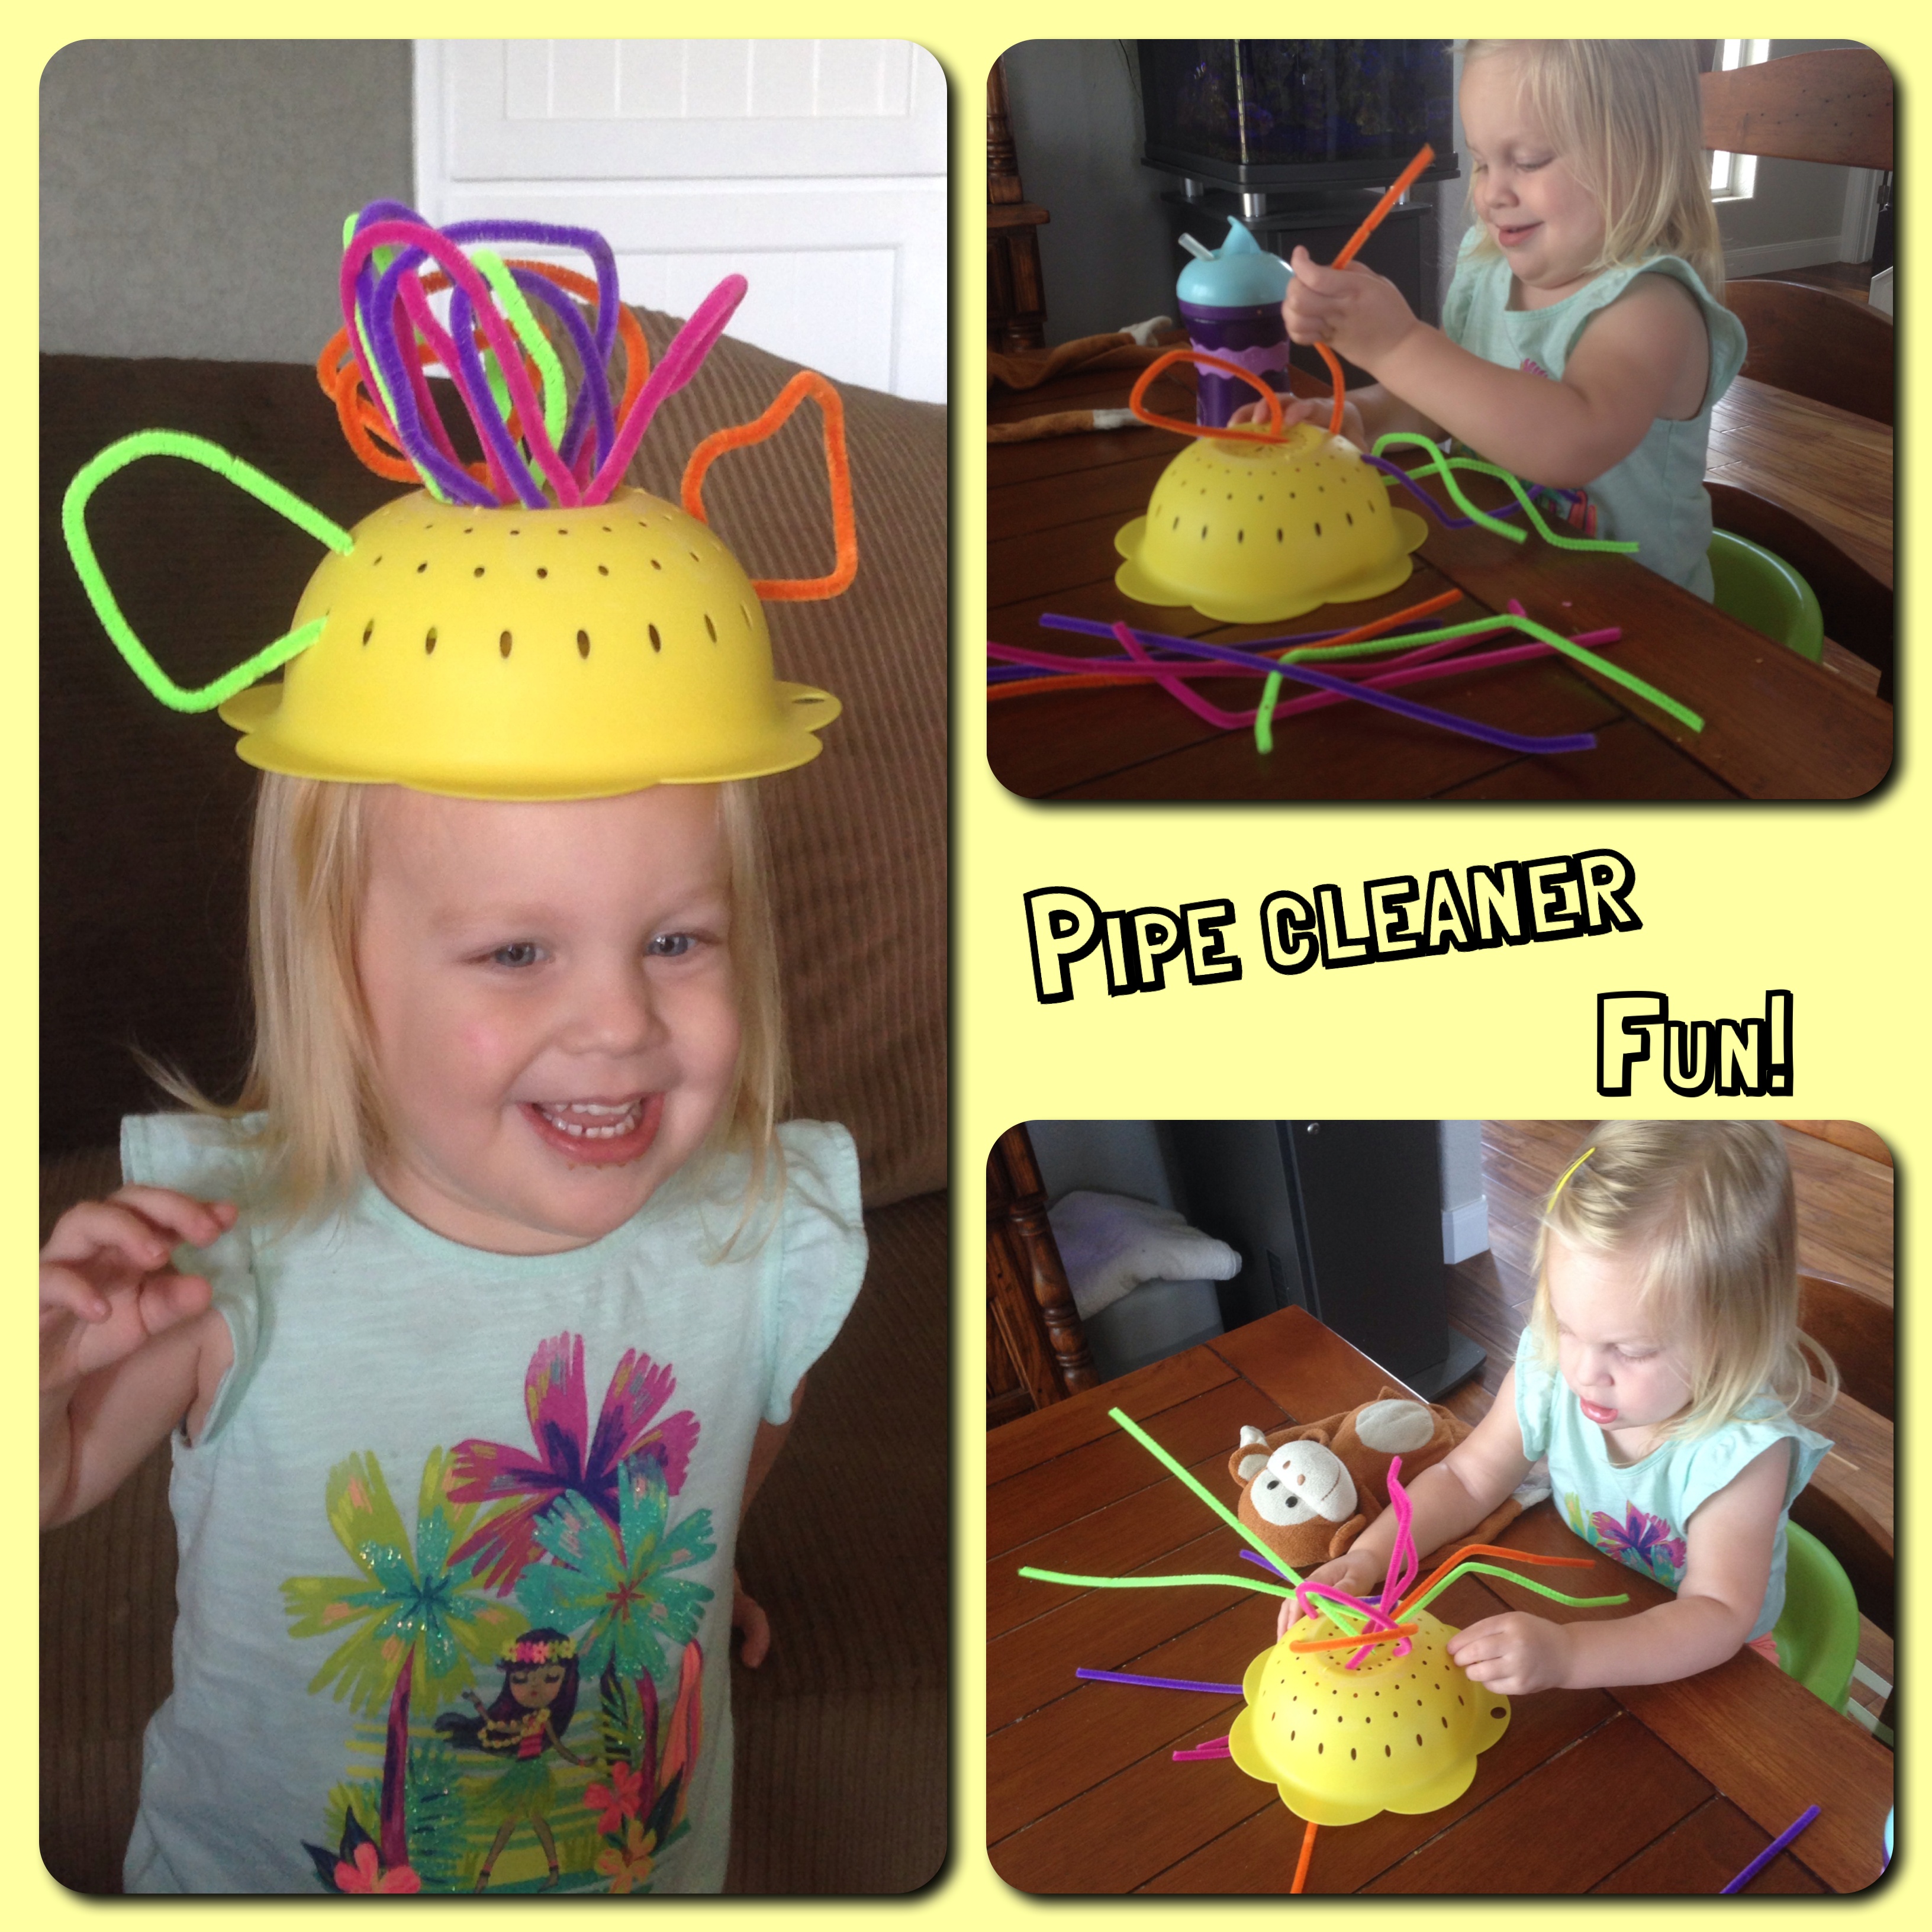
The first one that Becca has fallen in love with is with the colander.  This colander I picked up ions ago in the Target dollar section, and it was a favorite bath toy for quite a while.  Then it just sorta became a holder for more bath toys.  Now it has purpose once again!  She LOVES threading the pipe cleaners into the holes (the holes are too small for straws, as listed in the blog above).  The first time I introduced the activity, she played for 30 full minutes before moving on to a different activity!  Woohoo!  (And it’s great for her hand-eye coordination and fine motor skills, too!)  The larger picture in the collage came with help from Mommy – we made ears and hair for her hat.  She LOVED it!  I love the giggles that came from this fun play time, and it was fun for me to play with her doing something other than running cars on a mat, again.  For the millionth time. 🙂

Processed with Moldiv


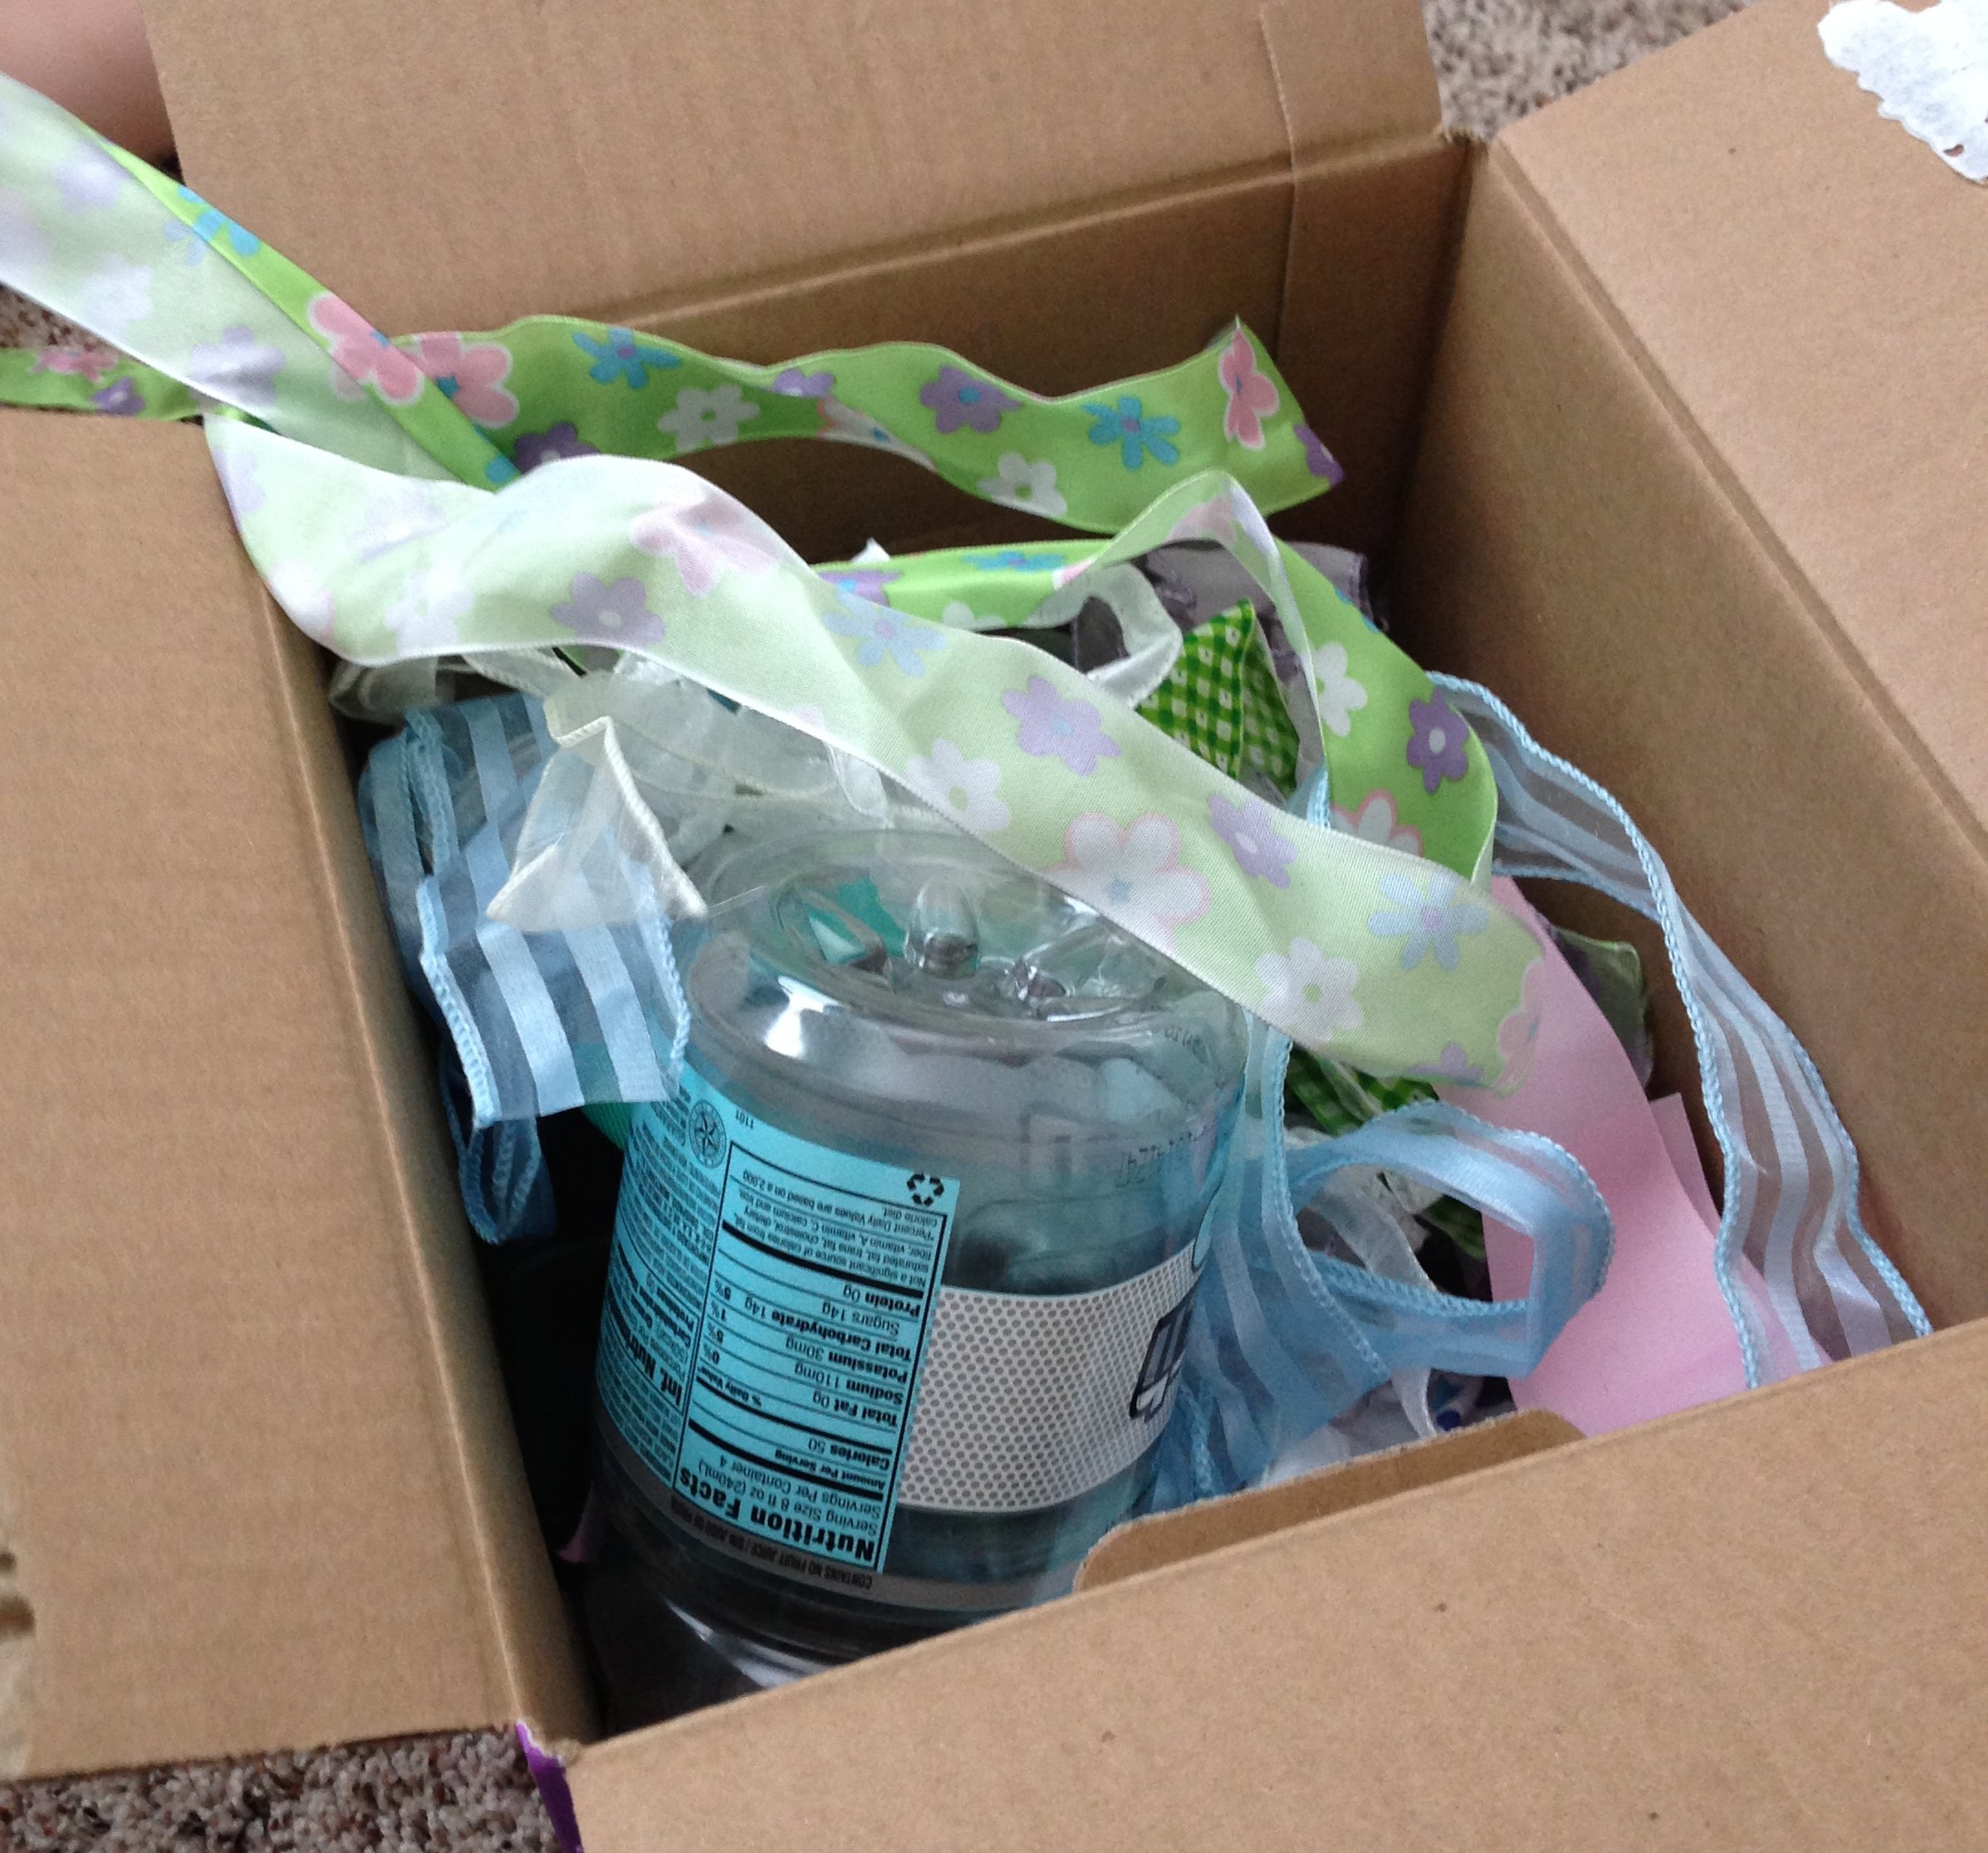
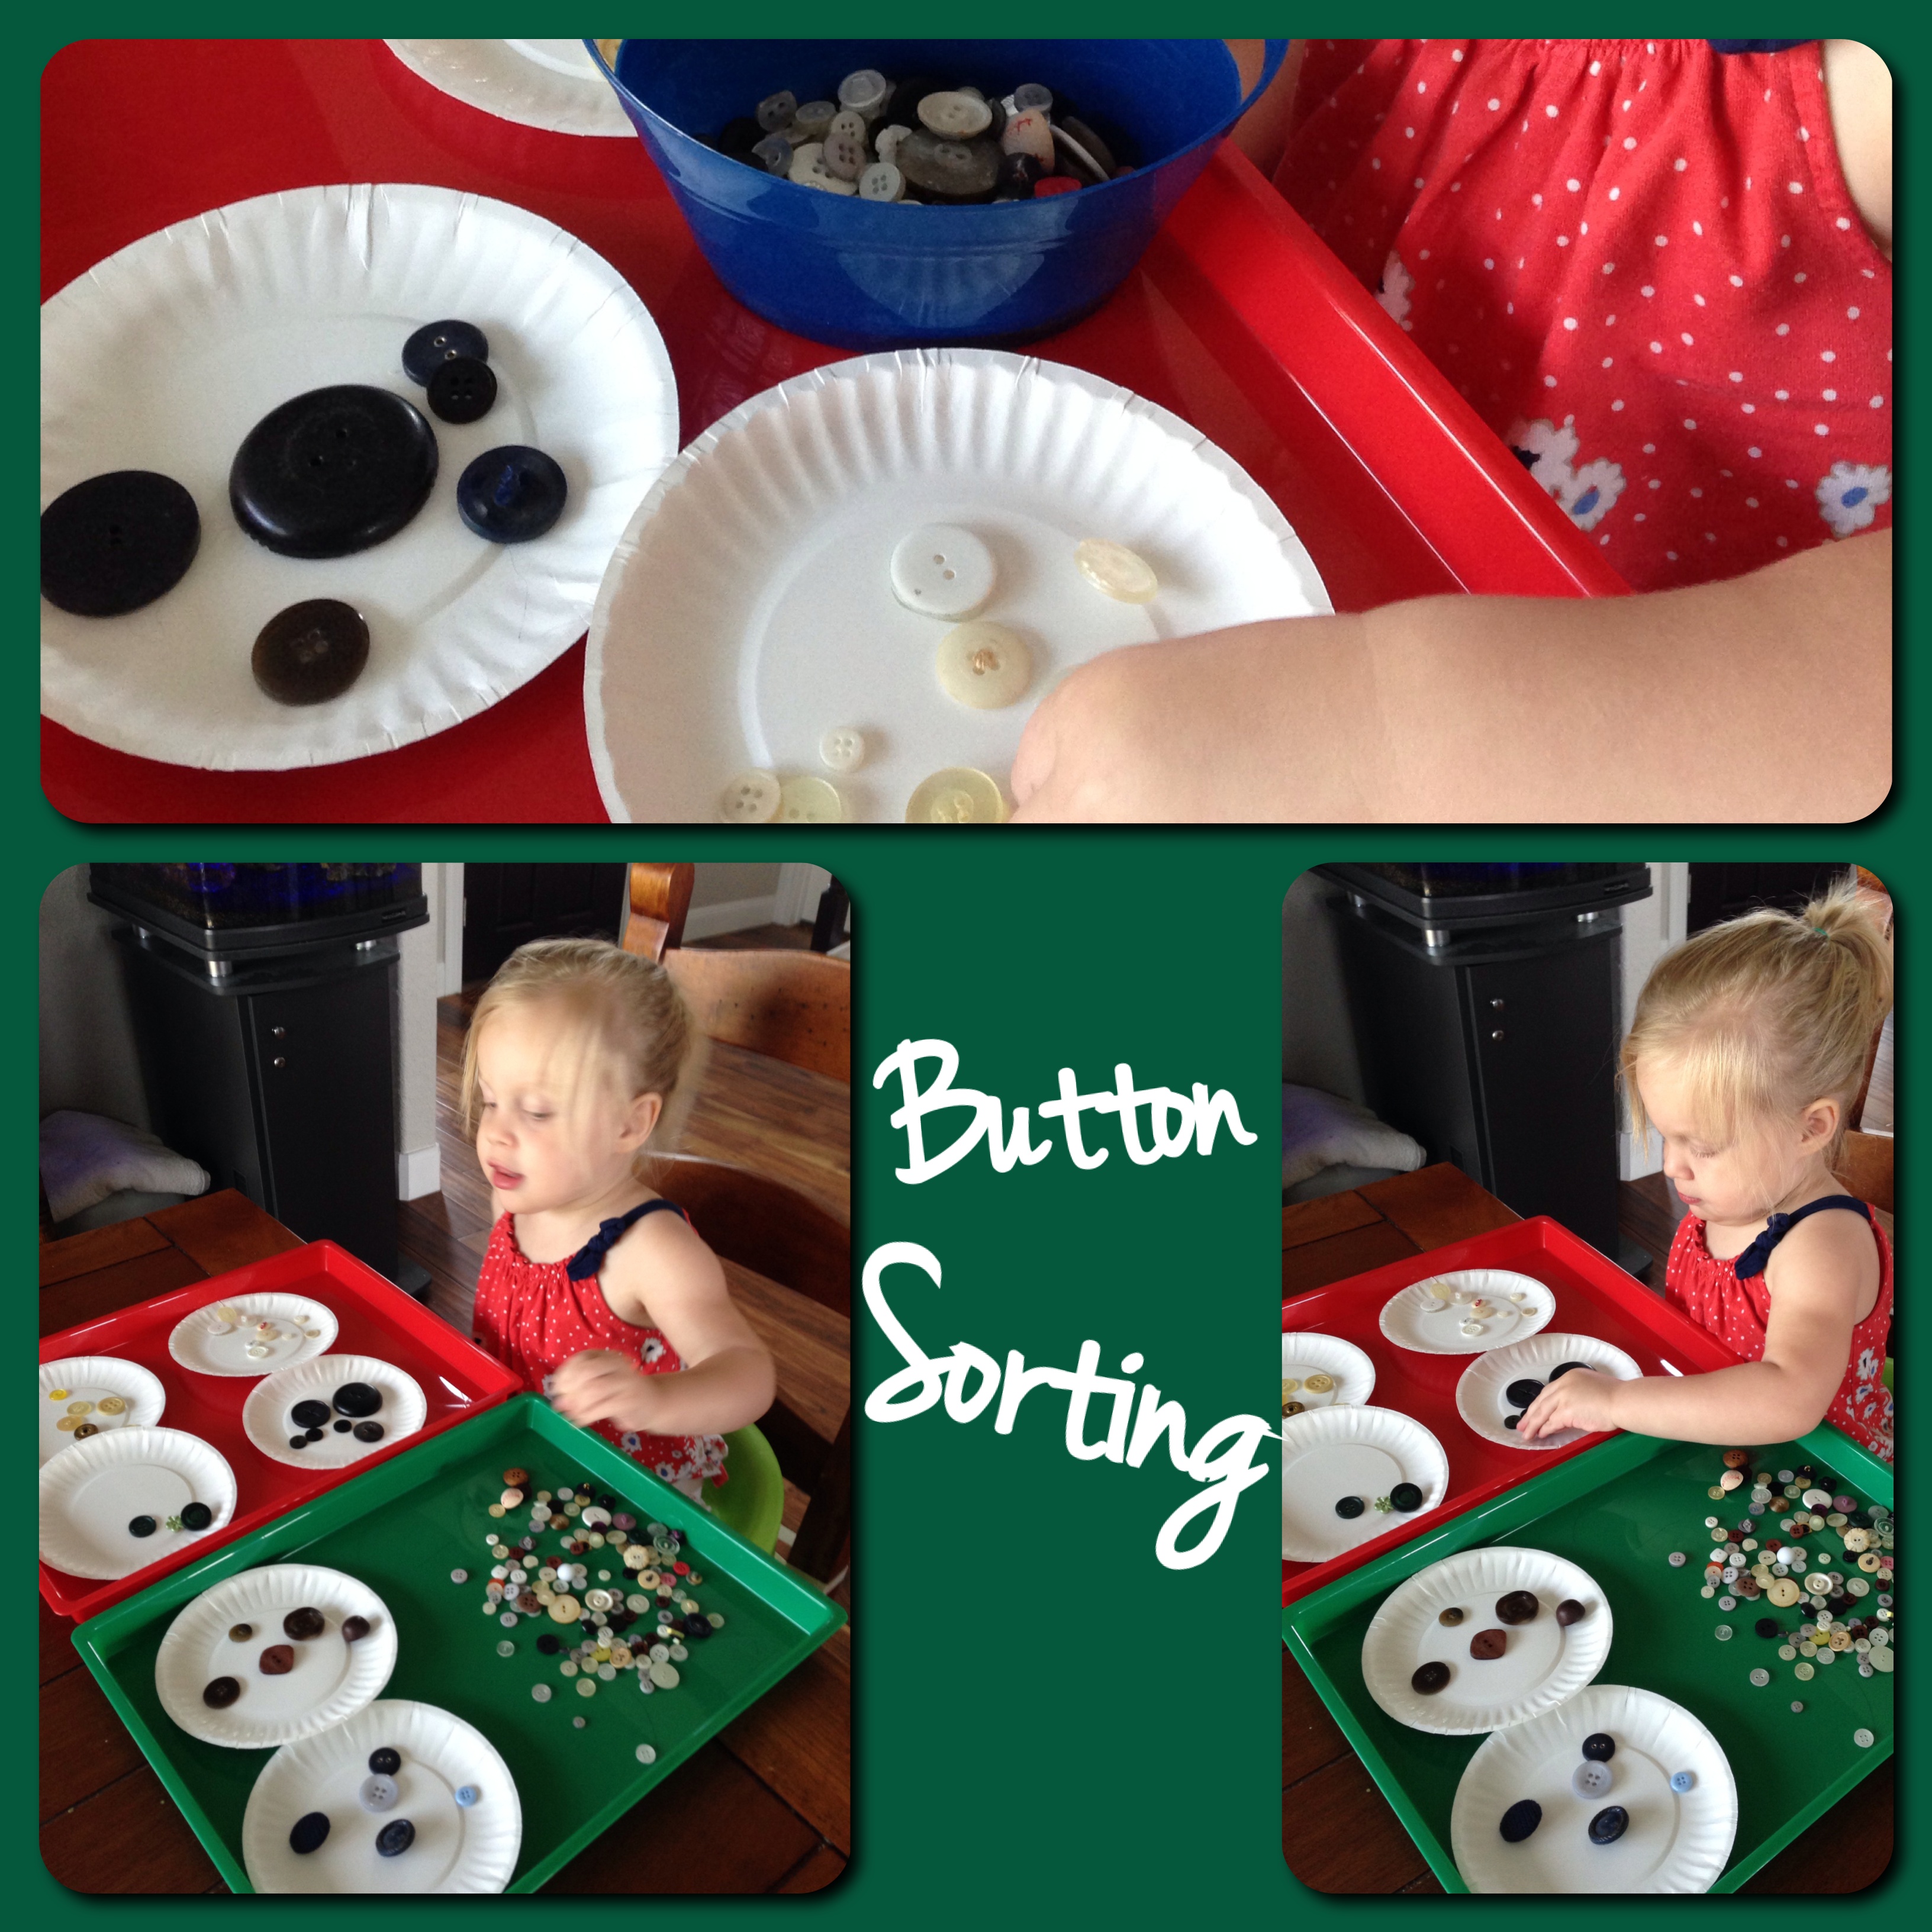
Another idea that she had on the blog was putting ribbon in a bottle.  I love that idea and can’t wait to try it, but it got me thinking – what else could she put in a bottle… until I realized it was recycling day and the bottles were already gone!  So, I began thinking about buttons, and decided to try a button sorting activity with her.  I discovered that I gave her too many small buttons for her patience/attention span, and instead of just digging my hand in the button box, I SHOULD have carefully selected some really cool ones for her.  Live and learn… and make changes for next time.  But, she did love the button sorting, and now that she’s done it with supervision, she should be able to replicate the result on her own.

Processed with Moldiv

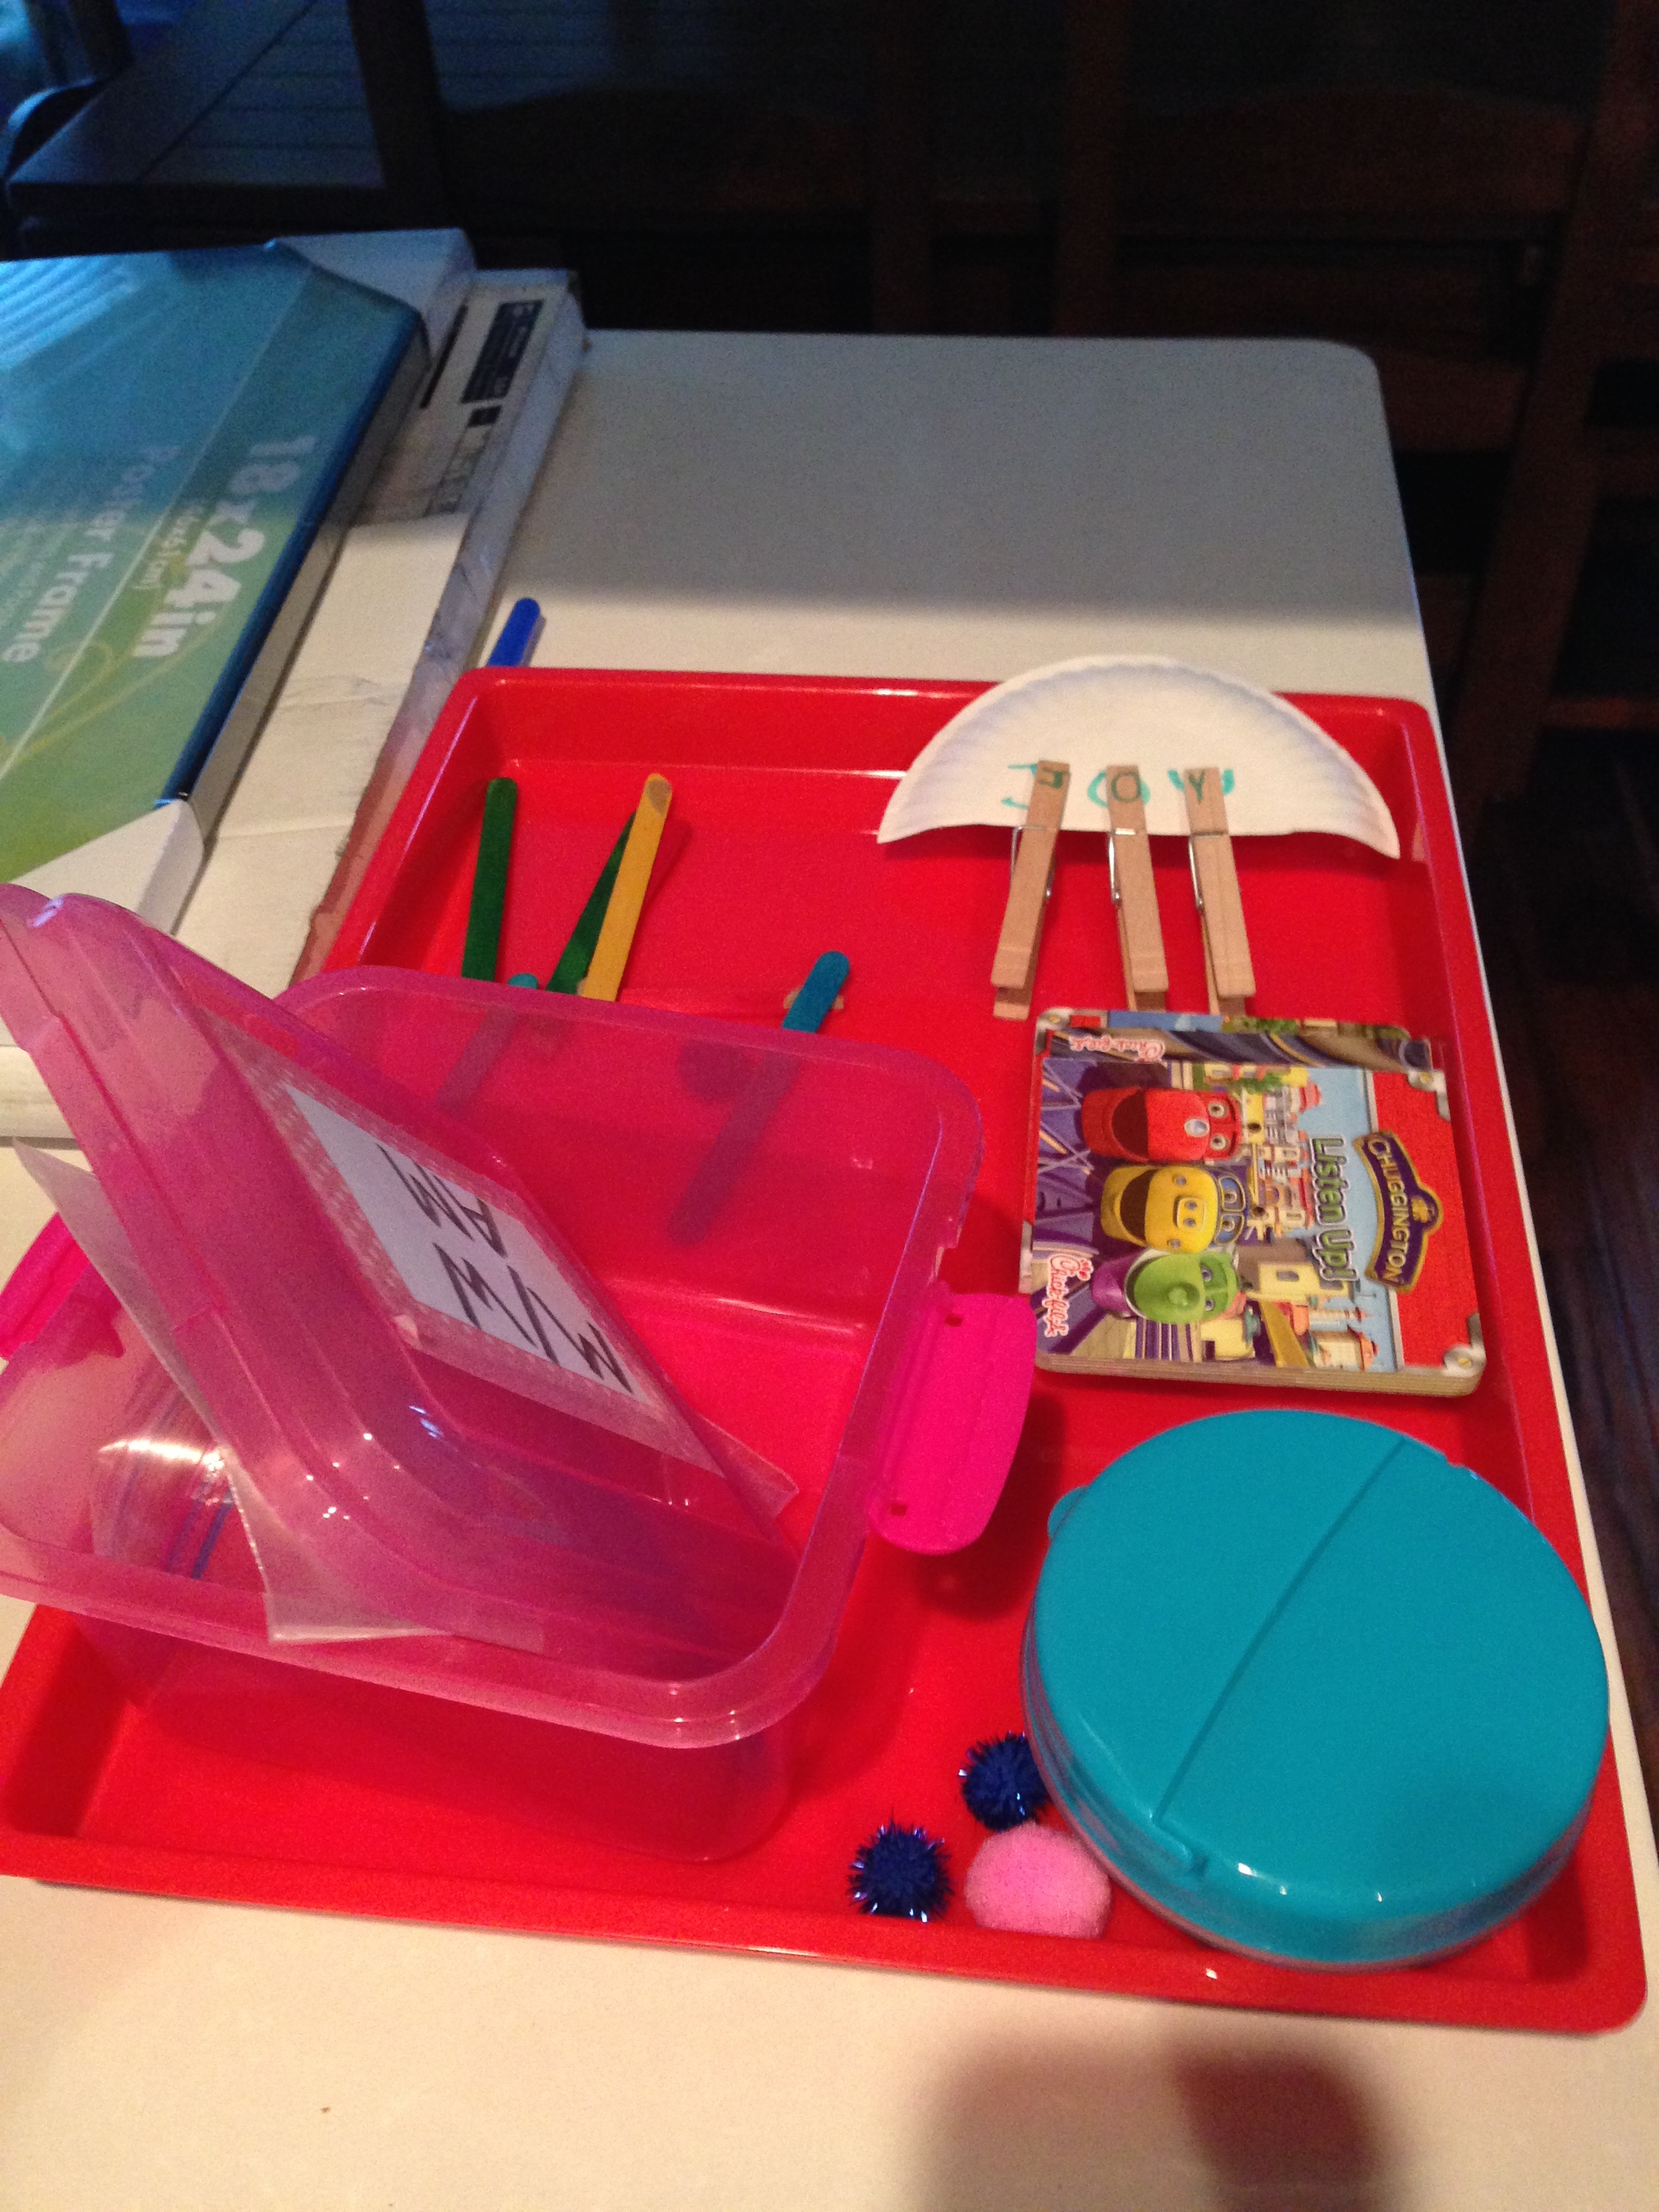
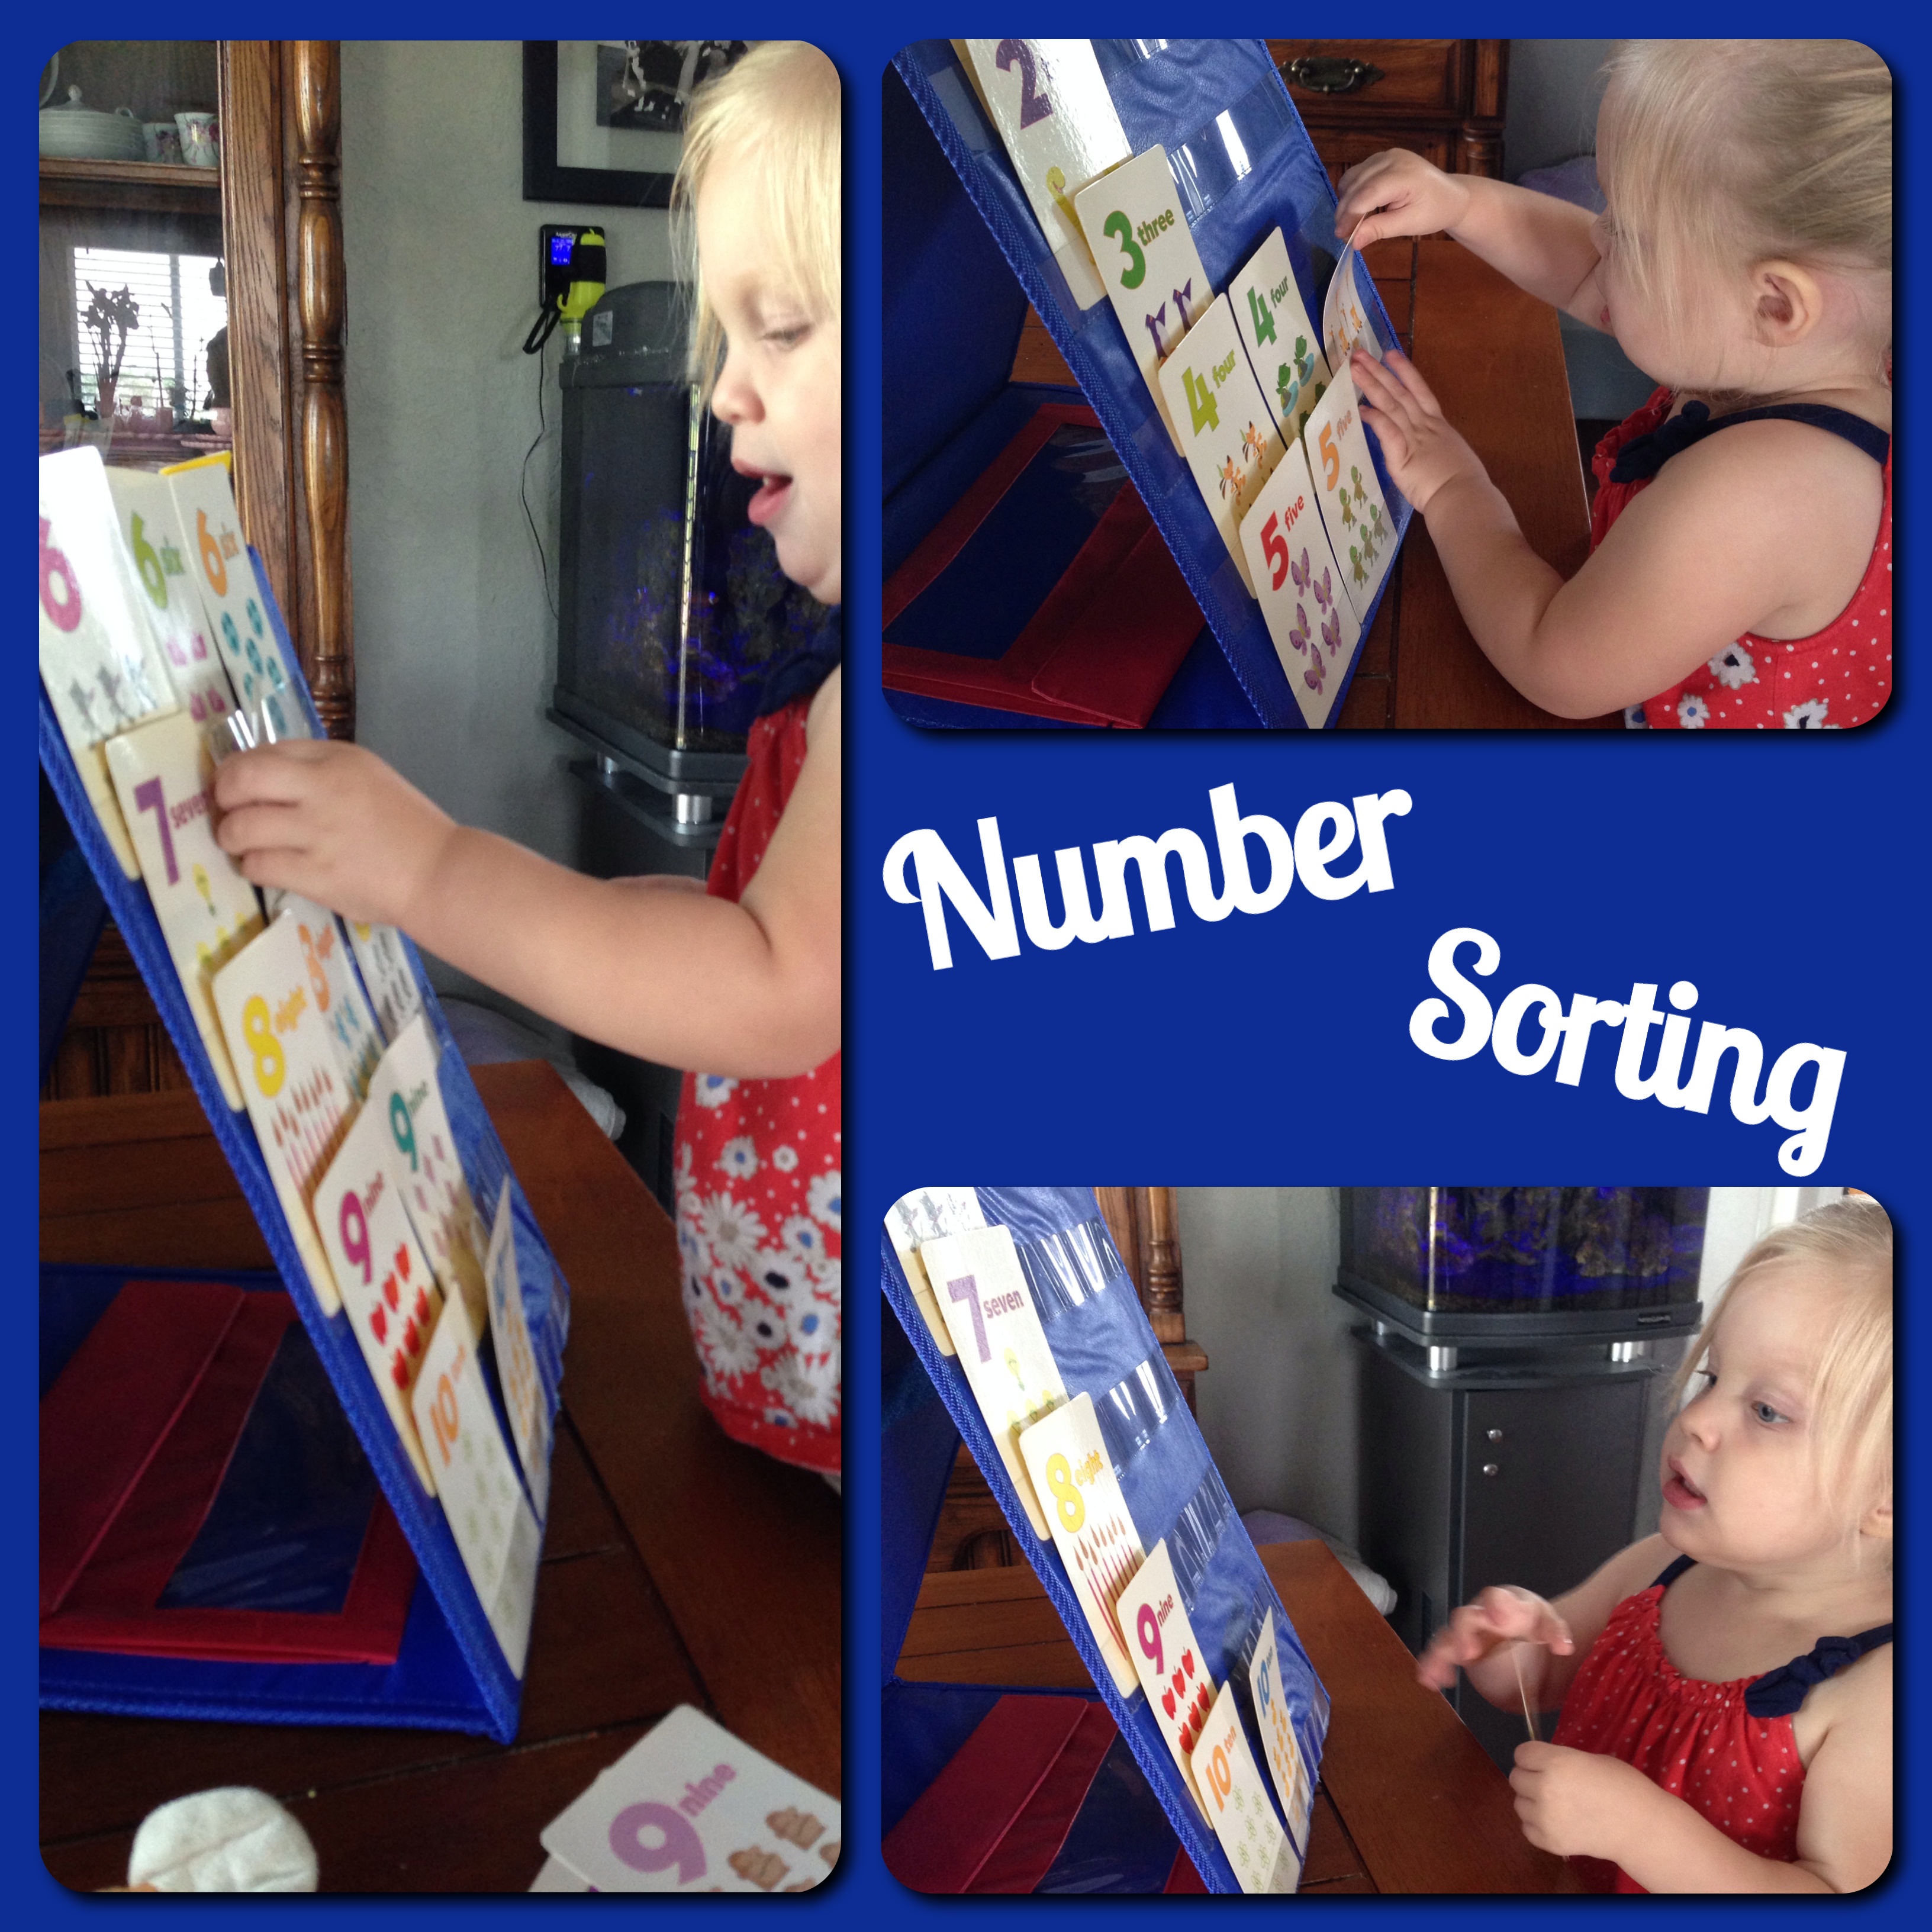
While I was upstairs digging in the button box, my eyes fell on these number cards from a Go Fish game I bought at Dollar Tree and laminated for durability.  So, I pulled them out along with our stand up pocket chart ( buy yours here), and put one in each pocket, and had her sort the numbers and put them in the correct row.  In all of her brilliance, she has trouble putting things in rows.  Her brain just doesn’t work that way.  She wants to put things in piles, not lay them out next to each other.  So this is a definite skill to work on – as well as the fabulous hand-eye and fine motor coordination skills of putting cards into a pocket chart.  She loved it.  My only complaint was that there aren’t enough pockets to include the numbers 11 and 12, which also came in our deck.  So, I had her just do them on the table.

Processed with Moldiv


The trick to all of these activities is figuring out what your child needs to work on, and making it fun.  Becca repeatedly asks for “Mommy, can we play games?”  She sees them as fun games because THAT IS HOW I HAVE PRESENTED THEM TO HER.  She would actually RATHER play games than do lots of other things.  I have to encourage her to keep doing her other types of play when the games are also available.  Now granted, these activities don’t always occupy and tame the savage beast for very long, and we still have meltdowns.  We still have time outs.  Because that’s life with a two year old.  But these activities seem to be helping, and that’s why I’m sharing them – so that hopefully they can help someone else, too!


Side note – if you’ve read my other posts, you’ve probably seen Becca wearing this shirt in pictures before.  Yes, it does get washed.  HA!  It’s just a favorite of hers that she often selects when getting dressed. 🙂


UPDATE!

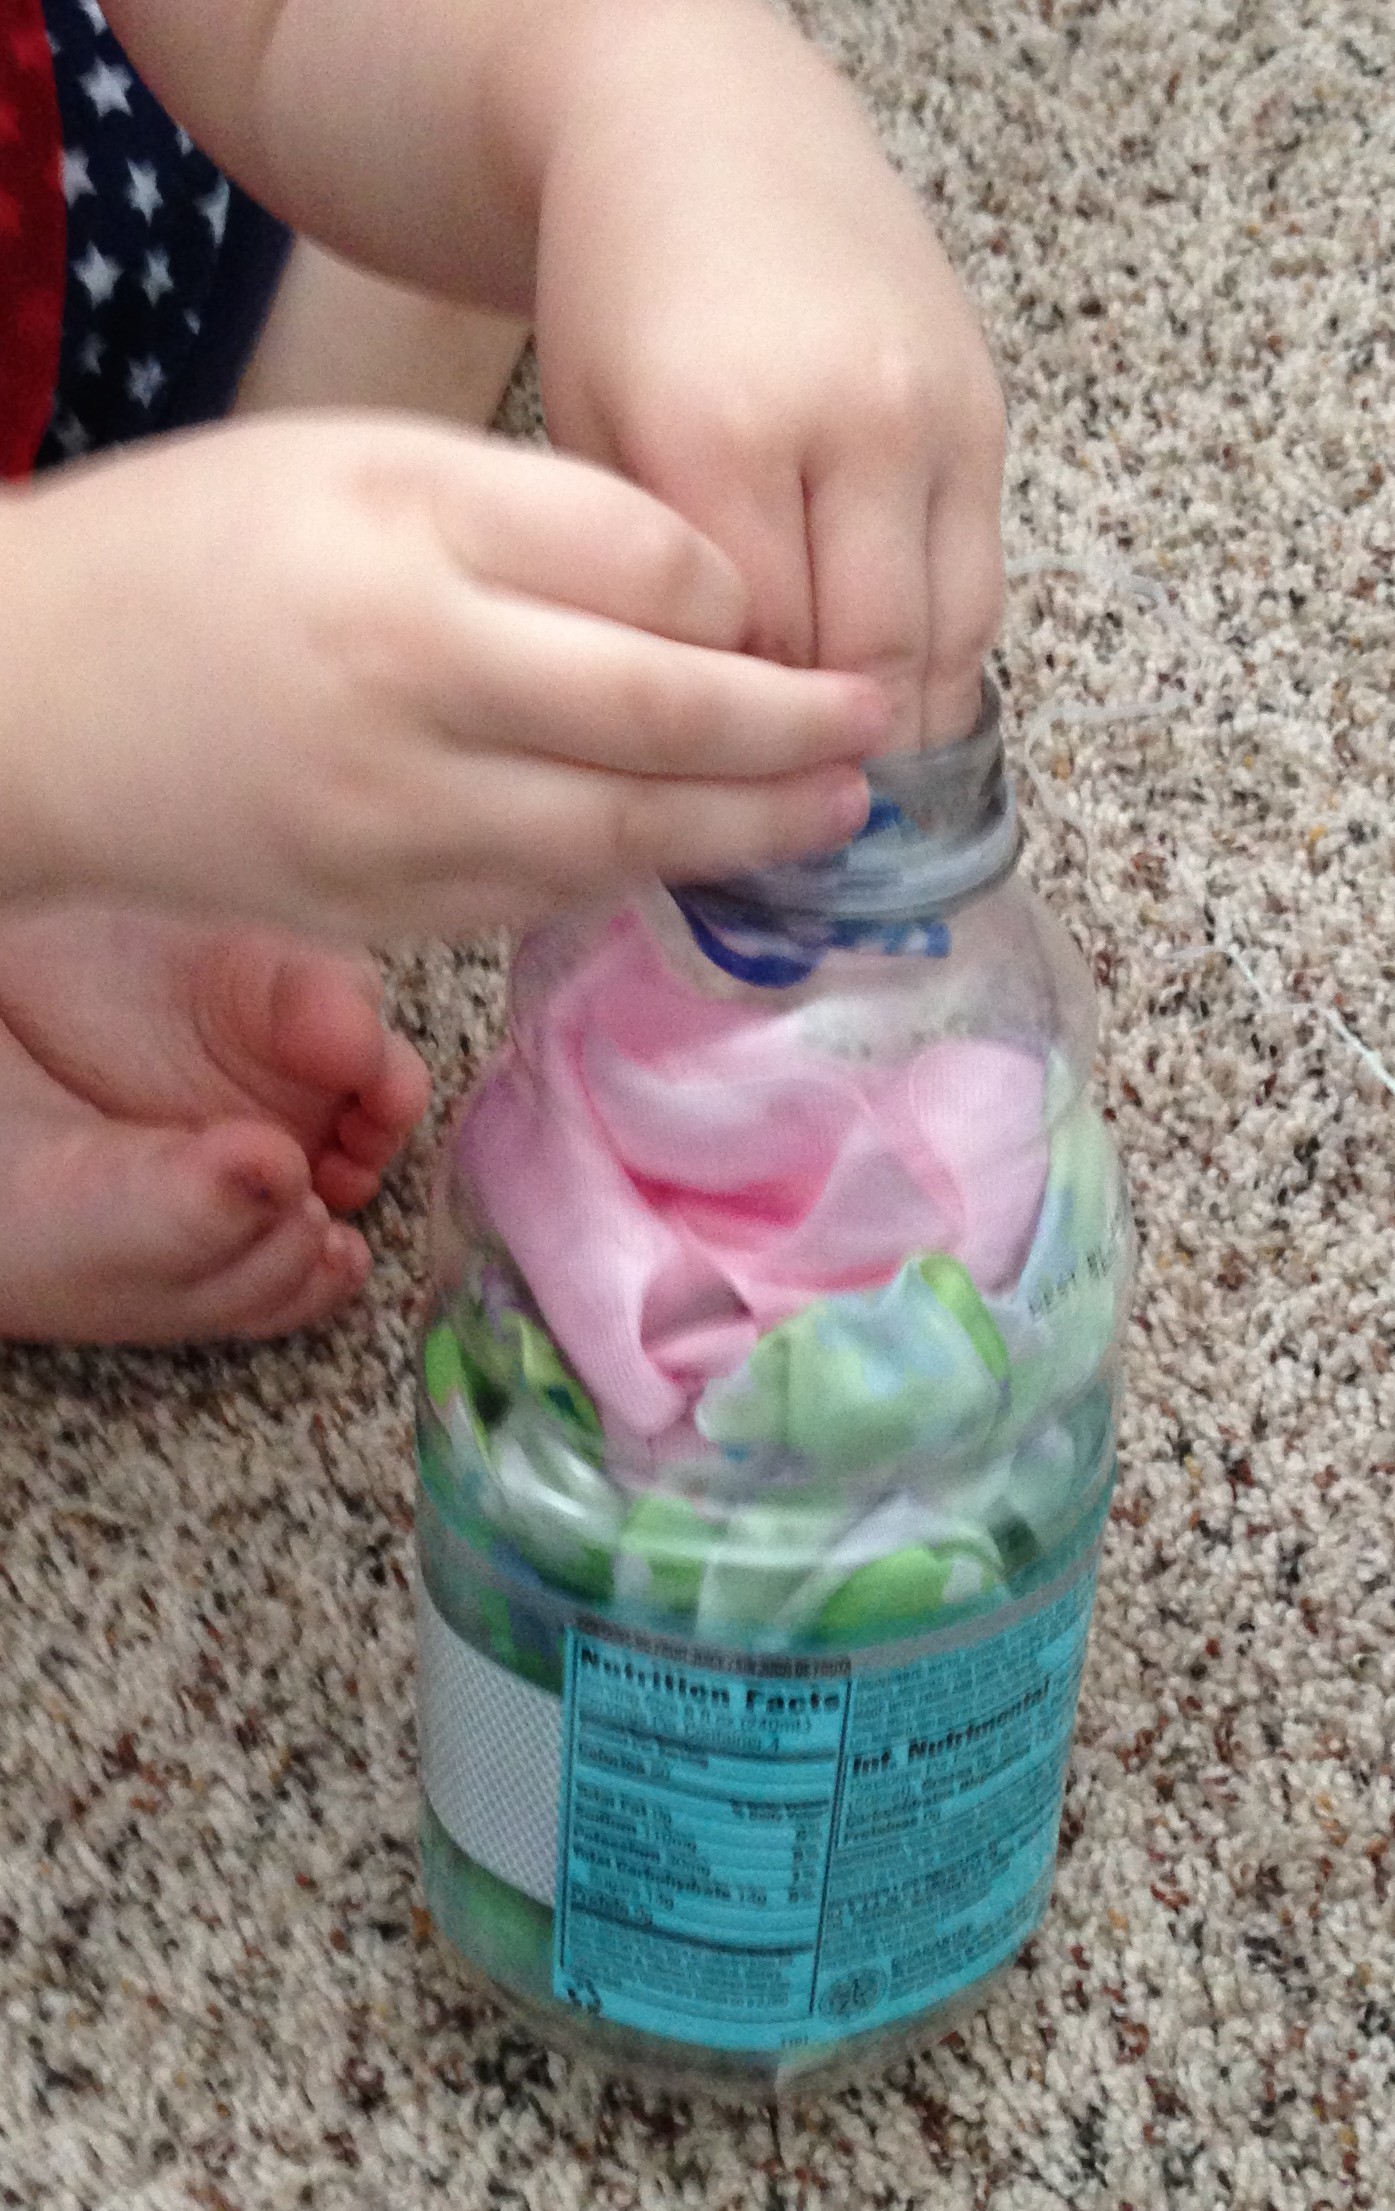
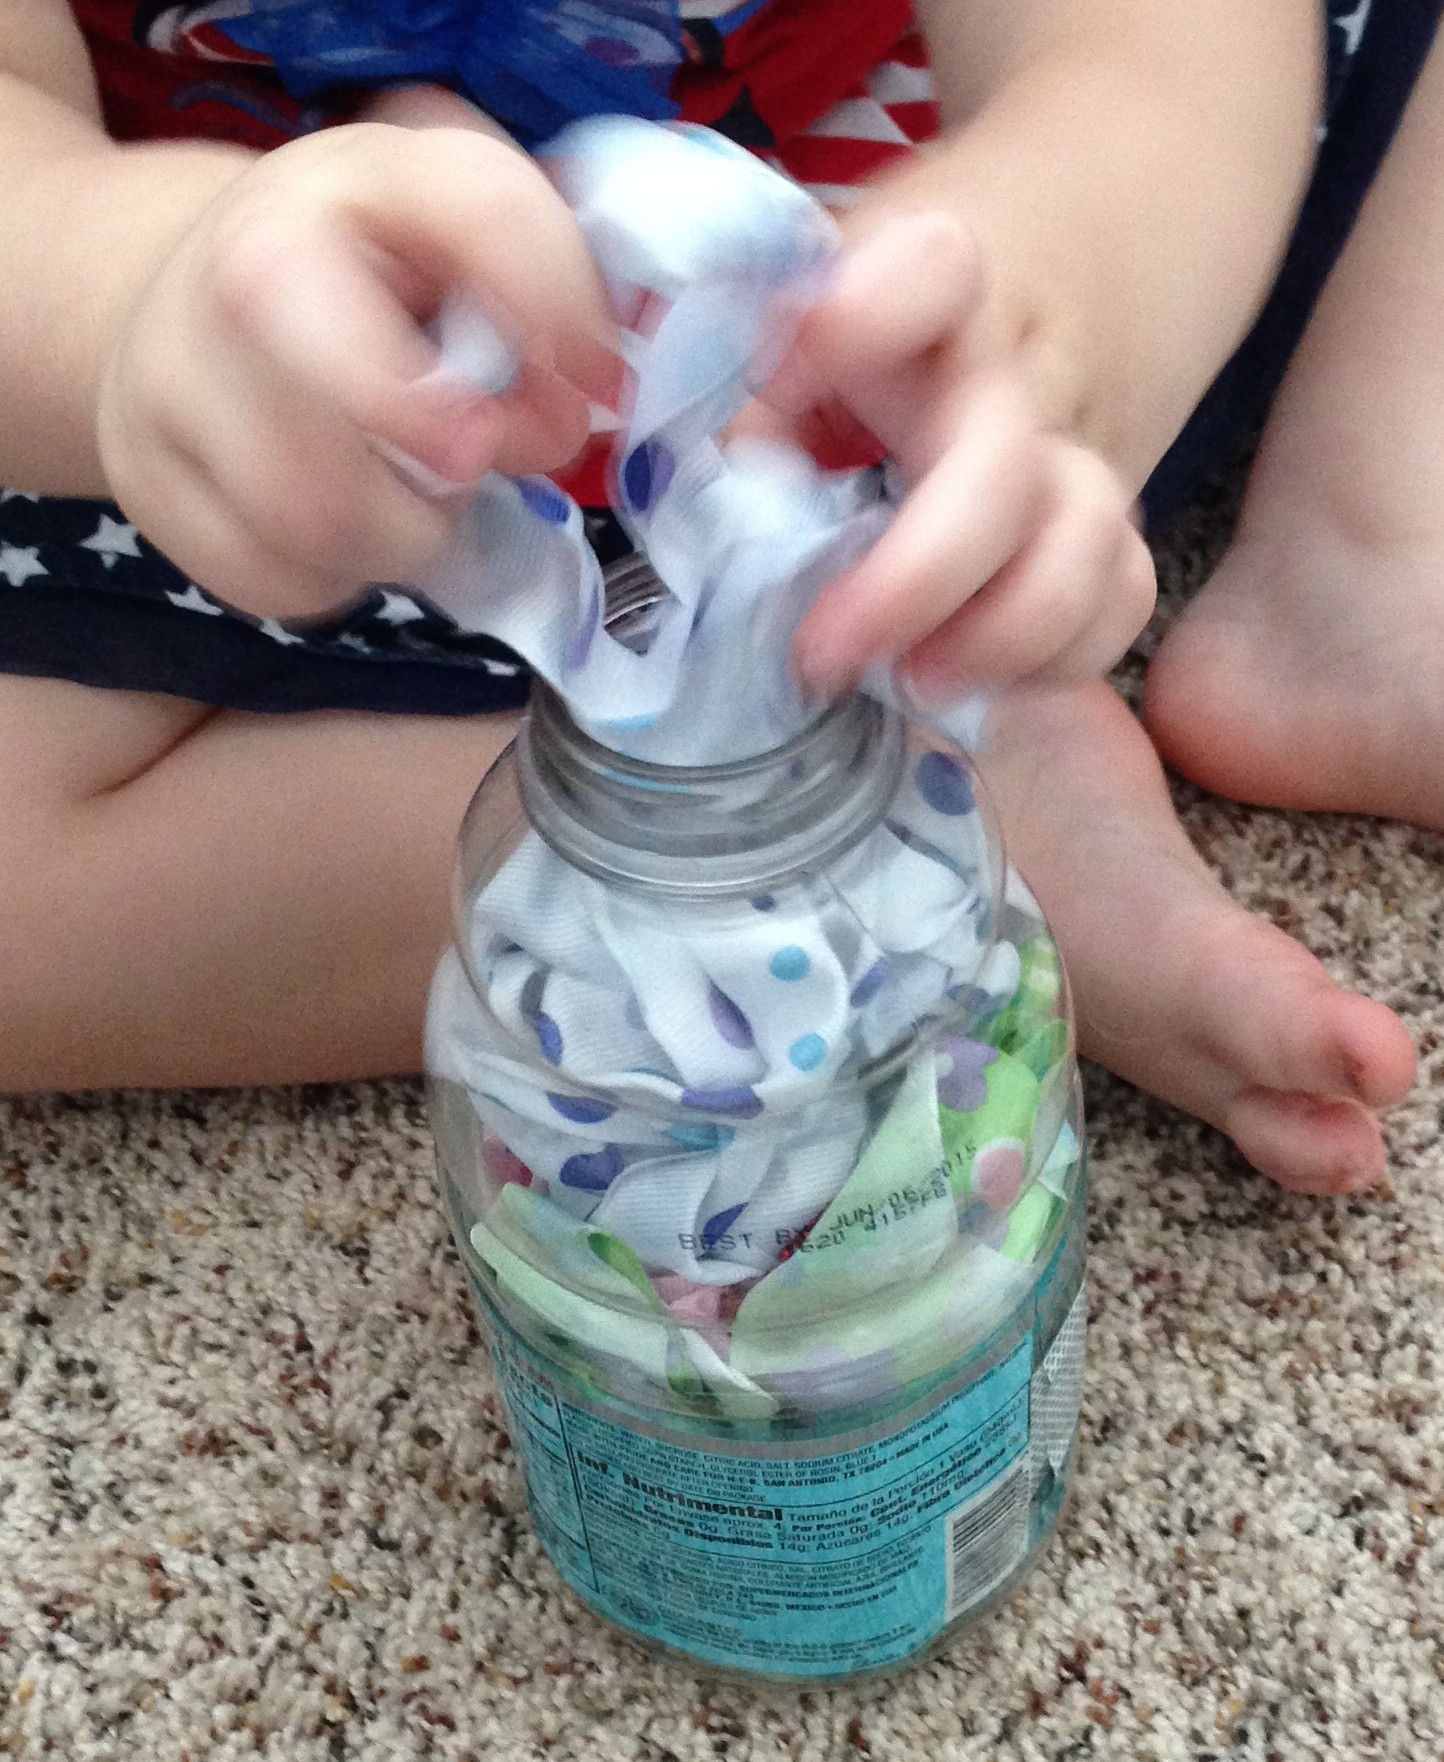
We tried stuffing ribbons in a bottle.  She enjoyed it, but really struggled to get them in – definitely a great test of her fine motor abilities!  I highly recommend trying it.  As you can see, we used a bottle with a wider mouth (like a Gatorade bottle) instead of a water bottle – that would have been impossible for her.  And still, I had to help a lot.  She had fun with it, but got frustrated quickly – we only played maybe five minutes.  We’ll try it again soon.  I just need to figure out how to get out all the ribbon we stuffed in… I think I need a dowel rod…

IMG_8272 IMG_8276 IMG_8280

Activity Trays

This blog post contains affiliate links.  I appreciate you purchasing items from this post!  Thank you in advance.

So I’ve seen several posts from Deb Chitwood over at Living Montessori Now that included trays.  Activities on trays.  Hmm.  Sounded interesting, and looked interesting.  And boy, has that been the best $9 investment I’ve made in a while!  Lakeshore had a set of four craft trays on sale for $8.99 as a doorbuster sale (lasts through Aug 31, 2014, if you are reading this before then!) that are normally $14.99.  (You can find a similar product here…affiliate link.)Anyway, so I got them.  And wow.  It’s SO nice to be able to put an activity in the tray and it not go accidentally rolling off in the floor, and it’s super easy to clean up and then get back out later because it’s as easy as picking up the tray and putting it somewhere else.  I’m looking forward to having Becca do lots of activities on her trays, and eventually Grayson, too!  They are super sturdy and fabulous quality, so they’ll be around long after the kids are in school, I’m sure.

Here’s a few pics of the things the trays can contain:

IMG_7901

Her race car mats (click here to check out that post)

IMG_7904

Her alphabet and number foam puzzles

IMG_7906

Her shapes for sorting

IMG_7907

Her popsicle sticks for building shapes

IMG_7998

Or, the contents of an entire busy box!  See more information about my activity boxes (or “Busy Boxes” as we call them) here.

Race Car Number Mats

Becca LOVES her Matchbox cars.  So much so that every night at bedtime when she says her prayers, she thanks Jesus for cars to play with on the rug.  Not kidding.  Jesus knows very well how much Becca loves her Matchbox cars.  So when I was wracking my brain trying to think of more things she could do at the table (confined in her booster seat) to occupy her academically, I knew I had to do something with her cars.  So, I came up with a Race Car Number Mat book (not shown in the binder in the pictures, but I’ve since punched 3 ring holes and put it in one of those cheap poly binders from Walmart).  She can use her cars to form the numbers, as well as count the cars on the page, and read the sentence at the bottom.  So far, they are a BIG hit.  The second day of playing with them, I drew arrows on them for how to correctly form the letters so that she could practice the correct way.  Needless to say, they are a BIG hit.  And she is already asking for them again and again – “Can I drive on my numbers now, Mommy?”

The set goes from 0-20.  Want the file?  Download the pdf here.  (You’ll have to add your own arrows if you want them.)

IMG_7901 IMG_7934

Quick Assessment Tips

So, yes, I’m a mom.  But before I was a mom, I had another life.  I was a teacher.  And, I hold a Master’s Degree in Educational Administration, Curriculum, and Supervision – with an emphasis on Curriculum Development and Testing Data Analysis.  So all of that training and experience has taught me a thing or two that I’m happy to share with ya’ll.

Have you ever wondered how much your child REALLY knows, but haven’t been able to quantify it or figure out what it means?  Hopefully these simple little tips will help.

The best way to do an assessment at home – esp for a toddler – is to make it a game.  I’ll be using the alphabet for my example.  So get a foam puzzle, or a set of flash cards, or make your own little letter cards, and let your child play with them for a while.  Once your child has thoroughly mixed them up, randomly pick up a letter and say, “Hey, what’s this letter?”  When you set it back down, you’re going to set it one of two places.  If your child got it correct, set it back in front of him or her.  If not, pull it out and set it somewhere separate for you to hang onto.  Go through all of the letters until your child has had the opportunity to identify (or not) all 26.  Save out the ones that were incorrect, and then later on the same day, using a different medium with a different font (for example – a t shirt with letters on it, or a picture book), point to those letters and see if your child knows them then.  IF you child knows any of them when asked in a different format/setting, then that is a “sometimes” letter – meaning that sometimes your child recognizes it, and sometimes they don’t.  Now, obviously, they could have more “sometimes” letters – that they knew in the medium you showed them the first time, but might not recognize later.  That’s ok.  But the letters that aren’t recognized the second time around, those are the letters that you want to take note of and chose to focus your time on.  For Becca, they are D, G, J, N, T, and Z.

IMG_7841

The “sometimes” letters will rear their ugly heads when you least expect it, so it’s good to always be reinforcing letter recognition (or number, shape, color, whatever the skill is that you are assessing and working on) even if your child has already exhibited knowledge in that area.  It’s also good once you get into lower case letter recognition that your child see letters in a variety of fonts – especially letters like g, a, and q, which can appear a variety of different ways depending on the font.  TRUE recognition comes when your child can identify the letter in ANY font.

Then I recommend keeping this information written down – in a binder, or on a file in Evernote, or wherever you can.  This way you can track progress.  Do the same assessment in a couple weeks after working on the skill and see if there has been improvement, if you’ve found more “sometimes” letters/numbers/shapes/colors, or what change has occurred.  Don’t do these assessments on a day that you know is a bad day for your child – either emotionally, physically, or astronomically.  (Don’t do an assessment on the day of a full moon.  Ever.  It really does skew your results.)  Also don’t be shocked if after working on certain letters, your child still doesn’t get them… or gets them and has forgotten others.  That is a totally normal part of the learning process.  Remember that total mastery is when in any situation at any time, recognition occurs.  Until that point, it’s not fully mastered.  And this goes for any skill.  Which, honestly, says that I never really mastered multiplication OR division, because lemme tell ya’ll… I do NOT know that stuff in any situation.  SO, don’t be too hard on your child if they forget at some point.  We all do.  Just keep working on it and reinforcing it in positive ways.

But the whole point of this blog post is to help you realize that you CAN give your child a “test” without them even realizing it, and it will give you valuable information that you can use to help him or her to succeed in the future.  I hope that this little post has been helpful, and I’m totally willing to give more advice to anyone who has questions or needs help.  Feel free to comment below.


Water Walking

Ok – so this is a totally UN-original idea that I got from Megan over at Coffee Cups and Crayons (view her post here!)  And, I remember doing a similar activity when I taught third grade and we were talking about plants, capillary action, and all that jazz.  For Becca, it was a simple color mixing activity that she LOVED!  I will say, however, that it TAKES TIME.  Our bowls didn’t look like the finished bowl set for over three hours.  Perhaps that’s just because Bounty truly is the Quicker Picker Upper… and holds way more liquid before it’ll start giving any up.  Who knows.  But, we started the project at 4:20, and the final picture was taken just after 8pm.  (It had been finished for a while, but at that point it was bed time for both kids, so snapping a pic of our science experiment was about, oh, say the last priority in my mind!  HA!  Ya’ll understand, I’m sure.  But here are the photos of our water walking experiment, and I feel sure Becca will be wanting to do more in the coming days with other colors. 🙂  If you haven’t done this with your kids, it takes about two minutes to set up and it’s amazing!  She kept saying “It was empty but now has water in it!  Is green!”

Processed with Moldiv