Traveling Tuesday – Sensory Bins for Grandma’s House

As a travel agent, I often look for tips to help my clients have a better experience wherever they are going.  Even on road trips.  Especially on road trips.  Especially on road trips… with kids.  Our own children are far from easy to deal with on the road.  Grayson is NOT fond of his car seat.  On many levels… but especially if the car isn’t moving.  Sadly, there’s not a whole lot I can do for him.  BUT – the other thing he’s not fond of, I do have more control over – that being Becca’s volume.  When she gets tired and frustrated, she gets LOUD.  Really, really LOUD.  And then Brother starts crying even harder and louder.  And then Mommy and Daddy really just need ear plugs because there’s nothing we can do.  We have been known to pull into a Burger King parking lot way after dark and attempt to tame the savage beasts a little by reading books and feeding a bottle.  But honestly, we are still on the search for what works for us in the car.  (And yes, I’ve tried a million cute games and magazines and magna doodle things.  But, when it’s bed time, it’s just bed time, and nothing can change that.)  So, my “Traveling Tuesday” posts the next few weeks leading up to your holiday travels for Thanksgiving will have tips and tricks for traveling with your kids, but it may be a while before they include anything for on the road… B/c we are still searching for that secret.

So today’s tip is about once you get to your destination – our trip was to the Grandparent’s house.  The grandparents have great toys that are different from what we have, but I also know that it’s good to bring something familiar just in case little Miss Picky decides she doesn’t like any of the toys and the “I’m BORED!” statement comes out.  Thankfully, we did really well on this trip – I think because Mommy packed lots of stuff to do in addition to all the fun stuff already there.

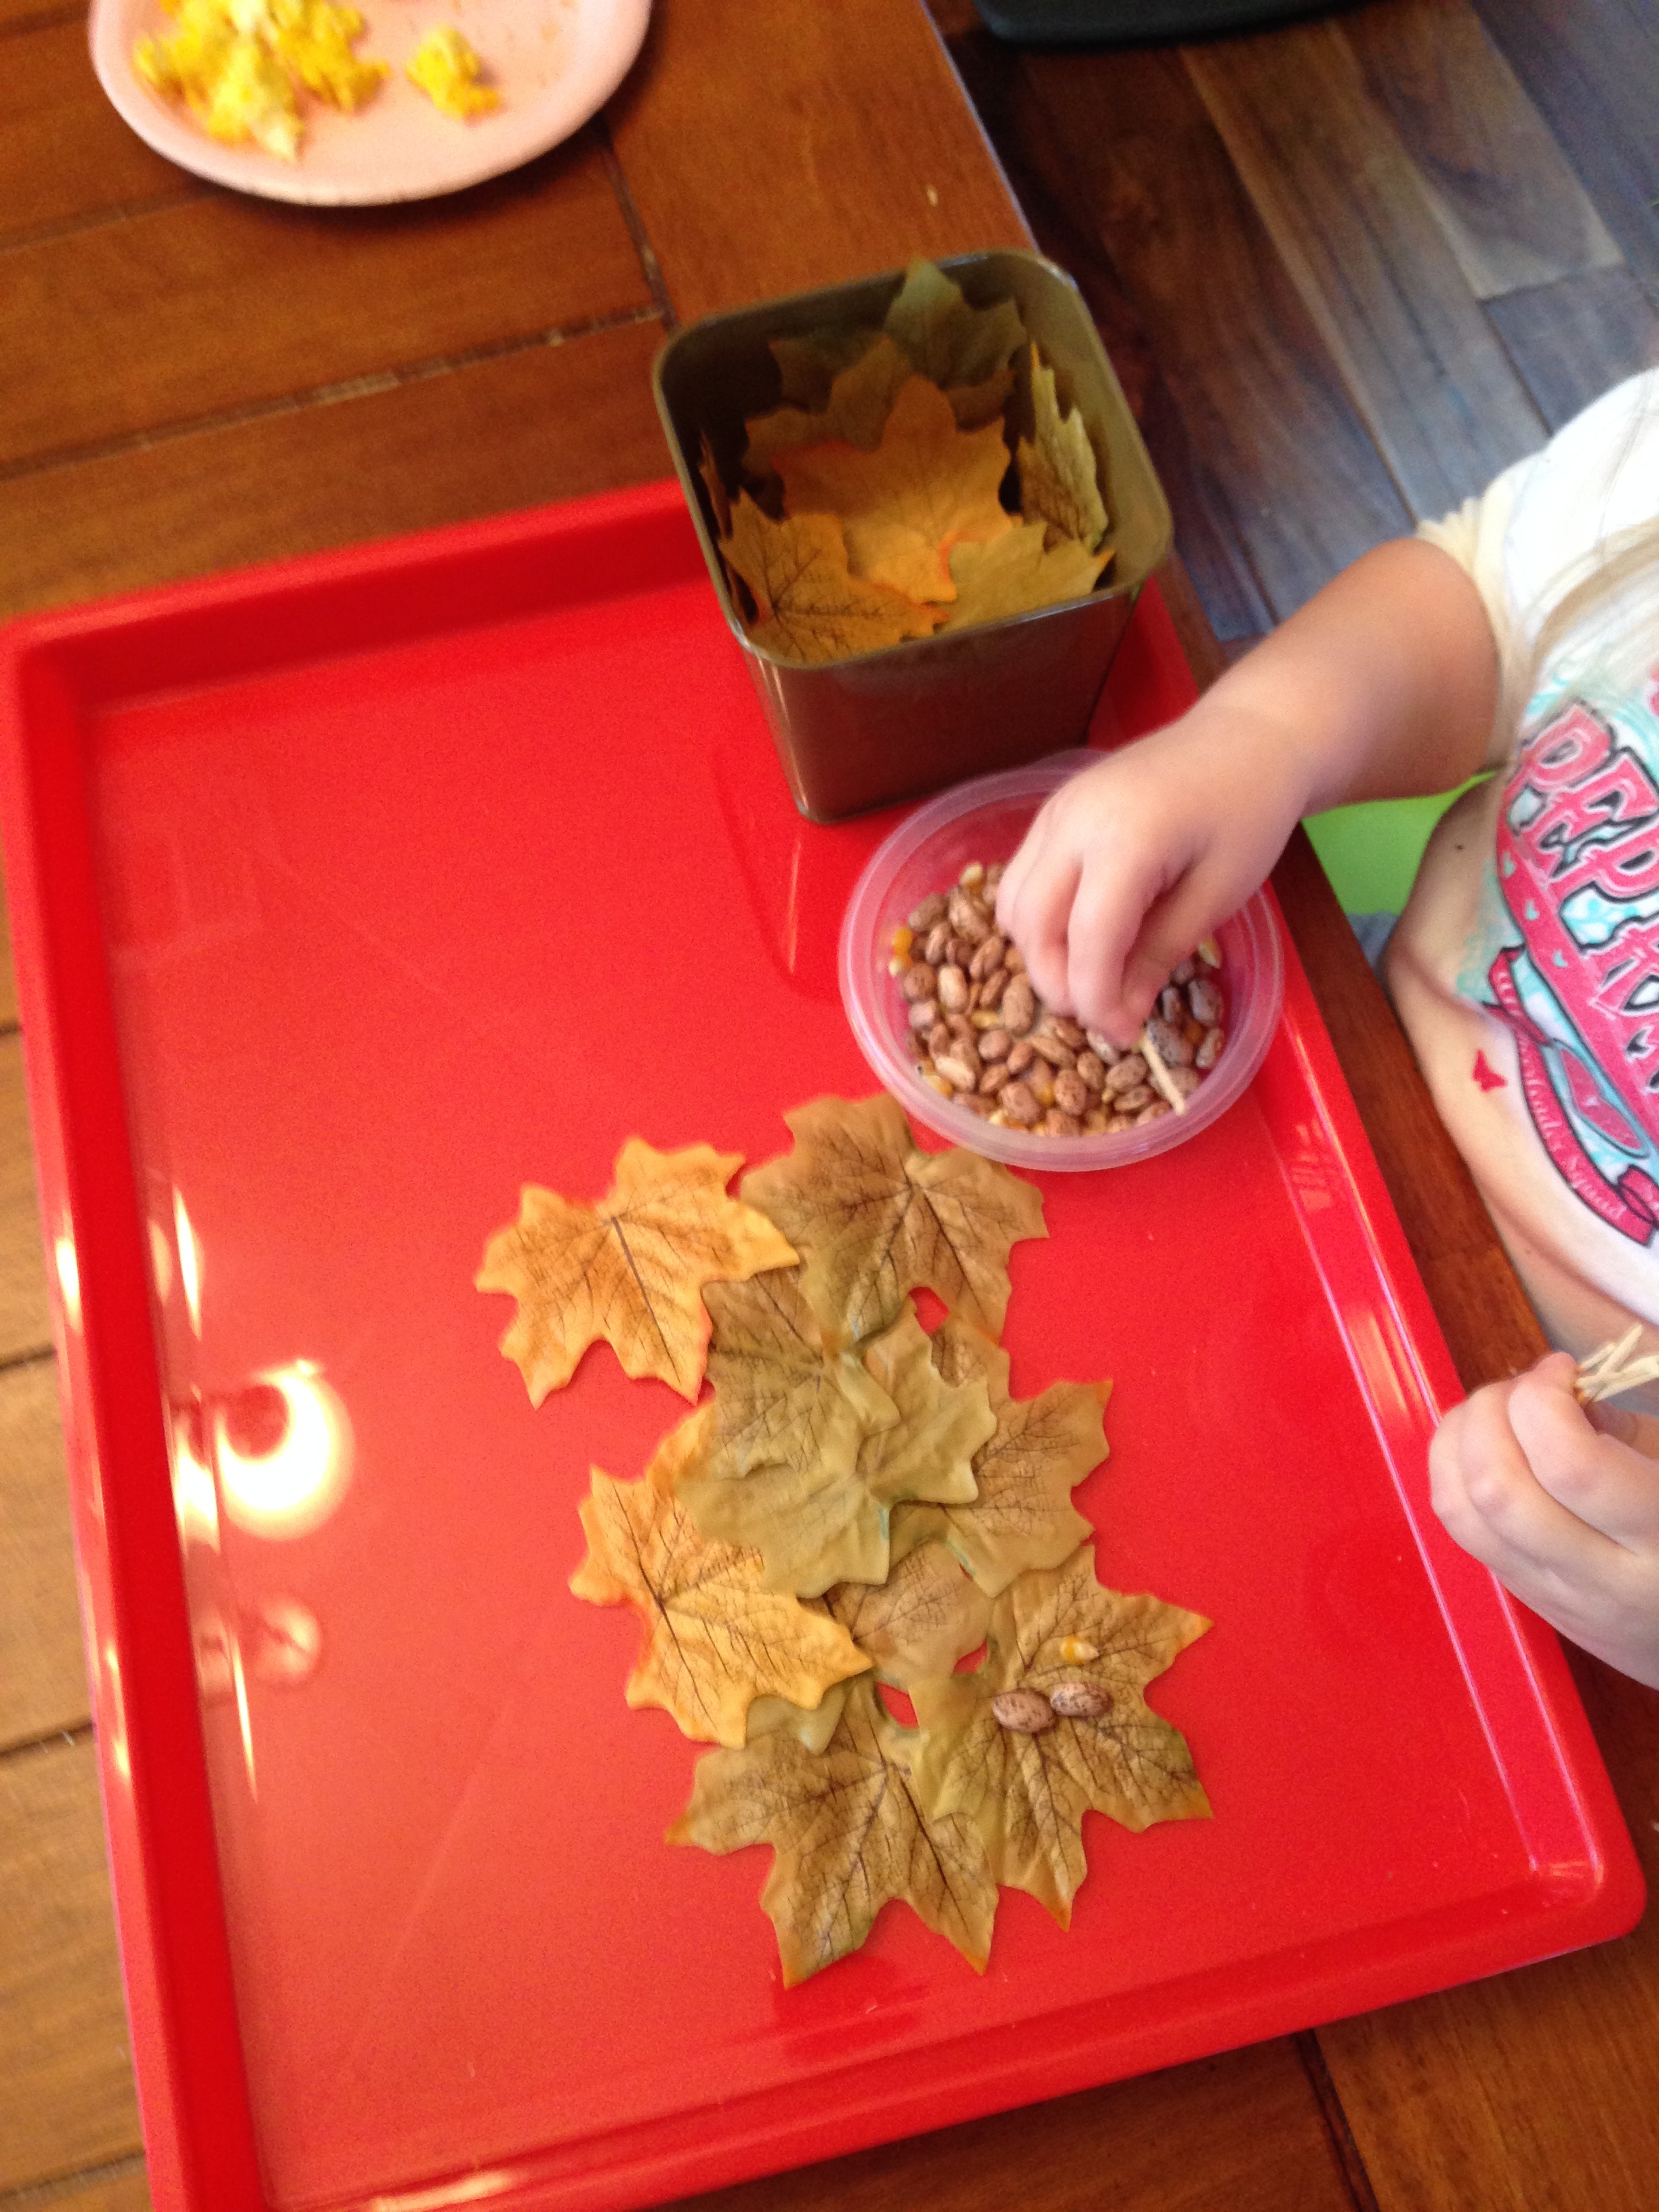
Becca loves sensory bins.  And she loves sorting.  She played with this bin a little bit there, and then has played with it a lot at home.  So… how do you travel with a sensory bin?  Because you’re probably thinking of a large tub with a lot of messy junk in it, right?  WRONG.  A traveling sensory bin should be something basic and simple, and not very messy.  And most importantly, it needs to go in a traveling container that has a lid. You need something like this. (aff link – thank you!)  I found some that were different colors, so mine is purple, not white like this one.  But the important features are the lid, the clips to hold it closed, and the handle.

IMG_8998

So what did I put inside mine?  I got paper flower petals from www.consumercrafts.com (not an affiliate link, but it seriously should be as much as I love their stuff and tell everyone in the world about their website…), threw in some little white shiny poms for a different texture, and then did what I’m starting to become famous for – took foam butterfly stickers and stuck them together to create some nice thick, cushy foam butterflies.


IMG_9019


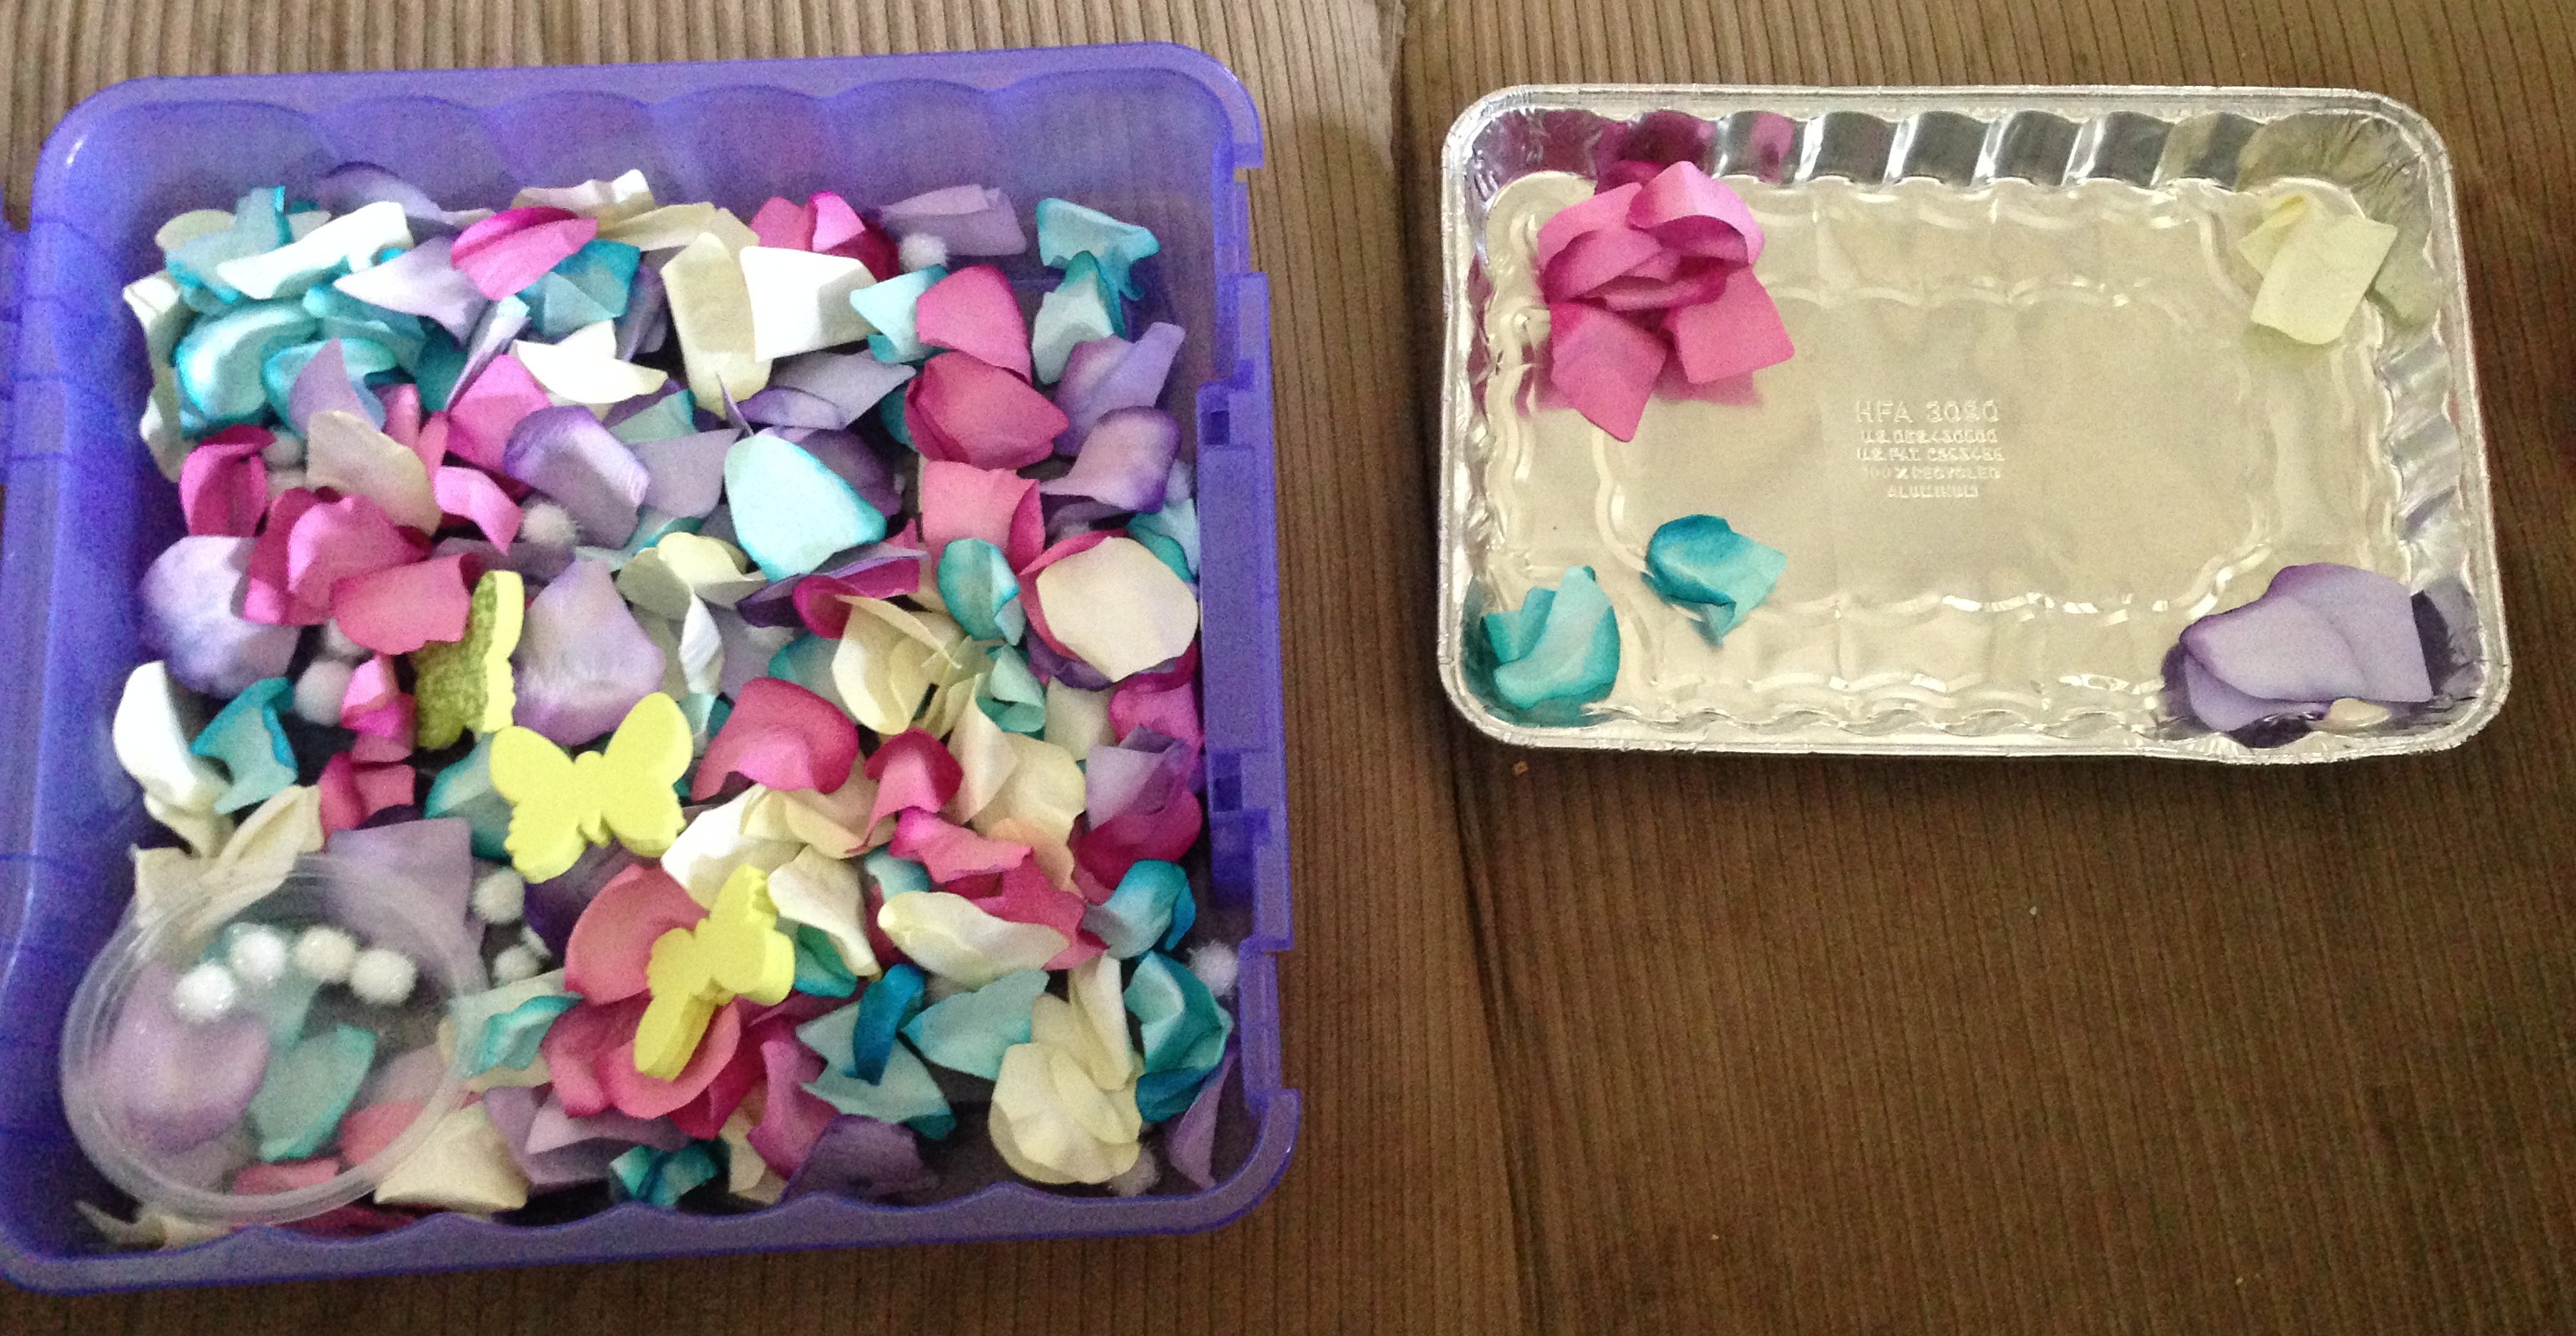
Here’s one way she can interact with the bin – by sorting the flower petals by color, and putting the poms in a bowl.  She seems to enjoy pulling out the butterflies and flying them around the room more, though.  I’m good with that.  In a couple days, I plan to throw all this stuff in a big ziploc bag, and hide it in the cabinet til Spring comes around.  But with a little girl who loves flowers and butterflies, it’s NEVER off-season to make a butterfly/flower petal sensory bin! 🙂  I’m already starting to contemplate what sort of non-horribly-messy fall stuff I can throw in a bin… pictures will no doubt come later.

Total Prep Time for Mommy: This one took a tad longer than it should have b/c I had the darndest time peeling the back off of some of the butterflies to stick them together!  I had estimated it’d take me about three minutes to dump it all together into the box, but with my sticker issues, it took more like 10 minutes.
Total Play Time for Becca: The first time, she was highly distracted (at grandparent’s house, remember), so she played with it off and on over the course of 30-45 minutes.  At home, she has played with it exclusively for up to 15 minutes.

Apple Volcano

There are LOTS of blog posts out there about how to make apple volcanoes, but if you haven’t done this with your kids, you really really should.  It’s super fun to make the apple “explode.”  Simply cut the core out, leaving the bottom in tact.  Pour baking soda down inside the apple, and replace the core.  Then, place it on a tray and pour vinegar over top!  That simple!  Becca enjoyed sticking her hands inside the “bubbles” and feeling the volcano.  Then, she found the vinegar smell interesting, and enjoyed playing in the soap in the sink to help her hands smell better.   All in all, it was a super fun after dinner activity!

IMG_8770

Melting Beads

For those reading this who have already had snow this month, this activity might not be for you… but for those in South Texas, where it’s still hitting 90+ every day, this activity is still quite in season.  To set it up, I hauled our water table inside, dumped in a bunch of water beads into the table, and let her play for a while.  Then, we added ice cubes of various shapes, and she played for a while – but she wanted a spoon b/c they were just “too too cold, Mommy!”  HA!  Over the course of about an hour, she kept coming back to the table.  Then, we decided (mutually – mainly her idea) to see if we could melt the ice cubes faster.  I suggested that we could try Mommy’s hair dryer.  She said, “no, probably not.”  So I said, “well, we could try salt!”  She thought that was the silliest idea she’d ever heard.  So, I got out the ice cream salt and she helped me dump the salt on top.  The ice, of course, started to immediately melt.  And so did the beads.  It was really cool – they started to split and dissolve, and we were both really into it.  It was fun.  A mess to clean up later, but fun. 🙂

IMG_8615 IMG_8622 IMG_8625

Leaf Man

This post contains affiliate links.  Thank you for your support of our family.

I LOVE books by Lois Ehlert.  So when I came across this one (aff link) on Amazon and realized that not only did I not own it, I had never read it… well, I decided it was time to buy!  So I did.  Leaf Man is a fabulous book and true to form, Ehlert has once again brought her illustrations to life and made fun shapes and sizes of pages.  As soon as the book came in, I read it to Becca, and have read it to her every day since.  She loves it, and loves looking at the pictures to see all the creatures Ehlert has created in her illustrations – using only leaves.

So we decided (it was pretty mutual) that we should try to make our own Leaf Man.  I got out the rest of the leaves left over from our owl project, and we made all kinds of fun things on her tray.  Then, I got out some beans and popcorn kernels and toothpicks from her fall sensory bin for eyes and such.  We had a lot of fun making them… and then she started to get bored.  But she noticed her beans sorta made the letter O… and we were off.  I started making letters out of beans, and she started making letters out of toothpicks, and it was super fun.  You never know when you will have an impromptu lesson on your hands!

IMG_8934 IMG_8936
IMG_8937 IMG_8939


Jack-o-Lantern Sensory Art

So I decided to go WAY out of my comfort zone, and do a spin off of this activity from Hands on: as we grow and make jack-o-lanterns!  So glad we did… it was a BLAST!  Not something we’ll do every day, by any means, but it was super fun.

Like Jamie did in her activity with her son, George, I gave Becca a tray of shaving creme, let her mix the yellow and red food coloring, and just play.  Then, I added glue and gold glitter.  Man, she loved it!  She most enjoyed when I got my hands in it too and we could hold hands and do finger play together in the goop.  (Meant that I didn’t get very many pictures, but I know you’ll pardon that since it just means we were having so much fun!)  Then, true to form, she started spreading it on her legs, tummy, arms… and when Daddy got home from work and saw what we were doing and said it was shaving creme, she proceeded to “shave” her legs.  Ya’ll, this must be some innate sense that is born into little girls b/c she has NEVER SEEN ME DO THIS!  HA!  She doesn’t even know about shaving her legs.  Ha!  Hilarity ensued.  I’ve cropped a pic here so you can see just a glimpse of how much shaving creme she had on herself.  It was just too much fun.

IMG_8863 IMG_8865 IMG_8866

Once she started to get a little “done” with the activity, I pulled out four paper plates – two large and two small – and let her cover the plates in the foamy paint she had mixed up.  We let them dry, and went to the bath tub for a wash down.  The next morning, after they were totally dry, I cut out black triangles and rectangles and let her glue them on for eyes, nose, and mouths for her jack-o-lanterns.  She really enjoyed squeezing the glue, but needed help.  Gotta work on that pincer grip still!  Then, the next day, I attached them to our butcher paper, and we sounded out some words to make our label for the page.  Super fun project that took a while to complete, but that’s ok… we need all the entertainment we can get around here!  HA!

IMG_8868

wet

IMG_8878

dry – a lot of the foam goes a way, but the big peaks stay puffy, creating an awesome look

IMG_8942
our completed project hanging on the art wall