What We’re Doing to Survive… School at Home #COVIDChronicles

If you’re anything like me, you have gone through a wide array of emotions this week as you struggle to figure out how to handle all of this stuff.  It’s just a crazy mess.  But the bright side is, all of the teachers out there are working hard to come up with great ideas and find resources to help you with your kiddos at home!!  I’ve stolen some ideas from others, and come up with a few things on my own that are hopefully super helpful to yall as you’re stuck at home!!!

So first up is Stained Glass Window Painting!  A friend of Gray’s from school and church enjoyed doing this at home and his mama posted on Facebook… so we tried it!!  It was SO MUCH FUN that now we’re contemplating doing the bottom half of the kid’s bedroom windows, too!  Here’s how I did it:
Get some Crayola Washable Paint (you can get the little pots on Amazon if you’re not venturing to Walmart these days, but even with Prime shipping they are about a week out on delivering… just fyi!).  You’re going to mix the paint with dish soap and water.  The proportions I used were kinda just by feel, but I mixed approx half of the little paint pot with two (small) pumps of dish soap and probably about 2-3 Tbsp of water, and mixed thoroughly.
To prepare, I used painter’s tape and some construction paper pieces of colors we don’t use much to mask off the window sill and sides.  Even though the paint is very washable, I didn’t want to have to stress.  I also talked to the kids a lot about wiping their brush on the side of the pot before painting so that it wouldn’t drip on other shapes below.  (But they still dripped, and it’s thankfully super easy to wipe off and fix!)
Lesson learned… we did one window one day, and the other one the next day.  So I discovered that if you kinda let the first coat dry and then add another coat, they look much brighter!  You can also try fun brush strokes – try doing some straight, some swirly, some zigzag, etc – because the brush strokes WILL show when it dries.  Then, because you’re using water in the paint, be sure you LEAVE the tape and paper up for several HOURS to insure it dries and you don’t have runs into your blank spaces.  It is a super fun and easy project, and DOES wash easily off of skin AND out of clothes.
(ALSO!  A couple different friends have shared similar ideas using painters tape and sidewalk chalk on a fence – that looks super fun, too!)

Processed with MOLDIV


Another super fun activity that we borrowed from a coworker friend of mine was playing with Magnatiles on the Garage Door!  This was a super fun activity (and also a good lesson on gravity vs the strength of a magnet for the big kids) that we tried out yesterday morning, and this morning the littles are having fun doing the Magnatiles on the freezer drawer inside!  Elle got super excited about this activity, too, and created Arendelle (“Adondell!”) and Elsa’s castle (“Elsa’s cast-tell!”) all on her own!

Processed with MOLDIV


Trying to figure out what to do with the papers that your kids are doing for school at home?  Try making this easy Recycled Cereal Box Paper Holder!  Simply take a large cereal box (we get the family size boxes), completely unfold it, and let your child decorate the blank sides!  I wrote on them first and had them use stickers (because we have MILLIONS of stickers!) to decorate where I didn’t write.  But you could have your child paint, draw, doodle, or even make a collage on the box.  Then, tape it back together!  I have a roll of clear contact paper, so since we used stickers that I didn’t want to fall off over time, I covered the boxes in clear contact paper.  I’m keeping the kids’ work in folders, but they are rapidly filling.  So after I take pictures of their work for the week to send to their teachers, I’ll be sticking that finished work into their boxes, which easily fit on the shelf in the closet!

Processed with MOLDIV


And now for a couple other ideas that you can purchase relatively inexpensively on Amazon!  (Reminder – I am no longer an affiliate, these links are just to help you out… please remember to always shop on Smile.Amazon so that you are helping out your favorite charity with every purchase!!!)

Processed with MOLDIV

This Water Doodle Mat is super fun for all three of my kids (3rd grade, kinder, and 2 yrs), and was only $24.  WELL worth it!  They have used it multiple times a day since it arrived, and I love that the water pens are interchangeable with our Melissa and Doug Water WOW! Books that we have gotten from my friend Casey over at Munchkin Land Kids!  (Yall please go and check out all of her awesome stuff… now is the time to support small businesses!!!!)

We also seriously LOVE Paint By Sticker Kids books, which you can get off of Amazon.  We have done SEVERAL of their books, but the ones I got for the kids for right now are Unicorns & Magic (full of LOTS of sparkly fun stickers!) and Beautiful Bugs.  They are $10 a piece and worth every penny!  Great for number matching/recognition practice, and fabulous fine motor / hand eye coordination practice!  They also make fabulous story starters for your kiddos who need some inspiration to get WRITING!!!

I also shared in that last graphic a photo from Natalie Grant and Charlotte Gambill… remember through all of this, mama… the struggle is real.  Make sure to let your faith rule over your fear.


WE CAN DO THIS!

blog signature

Summer Survival – Science!

Ok y’all, so we took a vacation, and I got a little bit behind on this series, BUT, on our vacation we tried out a couple of these ideas, so I have actual pictures to share!  Woohoo!

So these ideas came from a variety of places, and I’m just compiling them into one little list for you… plus, you get a bonus idea that we did on our trip that turned out super fun! But first, the list:

Screen Shot 2019-07-02 at 7.05.19 AMIf you’re not an educator, or a science nut, you may want some more explanation on these… So… let’s break it down!

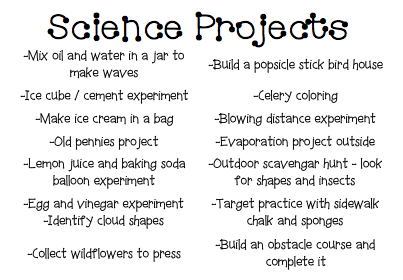
-Mix oil and water in a jar to make waves – take a spaghetti sauce jar, and clean it out thoroughly.  Fill the jar about half way with water, and add food coloring of your choice.  Stir it up, or close the lid tightly and let your kiddo shake the jar!  Then, ASK your child, “what do you think will happen when we add vegetable oil to this?”  Get them to make predictions, then try it!  Pour the oil in slowly, so they can really see how it doesn’t mix.  Then, screw the lid on TIGHTLY.  You may even want to put a couple drops of super glue on the mouth of the jar before adding the lid, just to ensure it doesn’t get opened.  Slowly turn the jar side to side, and show your child how waves occur.  Then, let your kiddo hold the jar and tilt it, turn it, and then finally, shake it really hard!!!  ***BONUS – if you have glitter and want to add glitter to the jar, that adds a fun element and it’s interesting to watch if the glitter sink or float through the oil!***  This activity gives you an opportunity to talk about density, and also about gravity and how it pulls.  This is also a good jar to keep around – if your child gets upset (sibling crap, right?) it’s a great time-out jar – have them shake it really good, and then sit and watch it until the oil and water are totally separate again!

oil and water bottles

-Ice Cube/Cement Experiment – this one is super easy, but you can modify it to make it really fun in lots of different ways!  Basically, on a hot day, set an ice cube on the concrete of your driveway or porch (in direct sun) and see how long it takes to melt totally!  While you’re doing that, play with other ice cubes!!  Use them to draw on the concrete.  It’s fun to first start the project inside, the day before – you can get super fun silicone molds at Dollar Tree, Walmart, or Hobby Lobby, and make your ice cubes be all sorts of fun shapes!  OR you can use a regular ice mold and put little items in the water – like tiny toy dinosaurs, buttons, or brightly colored pony beads.  As the ice melts, the items become accessible!  It seems crazy, and super simple, but you’d be amazed by how much it entertains your kids!!  (And aren’t we all about keeping their minds busy on something OTHER than a screen this summer?!?!)

-Make ice cream in a bag – ok, honestly, it’s been a LONG time since I’ve tried this one, but it’s on our summer fun list this year, and I think I want to try it while Gray is at “Mamie and Pappy Camp” at my inlaw’s house this year because Becca is my kiddo who REALLY loves ice cream.  Then, if it works well, we’ll add it to our fun “to do” list for camping trips!  Here’s the recipe I plan to use.  If you try it, let me know how it turns out!!!!  We’ll be doing ours in a couple weeks.

-Old pennies project – this one we’re actually doing today – watch my Facebook page for pictures tomorrow!!  The first step is to sort through your kids’ piggy banks… which could be as easy or as challenging as you want to make it.  You can have them sort all the coins, talk about values, who is on the coins, what they did for our country, etc.  You could count all the money, and plan for what they’d like to purchase… perhaps plan a lemonade stand to make more money to reach their goal.  Ultimately, you want to get about 5-10 really old, dirty pennies out of the piggy bank… so what you do to get to that point is up to you and the age/interest of your kiddos.  Then, in several small cups or bowls, you’re going to add a few different types of liquid.  Be sure to label each cup or bowl!!  Here are some liquids to try: lemon juice, vinegar, water, soapy water, Coke, apple juice, ETC – get creative!  If your kids are old enough, have them write predictions for each type of liquid and what it will do to the pennies.  Or, just discuss it!  Drop a couple pennies into each type of liquid.  Leave them on the counter, and come back around 24 hours later.  Record any/all changes (or talk about it).  If you want to extend it another day to see if there are more changes, draw it out as long as you’d like!  For your older kids, this is a great opportunity to talk about acidic liquids and what they do inside your body, too!

-Lemon juice and baking soda balloon project – ok, I’ve seen this one done a couple of different ways, but basically, it works best if you recycle a water bottle (or perhaps, the Coke bottle you used from the experiment above?).  Put some lemon juice in the bottle, and then add some baking soda and quickly place the mouth of a balloon all the way around the mouth of the bottle.  Watch the balloon expand, and talk about the gas reaction between the acid and base.  It’s also a good opportunity to talk about how important it is to talk about your feelings – if we hold things in and let them bother us, we can eventually blow up like a balloon, ready to pop… but if we talk through our feelings, or draw or write about them in a journal, it helps us get the pressure out so that it doesn’t  build up and make us explode!

-Egg and vinegar experiment – I posted on my Facebook page about this experiment here – go check it out for photos and more ideas that were shared in the comments!  This is a super fun and easy one to do.

-Identify cloud shapes – this is a great one to do outside on a cloudy day – you can lay on beach towels and just look at the sky – OR, you can even do it in the car on a road trip, or just randomly encourage your kids to do this around town as you run errands!  Check out this seahorse we found while on our trip to Palo Duro Canyon!

seahorsecloud


-Collect wildflowers to press… it’s just that simple!  Press in a heavy book and check on them a few days later!  They can be awesome kept in layers of contact paper as bookmarks, too! 🙂

-Build a popsicle stick bird house (or bird feeder) – this is a fabulous pattern/design shared here… and we plan to make these later on this summer to hang up at our new house!!

-Celery Coloring – we also started this one today, so be sure to check out my Facebook page tomorrow for photos of this project and tips/ideas!

-Blowing distance experiment – this one is super fun, and easy!  You’ll need some painter’s tape to tape on your hard floor (tile, linoleum, wood, or concrete) and a measuring tape.  You’ll also need several random items, like a small ball, a little toy car, some Legos on wheels, a paper cup laid on it’s side, etc.   You’ll also want a marker or pen to write on the tape.  Have your kiddos make a large L shape on the floor with painters tape, and make measurement marks on the long side – up to 12″ (or further, if they think they can blow the objects that far!)  Then, they’ll lay down on the floor on their tummies, and start each object at the short tape line.  They’ll blow as hard as they can to get the object to roll.  You might want to mark where it stops with a sticky note flag.  See which child and which object can roll the farthest.  This one is GREAT for a rainy day when they are going stir crazy and need something DIFFERENT to get them busy… laying on their tummies and blowing uses different muscles than they use in regular activity, too!

-Evaporation project outside – this one is great for older kids on a week when you know it’s going to just be hot and sunny all week long.  On day one, record the temperature at your start time (whenever that may be).  Carefully measure one cup of water into a clear container.  (A plastic cup that you can mark on with a sharpie is the best!)  Be sure to mark where the top of the water is before you set it in the sun.  Then, check on it every couple of hours to watch the water disappear!  For your older kids who are recording in a journal, they can measure how many in/cm change occurs.  They can try the next day setting it out at a different time to see if it evaporates faster/slower at different times of the day.  OR, they could also try evaporating different types of liquid!  Does apple juice, for example, evaporate as quickly as water?  For this, be sure you have your cups exposed to the sun exactly the same amount of time, and are setting next to each other so they for sure receive the same amount of sun.

-Outdoor Scavenger Hunt – you can search for different shapes, colors, or even things that start with the letters of your name!  I’m working on creating some outdoor scavenger hunt sheets, that should be on my Teachers Pay Teachers page next week!  Be sure to look for those – I’ll have one freebie, and the whole set will be $2.00, and will cover a variety of themes and interests!

-Target practice with sidewalk chalk and sponges – this is a super fun one… just draw a target on your driveway or porch, and have a bucket of water and sponges… practice throwing the sponges from different distances to see if you can hit the target!  For extra math practice, include numbers for points for each ring, and have your kiddos add up their points with each throw!

-Build an obstacle course and complete it!  This one can be great for ALL ages – even toddlers can get involved in this one… and you can do them indoors or outdoors, getting as creative as you want.  Use recycled materials, furniture, blankets, lawn decor, etc – depending on where you are doing it and how messy you want to get.  Perhaps even have your kiddos work together to create a trophy for the one who can complete the obstacle course in the fastest time!  Get together the neighbors, cousins, or just compete within your household!  Who can win?  It IS important for kids to work hard on something, and not win the trophy.  This is a great way for them to have a lot of fun setting it up, use some math with running a stopwatch, use some art to create the trophy, and then there’s only ONE winner.  Celebrate that person, and then everybody gets to enjoy popsicles as a reward for their hard work and dedication!


BONUS ACTIVITY…. SOLAR OVEN SMORES!

solar oven amores

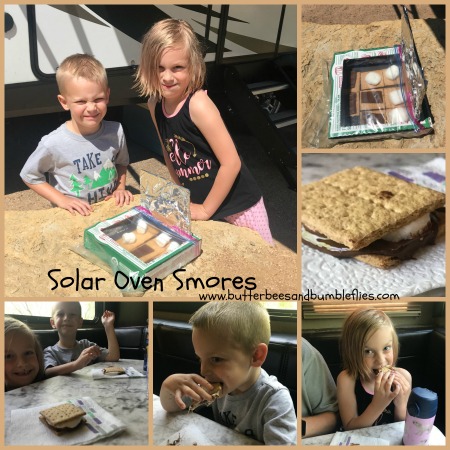
I found this AMAZING camping activity packet before we went on our trip, and it has some AWESOME Solar Oven Smores info in it!  I don’t want to steal Cristina’s thunder, or her ideas, so I’m going to just highly encourage you to purchase her packet (and check out her blog here).  I know $6.00 seems a bit high, but she has put a TON of work into this packet, and there’s some really cute stuff in there.  My kids have LOVED her book, “If you give a Moose a Marshmallow” that is interactive and included in the file.  Your kids will love it, too, even if you aren’t camping at all this summer!  You could camp in your very own living room with sleeping bags and turn on a sound reel of crickets chirping, make Solar Oven Smores, and just pretend you are camping, while enjoying your A/C and your own bathroom just steps away!  🙂  NOTE: We made our Solar Oven Smores for lunch time – we set it up at 11:40am, and by 1:15pm, they were ready to eat!  We did modify her solar oven plan a tad b/c I didn’t have any tape or glue in the rv, and I didn’t have clear wrap, so we used a ziploc bag in place of the clear wrap, and a couple bandaids instead of tape!  (Hey, you use what you’ve got, right?  Lol!)

Want more ideas?  I’m posting on my Facebook page a lot, plus, I’ll have the Summer Survival – Art Projects edition coming SOON!!

Busy Bees

Y’all, it’s been a LONG time since I’ve written.  Because, well, life.  I think I probably have started the last umpteen posts that way, if I’d go back and read them.  But seriously, life.  Three busy kids and assistant teaching two days a week has a way of keeping me busy.  We’re getting set to start building our new house, and finally getting settled into the rhythm of life living in our rent house.  This week is our Spring Break, and I must admit that yesterday threw me for a loop.  I had one fun outing planned for each day this week, but that was it.  I mean, that was IT.  I had nothing else planned.  I didn’t really think about the weather forecast for rain several of our days off, or what that would do to all of our spirits.  So they had done pretty much everything I had thought of for them to do including our outing for the day, and it was only 2pm.  Seriously.  I had pulled out worksheets, given them a craft project to make a Leprechaun trap from recycled materials, everything I could think of… I thought I might lose my mind if they kept asking me for more activities!  Yesterday was ROUGH, y’all.  Because I really don’t want to turn the tv on or let them have their kindles for the whole day… but they did end up with about three hours of screen time.  (Which I’m not proud of, but honestly admitting!)

So this morning I decided to get smart.  I pulled up my Pinterest boards and went through my sensory activity pins.  And I was reminded of all the cool, fun things I used to do before I was too busy to make stuff for my kids.  Or maybe lately I’m just too busy to care… hmm.  Need some self reflection there.  I determined we’d see what we had at home already, and then would grab a few things at Walmart to make our week a little more exciting.  So I’m combining here some things we pulled out and did yesterday, some things we’re doing today, and then some links to some activities we’ll be doing later in the week.

Hopefully these ideas will keep your kiddos busy bees this spring – through rainy days, holidays, and any other “I’m BORED!” moments!  (Although I did hear a great idea recently from an older, more experienced mom – she said if her kids ever say, “I’m BORED!” she gives them a rag and has them clean the baseboards.  BRILLIANT!!! I plan to do that later in the week… maybe we’ll get some spring cleaning done around here, too!)

Activity Ideas

Processed with MOLDIV
I wish I remembered where I originally saw this idea.  This one came back to me when I started going through my supply box looking for liquid starch, and there I saw the yellow colander.  This time around, I have two kiddos doing the activity, though, so I got out my good one too.  You can get an inexpensive colander at Dollar Tree or Walmart.  I love that yellow one because it’s fun for art too – you can trace around it to make a huge flower!  lol.  It’s as simple as the picture looks – give your child the colander and a bunch of pipe cleaners, and just see what they do!  You’ll be amazed at what they come up with, and the fine motor practice is phenomenal.
Processed with MOLDIV
This one came straight from Crystal Underwood over at Growing A Jeweled Rose.  I already had the pipettes – I ordered a big pack of them a long time ago off of Amazon.  I’m no longer an affiliate with them, but here’s the link just to be helpful!  They had a blast, and it kept them occupied for quite a while!  (I presented them with 6 bowls of colored water (the colors of the rainbow) and then they each got a bowl of vegetable oil – for more info, check out her blog!)
Processed with MOLDIV
I’m all about rice sensory tubs – my kids LOVE them.  They both absolutely love the feel of the rice between their fingers, and they beg for rice tubs frequently.  I had a pink, red, and white rice mix set up for Valentine’s Day, so for this one, I just scooped out most of that mix, pulled out the Valentine’s add-ins that were in the tub, and dumped in some older bags I had already mixed of blue, green, and white, and then I colored a little orange and purple just to add more spring color.  Then I hid foam letters that spell Happy, Easter, Becca, Grayson, and Elle.  I made sure to write the words on a card and attach to the box since Gray doesn’t know how to spell.  I also took some old foam egg and bunny stickers I got a couple years ago (also in that supply box with the colander…), peeled the backs off, and stuck them together.  Then I hid the eggs and bunnies and the letters to make a fun treasure hunt of sorts!

More Activity Links To Check Out!

Here are some more links to things we’ll be doing later in the week (I won’t promise a blog post because, well, life!)  And also, if you’re just looking for some fun time fillers, be sure to check out Doodle Art Alley – Samantha is an AMAZING artist and does some brilliant work.  She shares TONS of it for FREE on her website – all of it is there just ready for you to download and print!  I printed off a bunch of stuff today and not only did I color with the Bigs earlier, Becca and I enjoyed Cody joining us this evening after the Littles had gone to bed in coloring bookmarks!  We’ll take them and laminate them later this week and then she can use some, and share some with friends when she goes back to school!

Jell-O Scented Moldable Dough for Sensory Play from Sixty Second Parent

Rainbow Fruit Loop Sensory Bin from Love Play Learn

Liquid Starch Slime from Schooling Active Monkeys

Plus, here’s some stuff we’ve done in the past that is worth revisiting for St. Patrick’s Day!

St. Patrick’s Day Rainbow Activities

Rainbow Celery

Bell Pepper Shamrocks

We also picked up at Walmart a new super fun Paint by Sticker book – the kids love those!  If your kids haven’t tried them, I highly recommend them for fine motor and numeral recognition practice… and plus they are just downright fun!  Here’s one from Amazon (again, no longer an affiliate, just sharing for your benefit!) that we have and the kids love!

So between all of this and a ton of wonderful books, fun outings planned to a couple of parks, and a plan to hit up Dollar Tree for some window clings, some more stickers, and hopefully an easy crossword puzzle book for Becca… I think we’ll survive the rest of the week, and be better set up for some successfully fun weekends in the future, as well! 🙂

I’m Baaaack!!

So guess what, y’all? I’m back! Not long before I quit writing last year, we found out we were… SURPRISE!!!!… pregnant!  And then last fall, I got back into the classroom at a fabulous private preschool in San Antonio – teaching three days a week as an assistant to a simply amazing teacher who has become a great friend as well as coworker.  I absolutely LOVE teaching Pre-K, and look forward to getting back to teaching this summer for a few days of summer camp, and then to diving back in in the fall.  So anyway, on February 2nd, Mirielle (a French name that means miraculous, because, she really is, ya know?) was born… and the rest of her story is yet to be written!  I’m sure God has an amazing plan for her life!

Now, I’m starting a new adventure in my life – not only being a mom of THREE, but also I have now set a new path for my career! My master’s degree is in curriculum development, and I have long loved creating products for my own classroom, so I figured my maternity leave would be a great time to join the wonderful set of teachers on the fabulous website – Teachers Pay Teachers.

The very first free product I’m offering is a cute little book I’ve titled, “My Colors.”  It’s rainbow inspired for the spring, and was created specifically with Gray in mind, because he really wants to learn how to read, and since he knows his rainbow colors, I thought a simple little reader might help him pick up the color words as sight words.  Instead of merely creating a book on plain paper, we did a super fun art project to tie it all together, and then because Sis wanted to get involved, she colored her own copy of the book for me to use to show y’all as a sample!

Here’s the link to get your free download of the book.  Directions on how to put it together can be found below.

And here’s how we did the art!  Y’all, it’s so simple, it’s like falling off of a log!  I put some rainbow paint colors in an old egg carton, and made stampers from folded paper towels and clothes pins.  First, I had Gray do the craft part – the specific stamping of the colors in order – one purple spot in the middle, surrounded by blue, green, yellow, orange, and red.  I showed him on my plate how to do it, first.  Then, I let him loose and let him just create art!  He used the sponges, his hands, and even asked for a paint brush!  I love that he was exploring with the textures, and we talked about how each material he used made different marks on the plates.  We had such great discussions, and he was happily occupied for a good 45 minutes!  (Total mom score!!  Right??)  (Sidenote – did you notice how I called this activity both a craft AND art?  Check out my post here about the difference between process art and crafts...)

rainbow plates

We’ll be using the other plates he painted as book covers, too… be sure to check my Teachers Pay Teachers page soon for more free downloads, and for other fun book ideas using the covers we made!

How to Assemble Your Books:
To put any of these books together, you’ll want to first make sure your plate is thoroughly  dry, then fold it in half, and cut.  If you’ve done the rainbow circle, it magically becomes a rainbow!  You can simply add a cloud and it becomes much like this craft from Fantastic Fun and Learning.  Or, keep going and turn it into a book cover!  Take your colored “My Colors” book, and cut it in half.  Then, placing the bottom left corner of the book pages in line with the bottom left corner of your rainbow plate, cut around the top to make the arch.  Make sure the pages are all in rainbow color order, and then staple in the bottom left corner.  Use a sharpie to write your title and name, and then enjoy reading your book over and over!

book assembly

Thank you for checking out this post!  If it’s your first time to visit, welcome!  I share lots more on Facebook, so be sure to click on over and “like” my page.  I’d also love for you to follow my Teachers Pay Teachers page – as I’ll be adding lots of files in the coming weeks and months!  I love teaching preschool, and I love that now I get to share with y’all the fun things I’m creating!  I’ll also be throwing a few older kid downloads out there as well, when I make little things for Sis!  So you won’t want to miss anything – I won’t always do a blog post for every file.  If you have something you’d love to see me create, or a topic you’d love to see covered here on the blog, please be sure and let me know!  Just shoot me an email any time – I’d love to hear from you! 

St. Patrick’s Day Rainbow Activities

Well, so if you’re homeschooling, you may not officially have a Spring Break… or if you are public/private schooling, you may have kids who are constantly wanting SOMETHING to keep them busy!  Either way, I’ve got two fun activities for you that kids of all ages could enjoy this week as we prepare for St. Patrick’s Day.

First, if you’ve got kids under age 7, who are working on spelling, reading, or even just recognizing their color words, this super fun and easy craft stick rainbow activity is for you!  I wrote for my kids, but for older kids you could easily practice spelling and handwriting in a small space by having them write the color words on the sticks.  (Or older siblings can write for the younger ones!)

I simply had my kids squeeze glue (working on those fine motor skills!) onto the back of a thick paper plate (to provide a nice solid backing).  Then, lay the labeled craft sticks in order of the rainbow.  (I purchased colored craft sticks at Walmart, but you could also have them color or paint plain sticks.)  Then stretch your cotton balls and glue on top.  Once it is totally dry, you can cut off the excess plate and display your beautiful rainbow!

I wish I could take total credit for this next idea, but I can’t.  I saw on Pinterest somewhere a cute rainbow handprint painted sign… and then I downloaded this FREE set from Teachers Pay Teachers that was created by Lindsey from The Teacher Wife.  The two activities melded together well.

The thing I love about her free printable activity is that it’s very flexible for kids of all ages and stages.  To make my pots, I simply cut black construction paper out around Lindsey’s pot template and then cut out the coins from her template from yellow construction paper.  Becca decided she would draw her picture first, and then tell me what to write about it.  She is the one who picked that it would be a friend theme – the actual writing template says “Who is worth more to you than gold?”  She decided that Gray’s should have his friends, too, so I used the blank pieces from the set and just printed out pictures of him with his friends since he wasn’t interested in drawing them on the paper.  I just asked him who he wanted me to include and he told me.

There are multiple other template options in the set that would work for a variety of different ages.  In fact, the two blank pot pieces I used for Gray’s pictures could also easily be used in comic strip fashion and made into a pot of gold comic book by your older artists who are really dying for an engaging project this week.  I would love to see how you modify this to make it your own!

The rainbow painting was simple – I just pulled out paint, painted each child’s hand for each color, and used legal length paper to fit the most handprints together on one page.

**Note – baby wipes work great to get paint off between each color, and then you can do in-depth soap and water cleaning when you’re all done.  I prefer to use acrylic paints because they dry quickly, but they are prone to staining clothing, so if you prefer, use a washable finger paint or add dish soap to tempera paint before using.