Where has the summer gone? Today was the last day for me to spend with all three kids before camps and going back to work invade… and school starts just around the corner! So, I wanted to share our favorite art project from the summer!
Back in May, I read this post by one of my favorite bloggers, Sarah, from Little Bins for Little Hands. Right around the same time, my partners over at Clear Path Paper came out with their Mixed Packs of bond paper! Their bond weight paper is PERFECT for kiddos cutting to create art- because sometimes cardstock is just labor intensive for little hands.
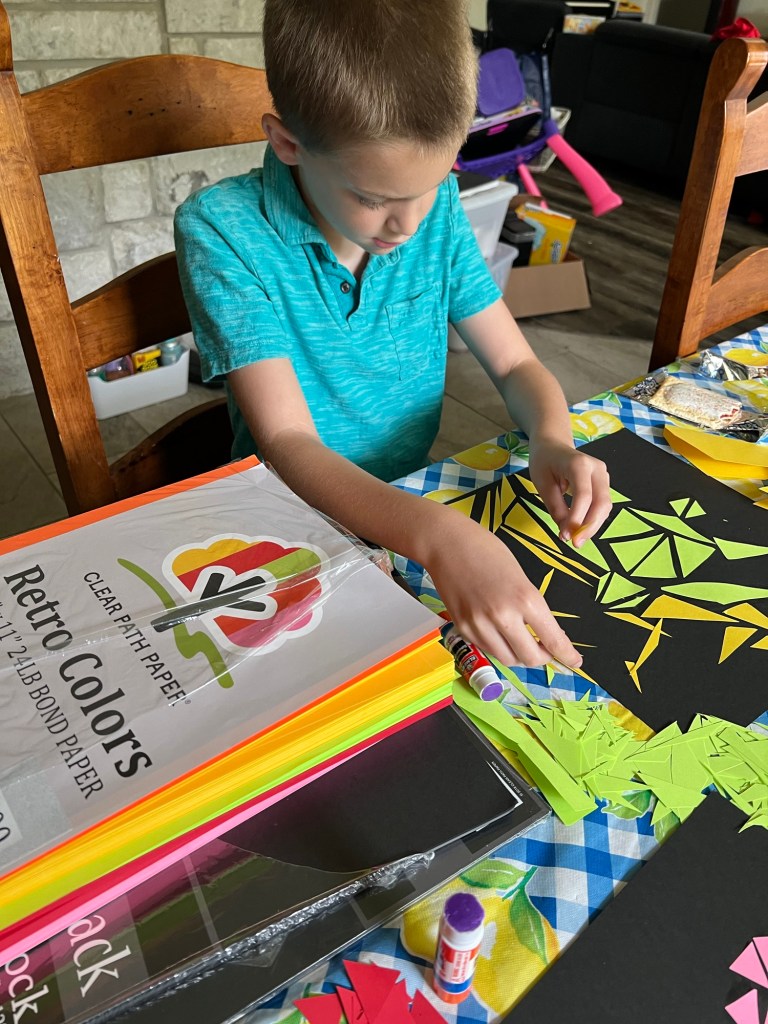
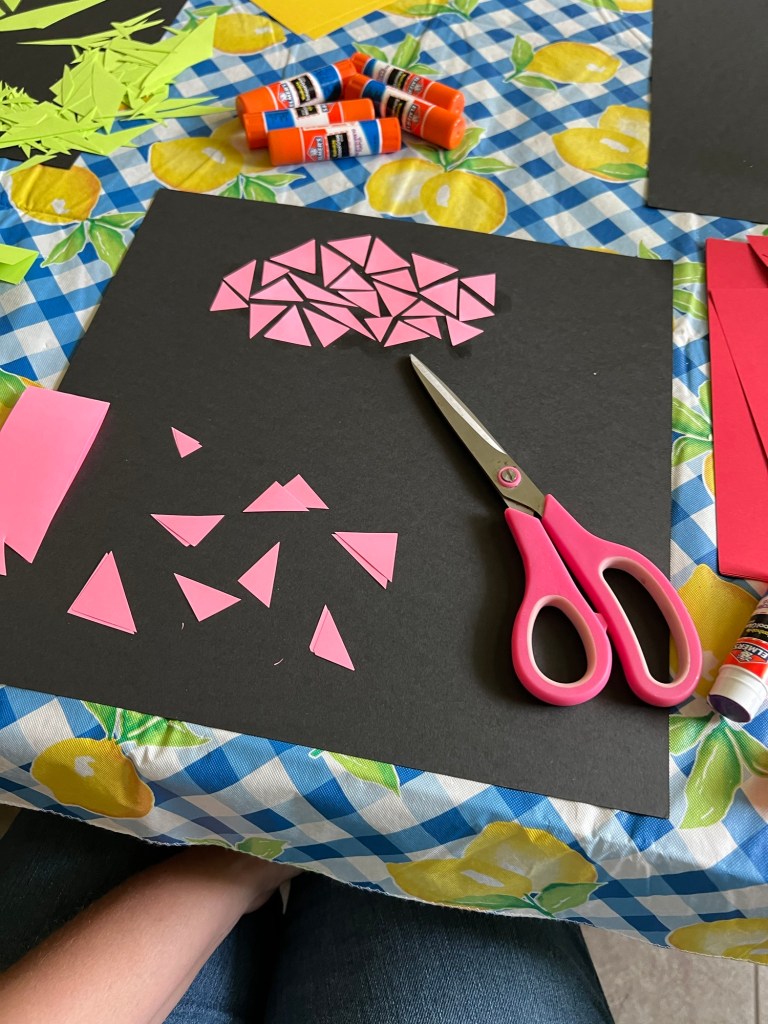
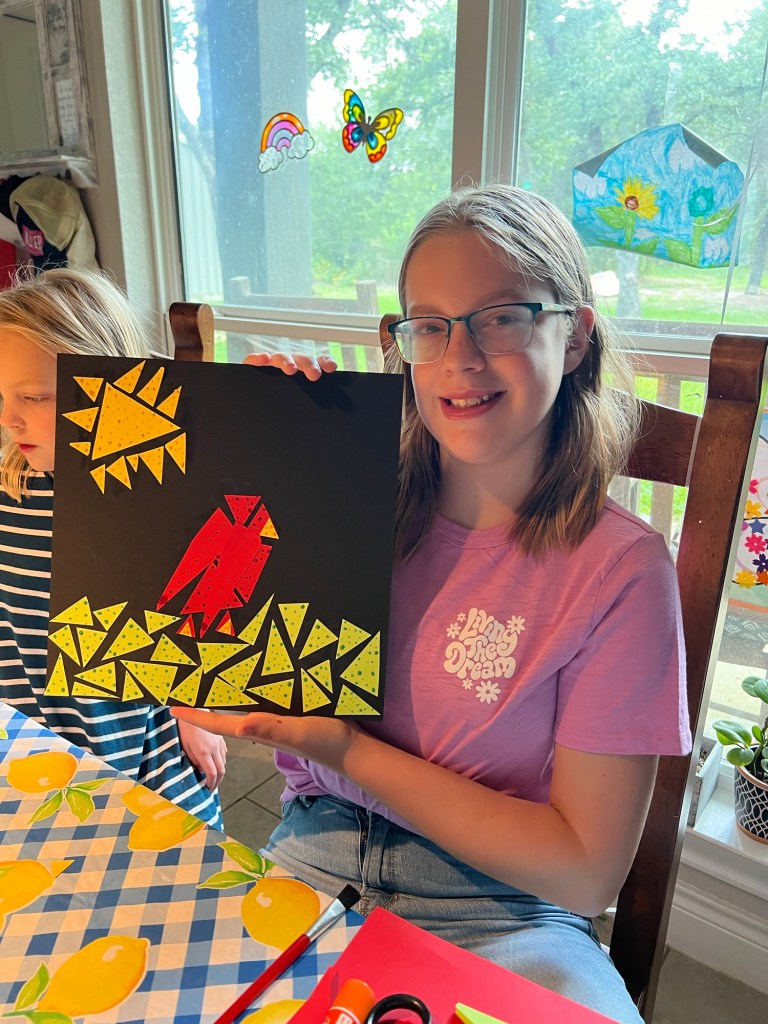
So, I got with Andrew and told him my idea… and once again, Clear Path came thru and made it happen! Their black cardstock is perfect to attach to, and the Retro Colors Mixed Pack just screams summer! My kiddos loved researching Yayoi Kusama, and had never encountered her particular style of art. We just kept enjoying more and more images from our Google search! I set the Retro Colors pack in front of the kids and told them to “think summer and triangles with polka dots.”
We first grabbed paper and started cutting triangles of all sizes. Both the older kids immediately had a picture in their head that they wanted to make. Elle didn’t really understand the concept, but she had fun cutting and gluing paper. (So I recommed this project for 4th grade and up!) The older two really took the idea and ran with their own concepts, but we didn’t tell each other what we were trying to make… and the three of us enjoyed guessing where the others were going with our art!
After our glue had fully dried, we went back and painted the polka dots by using the back side of paint brushes of various sizes, and a wide variety of paints we had in the art closet. They then enjoyed hanging them on our ever-changing art wall in their bedroom hallway, so they can enjoy seeing them for a few months til we hang up new art!
Becca loves the Cardinals that live in our backyard each summerThe pink in the retro pack made me think of cotton candy at a summer festivalGrayson’s sea turtle mama is going onto the beach to lay her eggs! The kids’ hallway is the perfect place to display their art!
We had so much fun with it, that we want to use the same pack of paper to make FALL inspired scenes over Labor Day weekend! Becca already has ideas for a basket full of apples, and hay bales!
Want to make your own art with your kids or students? Be sure to shop Clear Path Paper for all of your paper projects!!! And if you need help finding a specific paper for a project, let me know and I can help you find the perfect Clear Path Paper for your project!
You may have heard of selecting a single word to focus your year, and it’s often a great practice either for the beginning of the calendar year, the beginning of the school year, or even on your birthday, to set the focus. Kids need this positivity now more than ever. Especially as they get into upper elementary school- when grades start mattering, tests get more complicated, chores pile on at home, and friendships can get complex. The drama builds with every step closer to puberty. So I sat down last December with one of our school counselors to talk about what we could do to shift their focus from the up coming STAAR testing season (our Texas State achievement tests) to something POSITIVE, and in the form of some digital art work that we could do in my technology classroom.
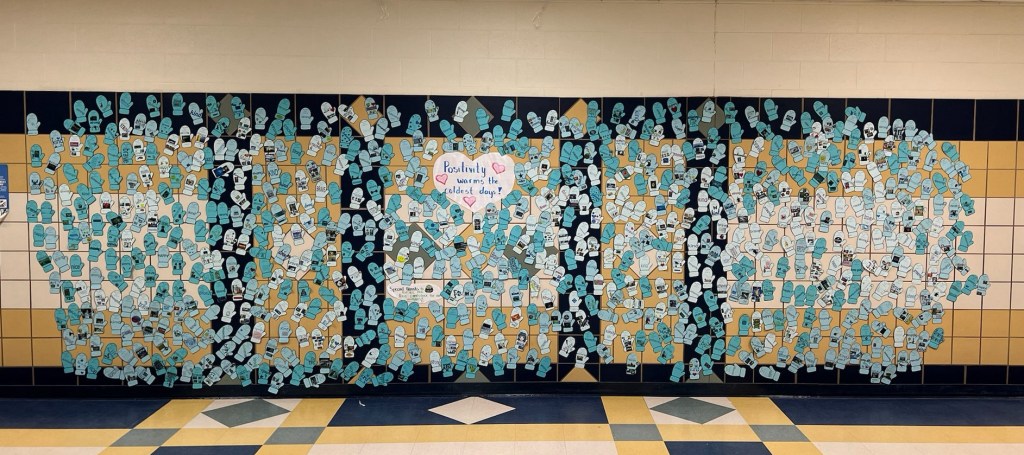
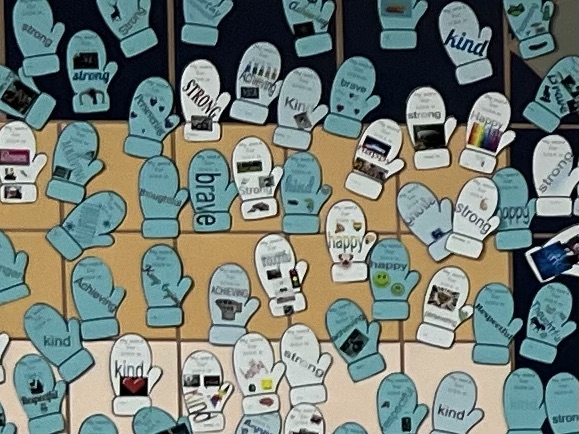
ALL of the completed mittens!
It’s important for kids to learn Google Slides (similar to PowerPoint) skills in a FUN way, and with lots of trial and error… so I wanted to do a digital artwork project that would allow them to play with WordArt, fonts, colors, inserting images, rotation, resizing, and so many more skills. Our counselor loved the idea of a positive word focus, and we decided on a mitten shape, and a set of 8 words they could chose from.
Then I contacted Andrew, my partner over at Clear Path Paper. There was only one way we’d be able to do the project up right, where we could display the mittens in the main hallway. They’d have to be on high quality cardstock, so that kids brushing up against them wouldn’t just rip them. And Andrew not only loved the project, he DONATED all of the paper we needed. Once again, Clear Path Paper showed how they care about teachers and their projects! We decided to do similar shades of light blues, but with a different shade for each of the three grade levels at our school. So he sent over enough 100lb Baby Blue, Light Cadet Blue, and Teal Blue to print two mittens per sheet for 700+ students!!!
Not only were the students intruiged by the project, MANY of them mentioned being surprised that a company would care enough about them and their art work to simply GIVE them paper. So it worked not only to get them in a positive mindset, but also to help them feel like they AND their art/artistic expressions really ARE important. ❤️ Talk about a blessing in so many ways!!
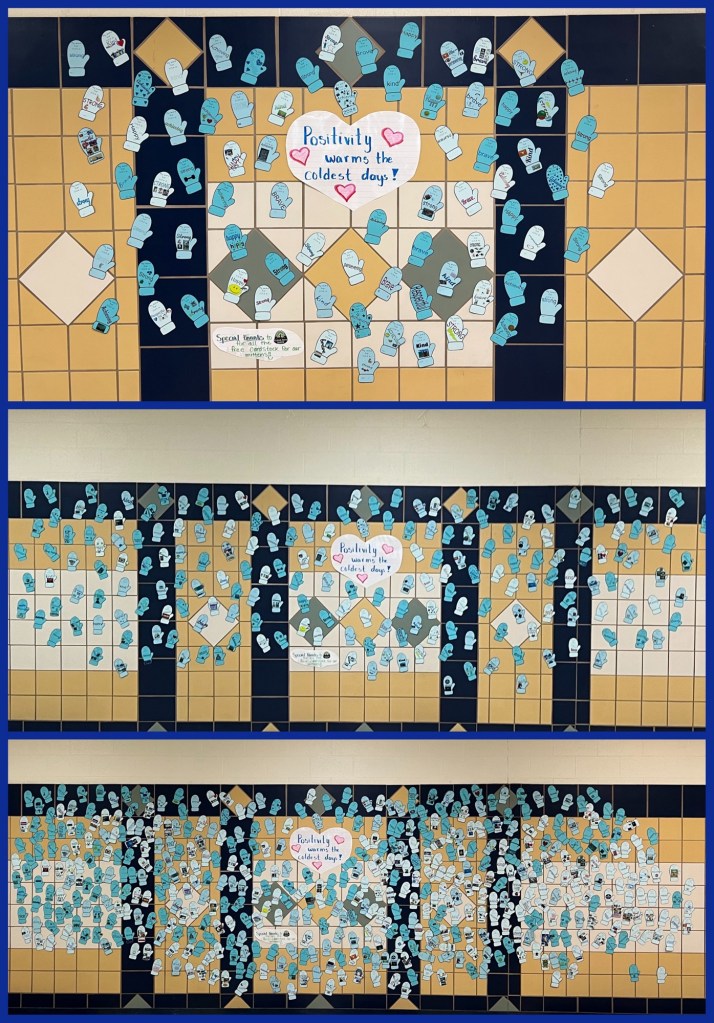
Zoom in of a few sections of the wall
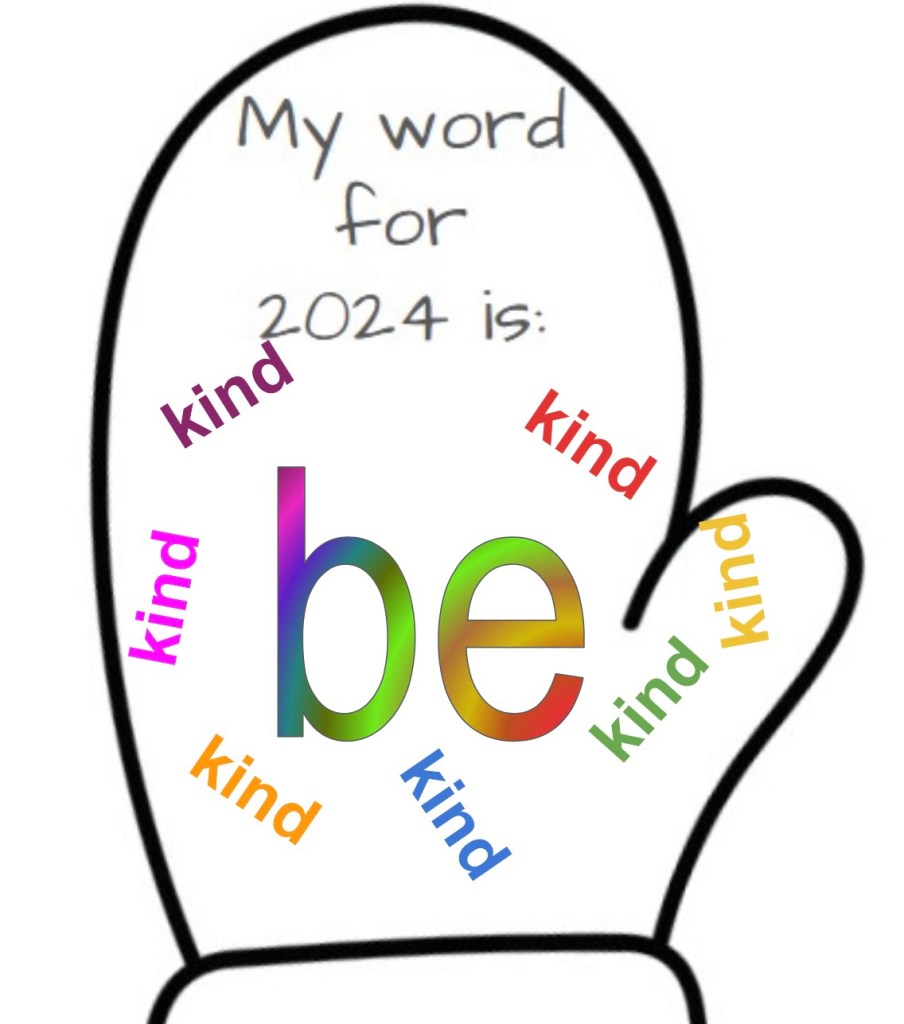
I set up the project in Google Slides, and assigned thru Google Classroom. Because many of my third graders are new to editing in Slides, I set the mitten pattern (with the words “My word for 2024 is:”) as the background of the slide, so it wouldn’t be easy to accidentally delete it. The kids loved learning how to create WordArt colorful fills, and some decided to add clipart or photos that went along with their word, while others just did a theme they like- like dinosaurs, cats, race cars, or their favorite college sports teams. The beauty in each mitten is the individuality, and seeing that while they each selected from a list of the same eight words, there are individual creative touches making each mitten unique, just like it’s designer.
A few random screen shots of designs before printing
The project took longer than I anticipated on the administrative end, and if you decide to do a project like this for your entire school, I have a few tips to suggest:
1) Create a separate Google Classroom for each day of your electives rotation, making it easier to locate with classes and students’ work you’ve printed.
2) Due to privacy laws, we can’t have student work posted in the main hallway with last names or major identifying features. SO! I assigned each classroom teacher a number, and had students put that number next to their first name on their mitten, so that when they come down off the wall in a few weeks, I can get them back to them to take home. With over 700 students, we have LOTS of repeat names… and I’m not going to hunt down the 5 Grayson’s and see whose is whose! (Using that example, b/c that’s my son’s name.)
Here’s a class number example
3) As you print the mittens when they are turned in on Google Classroom, mark off a classlist for each class so that it’s easy to go back and see who you’re missing, who needs to be printed, etc.
4) Make sure you have really good sharp scissors! 100lb cardstock is fabulous for this project, but if you’re cutting a shape, you need to make use of your time and cut at least two at a time, so make sure those scissors are sharp! Better yet, cut into rectangles on your paper cutter to save your handwork!!!
Pre-cutting, when I had only sliced the sheets in 1/2
5) Get a club or class of kids to help you hang them up! It’s very time consuming to put them all on the wall… but it’s so worth it, and getting kids to help hang them adds even more ownership of the project! This might be a fabulous project for your Student Council or other service group!
Seeing the wall get fuller and fuller of mittens over the course of a few weeks was so fun!
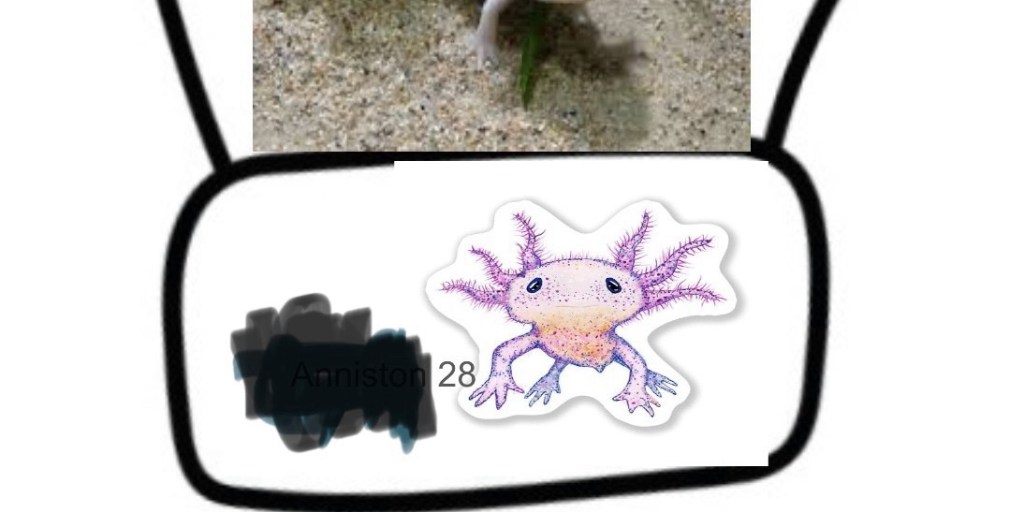
6) Differentiation is possibly the most difficult task that teachers face today. We have a select group of students with more extensive need than can be met in the General Education classrooms – both medical and intellectual disabilities – but I wanted them to still be able to participate!! I set up a Google Slide set where I already had each child’s name on their mitten, and had four of the eight words typed into WordArt off to the side, just ready for color to be added. I also selected 20 random cute cliparts that I put on the other side of the slide for them to pick from. I called them to my computer while they were in the lab, and let each of them pick their favorite word, tell me 3-5 colors they like, select a linear or radial color pattern, and then pick all the clipart they liked. Each one really enjoyed not only getting to design their mitten, but find them in the hallway once they were hung up! It’s not always super easy to find ways to include everyone, but it’s always worth it to make them feel just as important as everyone else. ❤️
A few of the mittens our ALE students designed with my help
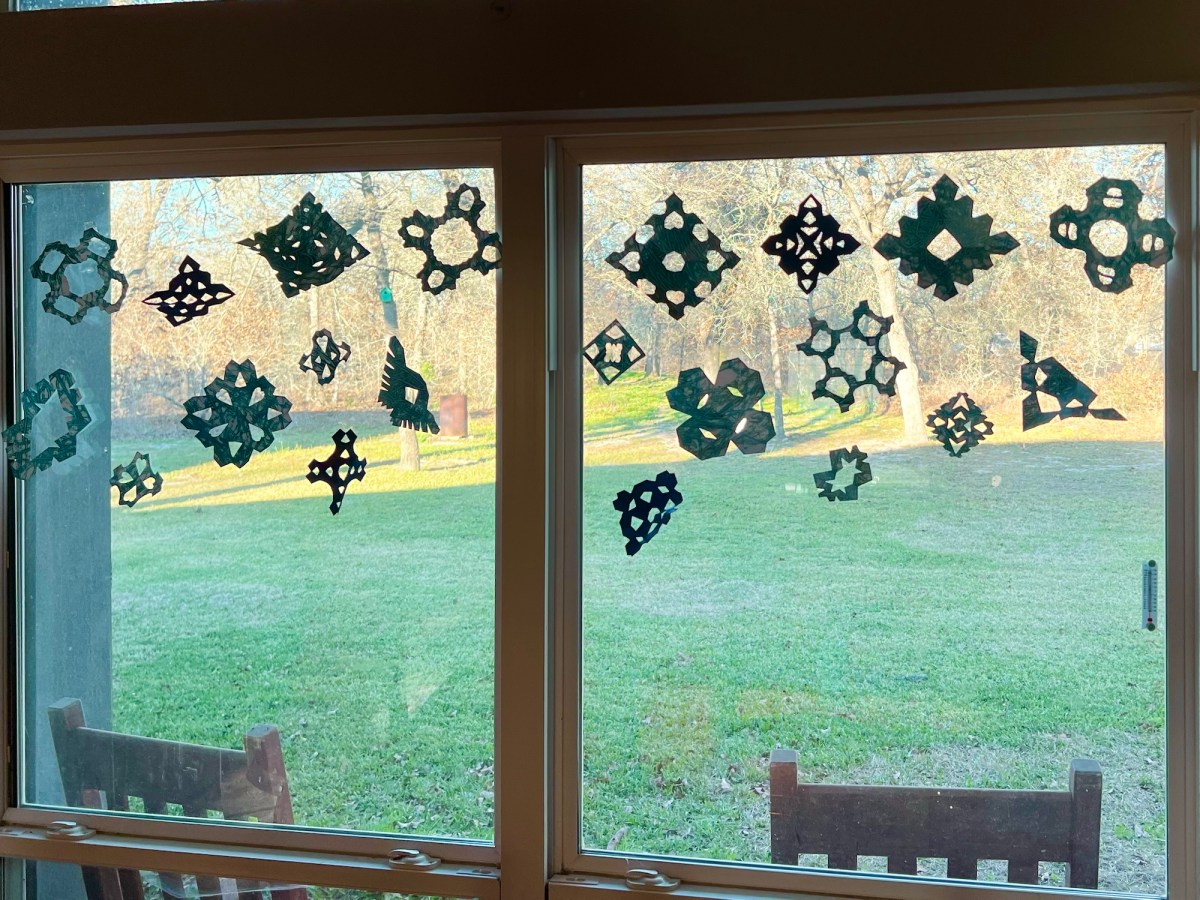
Living in the middle of an almost perpetual summer, we have to get a little creative sometimes to make January actually feel like winter! So while the weather was nice and cool one day (in the low 70s), we got outside to do some marble painting, enjoyed cutting snowflakes from them once it was dry, and now our dining room windows give the appearance of winter… as long as you don’t look out and see all the green grass behind them! HA!
So here’s how we did it…
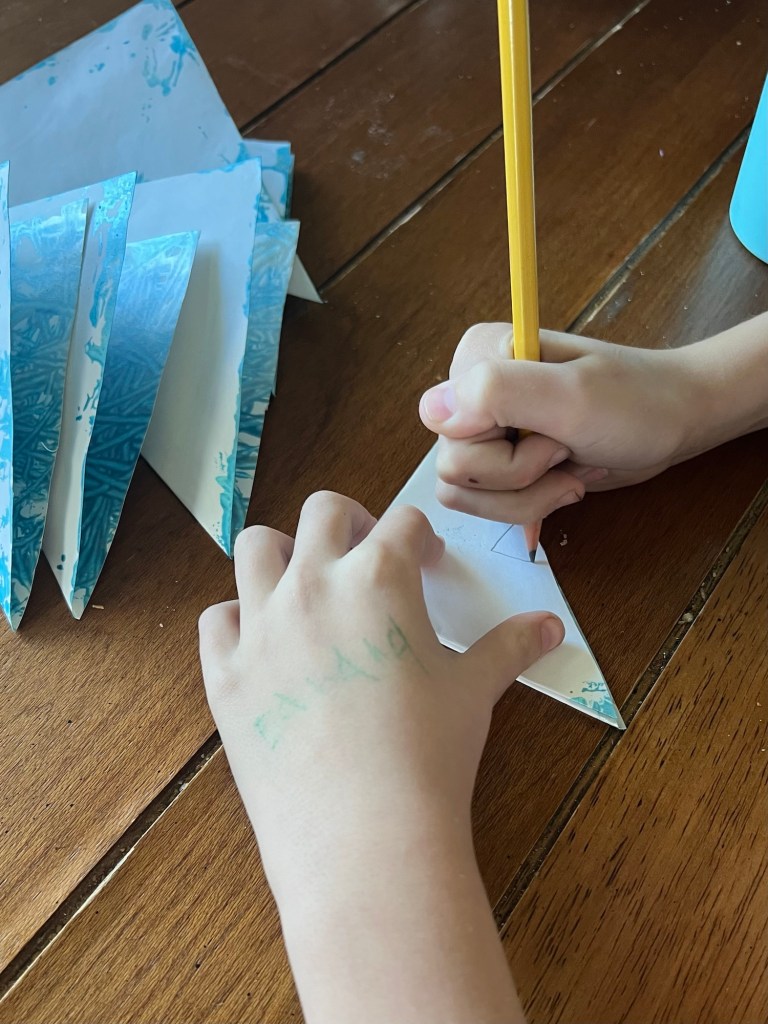
First off, you know how much I love sharing with you about my partners over at Clear Path Paper. They have so many fabulous products that are perfect for projects of all types. Their 100lb white cover stock is PERFECT for painting – heavy enough to stand up to a LOT of liquid. (It does make cutting for super small hands a bit challenging when folded over several times, though, so I DID cut the snowflakes shapes for my youngest, who is almost 6, where my 9 year old had no problems on his own.)
You’ll need: Clear Path White 100lb Cover, cut in half Aluminum cake or casserole pan Marbles Gray/Blue Paint (we used a washable metallic tempra paint, which has a nice shimmer to it)
Just put a dot of paint on the side of the pan in each color, drop the marbles in, and roll away! Both of my two younger kiddos loved this project, which kept them busy for quite some time while big sis was off at a school extracurricular. My boy loved making this slow-mo video for y’all to see how you can even make curved lines in the paint! Just gotta go slow and steady, and all kinds of fun patterns are possible.
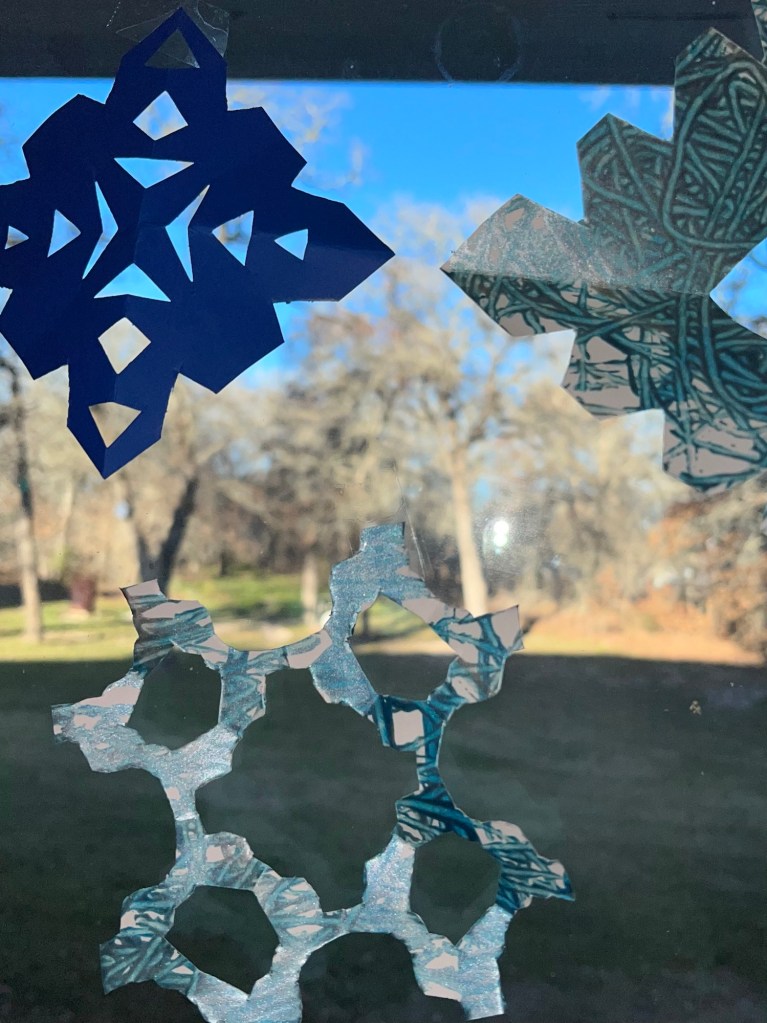
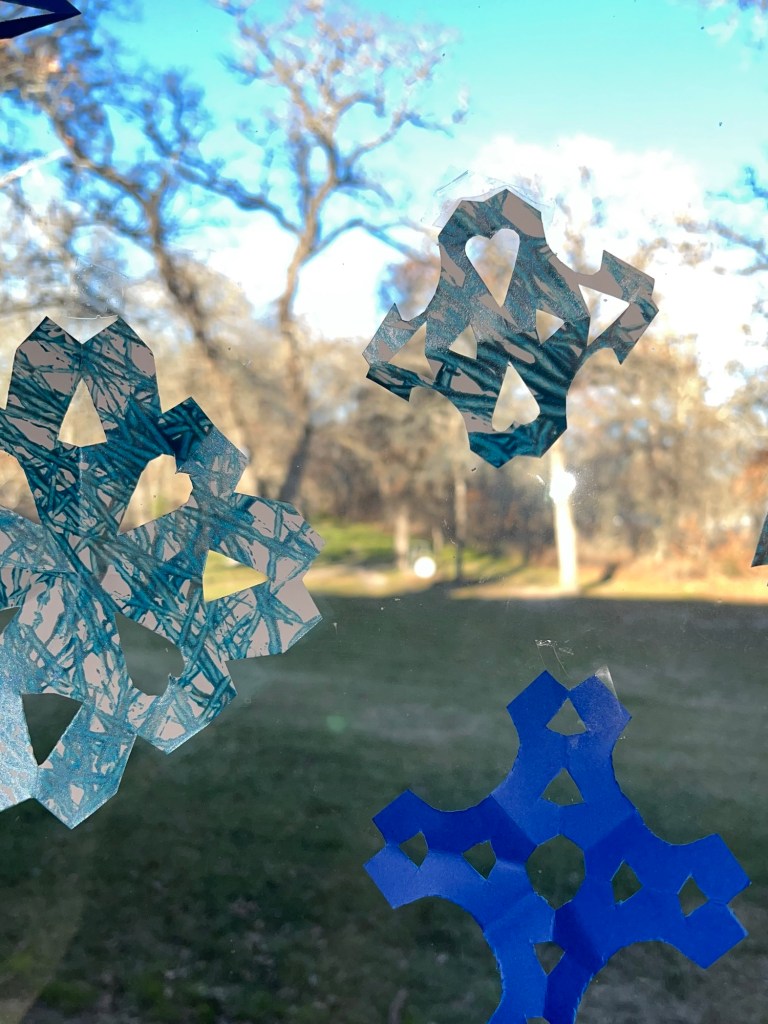
Once the paper is dry, the most basic way to do a snowflake is to fold the paper into a square, cut off the extra, and fold it into quarters. For my little one, she drew where she wanted me to cut, where my middle drew his designs and cut his own snowflake shapes easily. He even cut some squares in half to just play with what he could cut. They don’t look like snowflakes, but they were still fun and we hung them up as “abstract snowflakes” to add a little fun to the window.
Clear Path Paper is now also offering 4×4 (and 4×6) 65lb card stock, which is really cool for smaller projects! I used their royal blue 4×4 65lb to cut some solid blue snowflakes to mix in with their painted ones, and loved how easy it is to fold and cut… it’ll be perfect for my middle man to use for origami, to, because he gets frustrated with thin paper that rips if he gets rough with it, and he loves making TINY things, vs the sizes that regular origami paper usually makes.
Here’s how the windows look… getting us ready mentally to finally have some cold weather coming up early this next week! It actually got down to 30 last night! Whats up with THAT? We don’t know what this thing called cold is! It’s been a couple years since it actually snowed at all here… the kids are hopeful that maybe since we made snowflakes to hang up, maybe just maybe it will actually snow! Time will tell, ha!
It’s hard in the midst of the busyness of the Christmas season to keep the focus where it should be… So might I make a suggestion? You’re already going to be doing craft projects and activities… what if you just tweaked them a bit to make sure that your focus is on Christ? Don’t worry – I’m not suggesting you invent the wheel here! Nope, Alicia Michelle of Your Vibrant Family has already done it for you! (And no, it’s not too late to get it TODAY!)
When I found out about her Christmas system, I was excited to be a reviewer! (Full discloser – I received the set in exchange for my review – these opinions shared here are my own, and links to purchase the set are affiliate links that financially benefit our family – THANK YOU!) But once we started using the system, I started to love it even more! I read through her ideas, and something she said really hit me. I mean, I had head knowledge, but there was something about reading it… this is what she said:
And suddenly, reading this, I realized that it was ok to not cram pack every single day with activity. It was even ok to not do our annual Christmas cookie exchange this year… and instead use the funds to purchase some special craft activities that we could do together as a family, and sponsor an angel from our church’s angel tree.
Becca and I painted these wooden letters and as we did, we talked about why we chose “Joy” as her middle name, and also talked about that JOY can stand for putting Jesus first, then Others, then Yourself. It was a really fun time painting together, and a great, deep conversation!
Having this mindset and focusing on the true meaning of Christmas has helped my attitude toward the season so much! It’s amazing. I mean, it seems so simple. Because it is.
How we used the banner pieces:
Gray is 2 1/2 and LOVES to stick stickers! It’s a fabulous way for him to work on hand-eye coordination and build his fine motor skills, so I’m always looking for more sticker opportunities for him. He decorated the “Light of the World” banner piece with sparkly star stickers, and we talked about the star that shone over the stable where baby Jesus was born. We also talked about that Jesus can be called the “Light of the World.” Did he get it? I wasn’t sure. But the other night he made the connection when he made a star ornament at our church carnival and he said “It’s Jesus’ star over the manger! Is the ‘Light of the world!'” He also used stickers to decorate the “Merry Christmas” banner piece. He really enjoyed decorating – and when I got the banner hung up, he loved seeing his work on the wall!
Becca is working hard on her handwriting skills, but isn’t super fond of copywork. So – I thought it might be more fun if she could do her copywork onto banner pieces to be hung on the wall. She jumped on it and was so excited! She wrote Psalm 34:18 on the “Hope” banner piece, and on the “Joy” banner piece, she wrote “J is for Jesus” from the poem we read (also in the set!) about the meaning of the candy cane. Then she chose to draw a picture of Jesus on that banner piece as well.
I added a couple of family pictures to the other banner pieces to tie the focus to our specific family. Then, since we typically have a sign in the middle of our art display wall (I originally posted about this wall here), I used Alicia’s beautiful background paper that I printed on my color printer, and then ran it through my laser printer once it was totally dry… and developed a beautiful advent count-down calendar to fit in the frame that regularly hangs there… that we can mark with a dry erase marker! (If you purchase this set, please let me know, and as a thank you for your purchase, I will email you your FREE PDF copy of the “O Come, O Come Immanual” advent countdown calendar – that can easily be printed on top of her decorative paper! It’s not too late to start it!)
I am so pleased with how the whole wall turned out. I love that it’s visible from downstairs in our living room, and that it’s in a place where the kids will see it regularly (upstairs near their rooms) to remember where our focus should be this holiday season.
Another activity we did from this set was actually one I used with our AWANA K-2 group this week. We talked about the meaning of the candy cane, and the kids strung beads on pipe cleaners to make candy canes. They got to keep one, and take one to a friend at school – along with the candy cane poem printable from the set – as a Christmas gift to share Jesus with their friends! The kids had so much fun and were really excited to have a gift to take to friends. They colored the sheets in their classes once they had said their verses, or could take them home to color before giving to their friend. I’ll be doing the same thing with Becca this weekend – she’ll get to make candy canes to give to her friends, and can color the sheet as a Christmas card.
It’s so easy to use this set to stay on track, to keep your focus, and yet still accomplish all the goals you normally have during the holiday season! I so appreciate Alicia’s creation of this set, and look forward to using these parts (and more!) next year. I love that there’s so many different options, and I can use what works for our family now, and then still have new things we can add on or swap out next year, or the next!
Might I add… Don’t think if it’s after December 1st that you can’t start this!!!! It is never too late to get your focus right, and there’s always room to do stuff next year, but if you wait to get it, you’ll forget! So click here to get it today and use what you can, and just allow it to build in the future. You won’t regret it. That I can promise.
Y’all, I’m so not ready for Christmas! I mean, seriously. We haven’t had Thanksgiving yet! But Thursday will be here in just a couple more sleeps… and it’s time to start talking to you about Christmas. So as a mini-revolt against Christmas taking over Thanksgiving, I decided to tell you what I’m thankful for… about Christmas.
I’m thankful for family traditions.
I grew up in a Christian home. I remember that one thing we ALWAYS did, every Christmas Eve before we opened gifts was that we ALWAYS read the story of Christ’s birth from Luke 2. We’d eat dinner, and while the menu was usually the same, sometimes it varied. The dessert was always different, the tree always looked a little different, but that reading of Luke 2 was the same. Grandpa or Daddy or I (once I was old enough) would read the Christmas story. The reason for the season was never overlooked.
Cody grew up similarly. Every Christmas Eve, his family went to church to light candles and sing hymns with their church family and celebrate the birth of Christ. Because it was important to both sets of our parents to make sure that we as kids knew that Christmas wasn’t just about the giving and receiving of gifts… it was about the Ultimate Gift that God gave to us – His Son, Jesus Christ.
I’m so thankful for those traditions. But now, as a mom, I feel the pressure of the commercial world. Christmas is all about the decorations and the presents and the big fat man with a jolly beard who gives gifts to good kids. It’s about an elf who watches behavior and about how full your stocking is with technology items. Heck, Christmas isn’t even about spending time with family any more – its about seeing how fast you can open your presents so you can go play with them. Maybe it always has been, but for me, Christmas was about family, and about that story we read. It was about celebrating the birth of Christ.
And I’m thankful for that. I’m also thankful that Becca is growing up wanting to make Jesus a birthday cake every year. She came up with that idea when she was just 17 months old, and now we do it every year as a special part of our Christmas Eve traditions. Because THAT is the reason for the season! He is the reason why we celebrate. We give gifts because of Saint Nicholas and all that he gave to the children who were poor and needy. We give gifts to remember the Ultimate Gift that God gave us….
But in all of that, how do we juggle it all? I mean, December only has 24 days before the “big day” to fit everything in. Christmas has crept into November, and taken over Thanksgiving. The shopping for presents begins earlier and earlier every year. Heck, many stores even begin putting out their Christmas stuff before Halloween… because there just isn’t enough time to prepare for Christmas and all the hubbub. So how on Earth are we as busy parents supposed to make time to keep CHRIST in CHRISTmas?
I have a fabulous and easy set of printables I want you to check out. They’re on sale for a limited time before Black Friday (code: PREBLACKFRI10OFF to save $10), and you can find the whole set here. (Aff link, thank you!) This set isn’t about making more work for you, it’s about making Christ the center of Christmas and it’s SUPER EASY to print out what you want and has guides to give you ideas for how to use the items with all different ages of kids! I’m so excited to get all of my stuff printed out and set up this weekend (yes, AFTER Thanksgiving!) so that we can begin focusing on all the important parts of CHRISTmas. Alicia Michelle has really outdone herself on this set, and I hope and pray that you will invest in this set for your family. You can reprint pieces year after year, or print everything the first time on card stock and then laminate so all you have to do is pull it out and hang it up in the future. There are decorations, activities, and so much more in this set. I will be posting on my Facebook page as we complete certain parts of the set, and I hope that you will merge this set into your family traditions and share your photos as well – I know you will be blessed, and so will your kids!