Recycling Rocks!

I’ve had a lot going on lately… to say the least.  So just this week I finally picked up all the signs of Halloween around the house and got them tucked away for next year.  I wanted to do one more sensory bin for Becca before putting the water table up in the attic for the Christmas season (way too much stuff will be in our living room…), but WHAT?  I wanted something fallish, but different from her pumpkin center.  So I looked around and found some items that have long since been forgotten… her fall leaves number tree, her box of beans (minus the pom poms), and her tub of beans, leaves, and pumpkins.  And I’m pretty pleased with what I came up with!  (And she was, too!)

IMG_0436

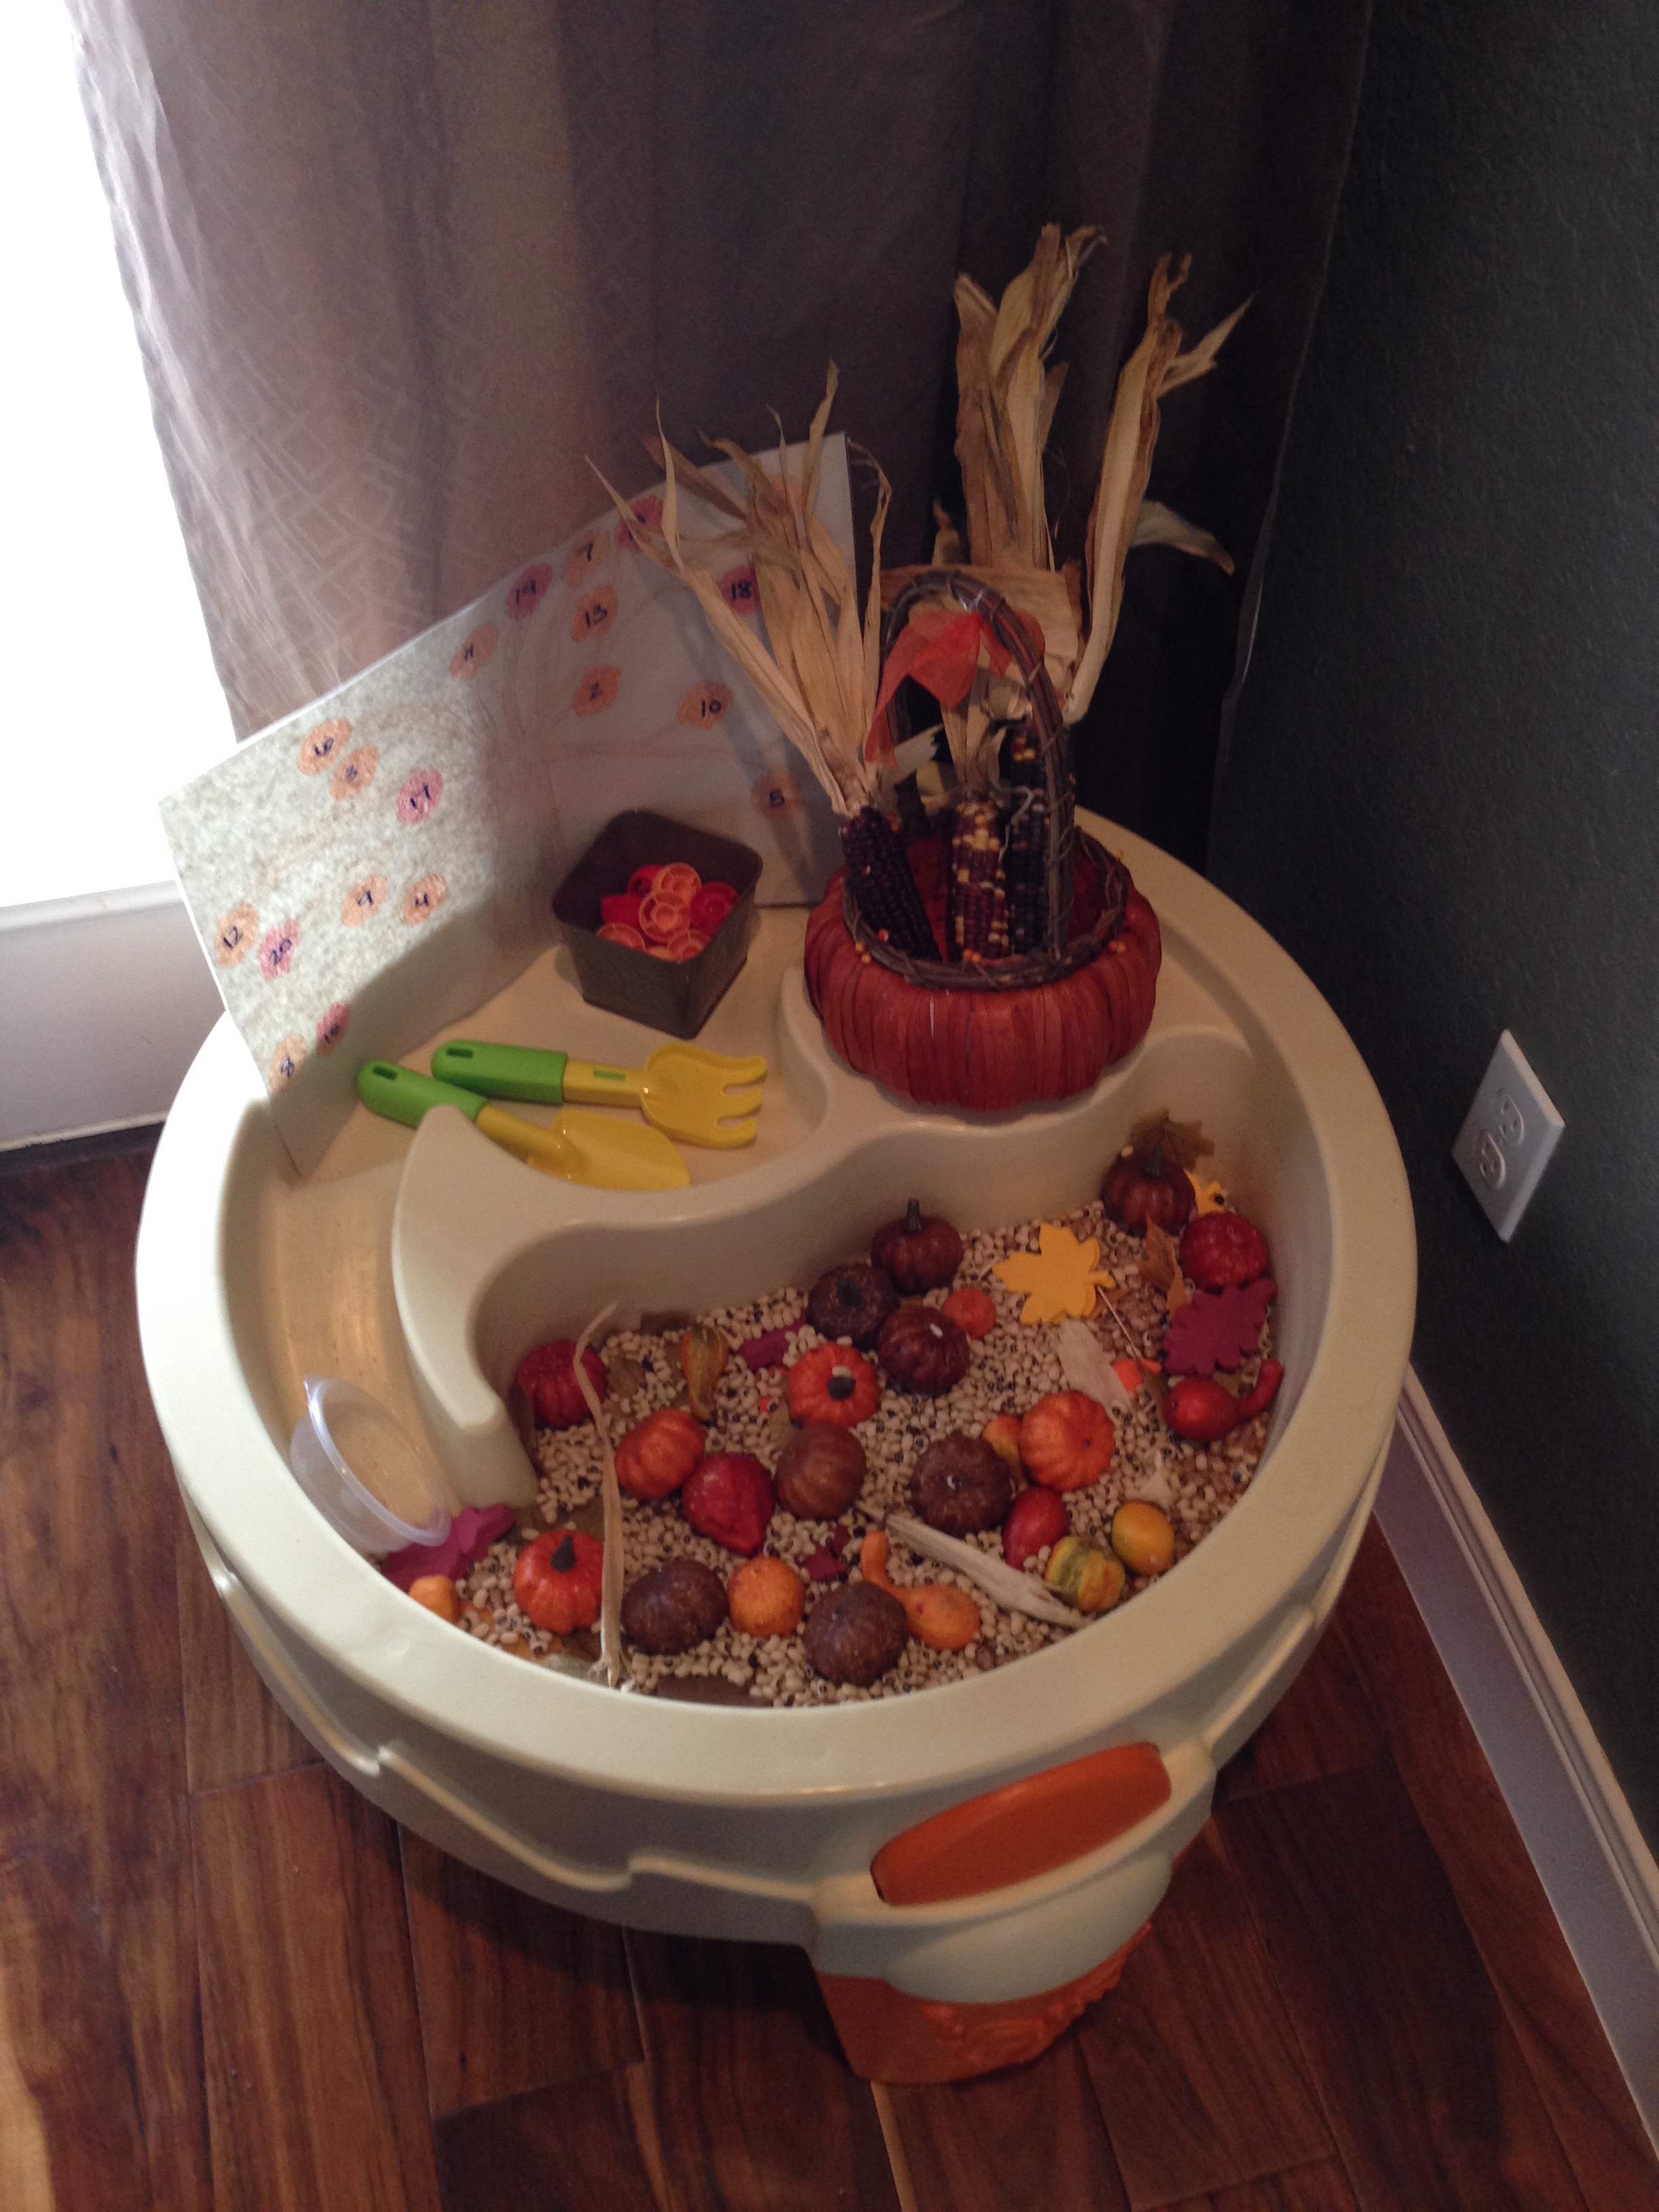
I emptied all of the beans, leaves, and pumpkins I could find into the main part of the water table, put her rake and shovel with the number tree in the top, and then put the Indian corn in a festive pumpkin basket that she can’t seem to get enough of (she hauls the thing all over the house at least twice a day).  She loved digging around using her tools, and just running her fingers through the beans again.  “This is fun, Mommy!  I like it better in here than that other place.”  So see, part of my problem before had been not enough space to dig in!  Now we know.  The container really DOES make a difference, and this water table (affiliate link – thank you!) is FABULOUS for way more than just water play!

I also showed her how she can pull the silks off the Indian corn and make fun strings, and how to pop the corn kernels off (into the table), which she had a blast doing!  Once she tired of it, she immediately pulled the fall number tree out, and we did that together.  Such fun to revisit old favorites – in a new format!  Recycling really does rock, ya’ll.  No need to throw out those activities because she was seemingly done with them!  Just gotta find a way to make things new!

IMG_0439

What activities do you have around your house that could stand to be recycled or “up cycled” into something new and different?

The gift that keeps on giving!

Snip20141112_4

Back on August 4th, I told you about our Farmer’s Market sorting set (this one: Learning Resources Farmers Market Color Sorting Set– affiliate link, thank you!), and how much Becca enjoys it.  I talked about all the fabulous ways you could use the set for teaching math skills, etc.  It really is a fabulous set.

But today, I wanted to shine the spotlight on Mr. Grayson.  You see, he’s learning how to pick things up, and how to drop them, and how to put them in his mouth… and once again, I’m impressed with the versatility of this set!  Because it’s fabulous for him, at 5 1/2 months, just as much as it’s fabulous for his big sister at 2!

IMG_0396 IMG_0408 IMG_0411

I love that the fruits and veggies are bright colors and have a variety of textures, so he’s getting a great sensory experience while playing with them.  And I love that they are big enough to really work his motor skills as well as his hand-eye coordination – while being safe… he isn’t going to choke on any of these items.  Sister also loves to play WITH him – she will bring him the right color bucket and help him drop them in!  She is also great about picking up the ones he drops on the floor (because that happens a lot)!

The manufacturer recommends this product for 36 months- 6 years.  But I would definitely say that if you’re looking for a Christmas gift that’s gonna just keep on giving, this is it – for any age of baby, toddler, or preschooler.  Granted, he doesn’t have any teeth yet – and I don’t know what will happen once he does and tries to chew on these, but they feel firm enough that I doubt he’ll be able to really take a bite out of any of these items.  (We’ll watch him close, though, and I’d of course recommend you do the same if you have a little one who will be playing with them.)

So there you go – a gift perfect for the little kiddos in your life – because they will never stop learning, imagining, and loving this set!

//ws-na.amazon-adsystem.com/widgets/q?ServiceVersion=20070822&OneJS=1&Operation=GetAdHtml&MarketPlace=US&source=ss&ref=ss_til&ad_type=product_link&tracking_id=butterandbumb-20&marketplace=amazon&region=US&placement=B006RQ8TY0&asins=B006RQ8TY0&linkId=JMSS6UF6BYLVX6YF&show_border=true&link_opens_in_new_window=true

Being Thankful

So what’s a good way to encourage thankfulness in your preschooler? Helping them think of all the things they have that are blessings! Here’s an easy activity you can do TODAY!

I’ve programmed pieces of construction paper with the letters of the alphabet, and then throughout the past few days, Becca and I have added to the list. (It’s now much longer than what this picture shows!) Then later this week, I will take the pages down off the easel, and put them together in book form.

There’s so many options of how to do this. You could make an “I’m Thankful for my Family” book and put each person’s picture on one page and then write their name. That would be perfect for a young child who is just learning everyone’s names.

For us, list form is fabulous. I’m sure she’ll be thinking of things to add to our lists later, so I don’t plan on laminating this one. But you totally could. I just like the idea of having a running record of our thankfulness!

Note: I’ve just had her tell me things she’s thankful for as they pop into her head, and I put them under the correct letter. Later this week, before we pull down the list, I’ll change up the challenge- and ask her to think of things that begin with the specific letters we haven’t filled up yet. 🙂

What are you thankful for?

IMG_0326.JPG

Microwave Puff Paint

kids in the kitchen

Well, I’ve mentioned before how much I love the ideas from Jean over at The Artful Parent… and THIS idea for Microwave Puffy Paint is no exception!  What a super fun way to tie in cooking with art!  Becca really loved this one.  We made the puffy paint (recipe below), and then used Duple blocks to make prints on cardstock paper.  Then, we watched them puff up.  It was amazing. And super, super fun.  I think we’ll have to do it again soon.  Note: this recipe makes a LOT of paint!  We had some left over, which I’m attempting to keep in the fridge.  We’ll let you know how that works out.

We also added colored glitter to ours… which added some sparkle to our pictures, but not as much as I would have thought.  Live and learn.  Probably not a real great idea to add glitter to this paint… it doesn’t really show up, and just wastes glitter.

IMG_9791 IMG_9794 IMG_9798 IMG_9803 IMG_9806 IMG_9810

The recipe:

Microwave Puffy Paint

1 cup flour
1 tsp salt
1 cup water
Food coloring

Whisk your flour, salt, and water together really, really well – so there are no clumps.  Then divide, and add your food coloring.

You can put it into squeeze bottles, or dip items like we did.  Do your painting, then stick the cardstock, cardboard, or paper plate into the microwave for about 30 seconds.  Watch it puff up!  If you don’t have much paint on your page, it won’t take the whole 30 seconds.  If you have a lot more, it might take a little longer.

Enjoy!!!  It’s SOOOO much fun!

Making an Impression

All this month, I’ll be sharing a variety of art activity ideas for you on Mondays… this week, I wanted to share an impromptu lesson on impressions that we both had a whole lot of fun with!

Becca LOVES playing with play dough, and she’s finally starting to get good at pushing cookie cutters down into the dough and coming out with shapes of dough.  Amazing how difficult that is when your fine and gross motor skills are still developing!  So the other day when she was playing, I thought I’d throw something new her way… and handed her a fork.  I loved her immediate response when I pressed the fork into the dough.  “WOW, Mommy!  You made ridges!”  And so it began.

First it was the fork, then a little pumpkin bead, then her spiky ball, then a food pouch lid, then a play apple… she took time to press each thing into the play dough to see what response she got from the item, and from the dough.  She noticed that the play dough wanted to stick to the spiky ball, but the plastic bead came right out… both left neat impressions.  The food pouch lid was just a mess.  It left a neat impression, but brought back a bunch of play dough stuck inside.  The apple was most disappointing to her – because she did it last, and it’s smooth surface “wiped away my holes!”  The spiky ball had left such a neat pattern, and then suddenly it was gone!

It was such a fun lesson, I know she’ll be wanting to do this again soon, so I’m already trying to think of things we can use to make impressions on play dough.

IMG_0049 IMG_0050