
If you’re anything like me, you have gone through a wide array of emotions this week as you struggle to figure out how to handle all of this stuff. It’s just a crazy mess. But the bright side is, all of the teachers out there are working hard to come up with great ideas and find resources to help you with your kiddos at home!! I’ve stolen some ideas from others, and come up with a few things on my own that are hopefully super helpful to yall as you’re stuck at home!!!
So first up is Stained Glass Window Painting! A friend of Gray’s from school and church enjoyed doing this at home and his mama posted on Facebook… so we tried it!! It was SO MUCH FUN that now we’re contemplating doing the bottom half of the kid’s bedroom windows, too! Here’s how I did it:
Get some Crayola Washable Paint (you can get the little pots on Amazon if you’re not venturing to Walmart these days, but even with Prime shipping they are about a week out on delivering… just fyi!). You’re going to mix the paint with dish soap and water. The proportions I used were kinda just by feel, but I mixed approx half of the little paint pot with two (small) pumps of dish soap and probably about 2-3 Tbsp of water, and mixed thoroughly.
To prepare, I used painter’s tape and some construction paper pieces of colors we don’t use much to mask off the window sill and sides. Even though the paint is very washable, I didn’t want to have to stress. I also talked to the kids a lot about wiping their brush on the side of the pot before painting so that it wouldn’t drip on other shapes below. (But they still dripped, and it’s thankfully super easy to wipe off and fix!)
Lesson learned… we did one window one day, and the other one the next day. So I discovered that if you kinda let the first coat dry and then add another coat, they look much brighter! You can also try fun brush strokes – try doing some straight, some swirly, some zigzag, etc – because the brush strokes WILL show when it dries. Then, because you’re using water in the paint, be sure you LEAVE the tape and paper up for several HOURS to insure it dries and you don’t have runs into your blank spaces. It is a super fun and easy project, and DOES wash easily off of skin AND out of clothes.
(ALSO! A couple different friends have shared similar ideas using painters tape and sidewalk chalk on a fence – that looks super fun, too!)

Another super fun activity that we borrowed from a coworker friend of mine was playing with Magnatiles on the Garage Door! This was a super fun activity (and also a good lesson on gravity vs the strength of a magnet for the big kids) that we tried out yesterday morning, and this morning the littles are having fun doing the Magnatiles on the freezer drawer inside! Elle got super excited about this activity, too, and created Arendelle (“Adondell!”) and Elsa’s castle (“Elsa’s cast-tell!”) all on her own!

Trying to figure out what to do with the papers that your kids are doing for school at home? Try making this easy Recycled Cereal Box Paper Holder! Simply take a large cereal box (we get the family size boxes), completely unfold it, and let your child decorate the blank sides! I wrote on them first and had them use stickers (because we have MILLIONS of stickers!) to decorate where I didn’t write. But you could have your child paint, draw, doodle, or even make a collage on the box. Then, tape it back together! I have a roll of clear contact paper, so since we used stickers that I didn’t want to fall off over time, I covered the boxes in clear contact paper. I’m keeping the kids’ work in folders, but they are rapidly filling. So after I take pictures of their work for the week to send to their teachers, I’ll be sticking that finished work into their boxes, which easily fit on the shelf in the closet!

And now for a couple other ideas that you can purchase relatively inexpensively on Amazon! (Reminder – I am no longer an affiliate, these links are just to help you out… please remember to always shop on Smile.Amazon so that you are helping out your favorite charity with every purchase!!!)

This Water Doodle Mat is super fun for all three of my kids (3rd grade, kinder, and 2 yrs), and was only $24. WELL worth it! They have used it multiple times a day since it arrived, and I love that the water pens are interchangeable with our Melissa and Doug Water WOW! Books that we have gotten from my friend Casey over at Munchkin Land Kids! (Yall please go and check out all of her awesome stuff… now is the time to support small businesses!!!!)
We also seriously LOVE Paint By Sticker Kids books, which you can get off of Amazon. We have done SEVERAL of their books, but the ones I got for the kids for right now are Unicorns & Magic (full of LOTS of sparkly fun stickers!) and Beautiful Bugs. They are $10 a piece and worth every penny! Great for number matching/recognition practice, and fabulous fine motor / hand eye coordination practice! They also make fabulous story starters for your kiddos who need some inspiration to get WRITING!!!
I also shared in that last graphic a photo from Natalie Grant and Charlotte Gambill… remember through all of this, mama… the struggle is real. Make sure to let your faith rule over your fear.
WE CAN DO THIS!


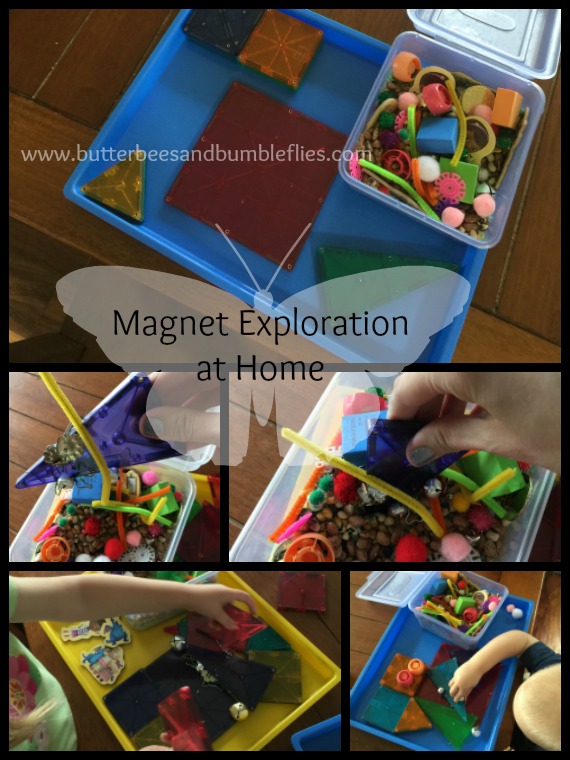 The invitation to play was simple – a box full of random items both magnetic and non-magnetic, and a bunch of MagnaTiles. When we got home, Becca immediately hopped up into her chair and started playing. Without me even showing her or telling her what to do, she started testing items to see if they are magnetic. Today, I’ll give her the same activity with a sheet of paper similar to what Gray had for sorting at the DoSeum and let her sort her items based on whether they are magnetic or not. Gray also immediately dove in and really enjoyed the activity again at home in our little variation.

