Magnet Exploration

I recently signed Gray up to take a class at The DoSeum – our local children’s museum that I have written about before.  The class is called “Little Makers” and it’s basically a science and engineering class for toddlers 18-36 months old.  Yesterday was our first class.  Not only did Gray have a blast, I came away very inspired…
magnets at the dose

His teacher, Ms Cheryl, had all sorts of magnets for the kids to explore with.  The invitation to play was simply a box of random items and a couple of magnet wands.  Gray immediately dug in and was ready to explore!  She had extension activities for those who were interested in sorting their magnetic vs non-magnetic items, and blank paper “journals” for any who wanted to draw/write their thoughts.  Gray enjoyed sorting his magnetic/non-magnetic items, and eagerly sat in my lap to sort them!  He enjoyed playing with magnets on the classroom divider wall, and of course he loved the story – Goodnight, Goodnight, Construction Site is one of our family favorites!  (Aff link, thank you!)  Then after class he enjoyed going to the Kaleidoscope play area and spending more time with the MagnaTiles there.  (Aff link, thank you!)  All of the magnet play inspired me, and we ended up purchasing our own set of  MagnaTiles to take home with us.

While he napped, here’s what I set up for when we got home from picking up Sis from Mother’s Day Out:

magnets at home 
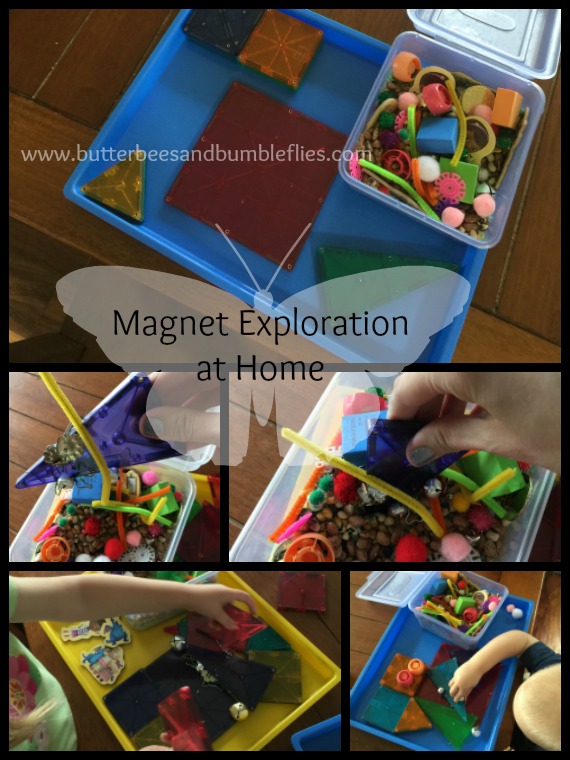
The invitation to play was simple – a box full of random items both magnetic and non-magnetic, and a bunch of MagnaTiles.  When we got home, Becca immediately hopped up into her chair and started playing.  Without me even showing her or telling her what to do, she started testing items to see if they are magnetic.  Today, I’ll give her the same activity with a sheet of paper similar to what Gray had for sorting at the DoSeum and let her sort her items based on whether they are magnetic or not.  Gray also immediately dove in and really enjoyed the activity again at home in our little variation.

reality check

Because I’m all about being honest with you and telling you what works and what doesn’t work, this is NOT an activity for your toddler to do unsupervised.  I thought I’d take advantage of them being so engaged, and I’d do the dishes… well, then I looked over and he had something in his mouth.  Thankfully, it was just a pompom – not a magnetic item, but because he’s cutting a couple of new teeth right now, I can’t give him the box unsupervised.  This is an activity to do when I’m sitting right with him.  To buy myself some more time, I simply removed the box from his reach and let him play with the MagnaTiles.  He LOVES building with the MagnaTiles and that easily occupied him for the rest of the time I needed him to be occupied until I could join him at the table and let him have the box back with close supervision.

MAKING THE BOX
Here are some ideas of what you could put in your box.  I used the following items that I had laying around randomly here:
-Colored Rice (non)
-Mixed beans and corn from an old fall sensory bin (non)
-Paperclips (magnetic)
-Paper brads (magnetic)
-Refrigerator magnets (magnetic)
-Feathers (non)
-Pipe cleaners, cut into pieces (magnetic)
-Jingle bells (magnetic)
-PomPoms (non)
-Play plastic coins (non)
-Foam blocks (non)
-Fruit pouch lids (non)
-Plastic stackers (non)

Here are some other fun magnet activity sets that we have and enjoy (Aff links, thank you!):
MindWare Imagination Patterns (Becca got this for Christmas and loves it!  Gray has not used these… but easily could – they are large enough to be toddler safe, she’s just very possessive of them.) UPDATE: Gray loves playing with this set!  There are a couple of small circles that I take out of the set when he plays with it.
Magz51 New Interlocking Toy Building Set (NOT toddler safe)
Magnetic Spinning Gears (Both kids LOVE this set!)
Lauri – Fun with Magnets (I have this set on order and can’t wait for it to arrive!)

more fun with magnets
update 4/7/16: He loves playing with the Imagination Patterns AND the MagnaTiles together because the Imagination Patterns board allows the MagnaTiles to stand upright for vertical fun!

Children’s books about magnets (Aff links, thank you!):
What Makes a Magnet?
What Magnets Can Do
Magnets: Pulling Together Pushing Apart

What fun magnetic activities have you done?  The kids are totally enthralled and I’m looking forward to finding more fun magnet activities! I also think Becca would enjoy going on a magnetic hunt to test different household objects to see which are magnetic and non-magnetic… we may do that today!


Create Your Own… Recycled Christmas Tree

steam activities header

Looking for a super fun, EASY, throw-it-together-in-two-minutes project for your kids that involves STEAM?  Check out this fun little engineering activity I did with Becca this morning!  She had to miss “school” (Mother’s Day Out) today because we are all sick, but I promised her something fun.  She agreed that this project delivered on that promise.  And seriously, ya’ll… it was SUPER easy.

recycled christmas tree

All you’ll need are some cups (any kind of cups would work, but we happened to have green and yellow solo cups, so we had a green tree with a yellow star on top!), some straws, some fruit pouch lids (or any sort of recycled lids you can use), and some masking tape!  Our lovely Christmas tree is now in our foyer on our entry table next to our nativity set – she said we should put it there so Baby Jesus could see it.

This project was great for her problem solving skills – we had to use a lot of tape to make sure the cups wouldn’t fall, and she was upset that our first design didn’t look much like a tree, so we re-built it and she was much more satisfied with it’s shape the second time.  We spent about twenty minutes working on this together.  It was the perfect easy time killer, and lots of giggles were included!  She can’t wait for Daddy to get home from work so she can show him our “masterpiece!”

Looking for more Christmas activity ideas?  Check out my post here for little “busy bag” activities you can put together to keep even your toddlers busy!

Looking for more STEAM and Engineering activity ideas?  Check out my STEAM and Engineering pages!

Math – Made Fun with Food Pouch Lids!

steam activities headerWelcome to another STEAM Thursday!  Not sure what STEAM is?  Check out my STEAM page here, and peruse through all of my previous STEAM posts!  Today’s topic is Math – specifically adding, subtracting, counting by 2s and 10s, geometry, and patterning.  But, as usual, we have also squeezed some engineering in too… we seem to find a way to do that with everything these days!

food pouch lids

Last fall, I shared some ideas for what to do with all those extra food pouch lids you might have sitting around your house… and today I wanted to expound on those ideas a bit.  I briefly mentioned making patterns in my previous post, but Becca has been interested in making more complex patterns, so today we tried a really hard one – peach, pink, pink, pink, peach, peach, pink, pink, pink, peach.  She continued the pattern correctly – pink, pink, pink, peach, peach, pink, pink, pink, pink, peach.  (I didn’t get a picture).

In the process of stacking them up to make the pattern, we ended up building pyramids and cubes as well.  Then we discovered that simply stacking them on top of each other makes a cylinder!

Our main focus, however, was adding and subtracting.  Just like you might use a ten grid to add and subtract with counters, I simply took some scrap paper from our recycle pile and drew ten rectangles on it that we used for our pouch lids.  We started out with basic equations to remind her how the ten grid works (it’s been a while since she’s seen one), but then we got more complex by adding her ten grid to mine to see how many pouch lids we both had combined, or subtracting hers from mine to see how many more I had, or reverse.

I was able to show her the physical ability of the pouch lids to cancel each other out to subtract and find the difference more quickly.

We practiced counting by twos to put the lids into groups of tens, and then counted by tens to see how many lids we have.  We compared the groups to see which color we had more of, and which color had less.  Then we subtracted by canceling out the groups of ten to find out how many more pinks we had than the peaches.

If you saw my post on Monday, you know that Becca considers math “kind of schoolish” and not really “summer fun…” however, she stayed so engaged with this activity that when I said, “So, did you enjoy doing math today?”  She said, “If all math was like that, I’d love it every day!”  HA!  So, now I’m on a mission to make math much more hands on and fun for her!  And you can bet that we’ll be doing a lot more with these food pouch lids in the future!!!

If you have kids who like applesauce (or anything else) in a pouch, SAVE THE LIDS!!!  There are just so many fabulous things you can do with them.  The possibilities are endless!  Please share – what are some ways you reuse your food pouch lids?


Mystery Messages

steam activities header

A super fun way to spread the word… about anything… is to make it a mystery!  Whether your child makes the message, or you do, there’s nothing quite so exciting as taking what appears to be a blank white sheet of paper and turn it into a special message!  Becca simply loves doing these crayon resist water color paintings, and with this activity your options are truly limitless!mystery messagesJust take your white crayon and write a message on white cardstock, then paint over it with water colors to reveal the mystery message!

Your mystery message could be a simple Bible verse, an I love you note, a reminder of your home address/phone number, or a sign for your child’s door!  You could easily make math fact cards or illustrate the life cycle of a butterfly.  The awesome part is the science lesson behind it all – water won’t stick to wax!  The colored water just beads and rolls right off.  Becca has decided that next we need to try mystery messages on other colors of paper.  So we’ve been trying to pair up the right shades of crayons to our paper stash to see if we can make mystery messages in more than just white!

Have you already tried crayon resist paintings with your kids?  Well, what about glue resist?  It’s a little more complicated – make your glue design and then allow it to dry thoroughly before painting.  You’ll have to also try different kinds of glue – what sort of results do you think you’ll get trying Elmer’s vs hot glue?

It’s so fun to get your kids to predict and then check their hypothesis!!  Introduce the scientific method early and often to your kiddos and they will learn to love science… as well as see how much it relates to everything in our world!


Marble Run Fun

steam activities header

STEAM THEME: Engineering, Math (estimating, height/width), Science (gravity concepts)

Yes, I know it’s not STEAM Thursday yet.  Yes, I know that it’s been quite a while since I’ve posted.  But this Thursday I’ll have a very special post, and I wanted to go ahead and get something – anything – out here b/c I know ya’ll are just dying for some new ideas, right?  🙂

Well, so back when the consignment sale was going on, I picked up a marble run set.  Totally on a whim – because it was only $10.  And I have never been so happy about a consignment sale find ever.  (And I get pretty excited about my consignment sale finds, ya’ll… I mean, seriously, seriously jumping up and down excited.  My friend Kim can tell you just how consignment sale happy I am.)  But, I digressed.  If you don’t have a marble run set, here’s a fabulous one to start with from Amazon (aff link, thanks!)Marble Run 37-Piece Set  This is a small portion of the set that I got… from looking online, I think I ended up getting a combination of this 37 piece set and two of the 80 piece sets.  (Big score, ya’ll.  Big score!)
marble run fun


We have had SO MUCH FUN making a wide variety of marble runs.  There are so many ideas that I can’t remember all of what we’ve done to share with you, but I love setting up engineering challenges for Becca.  Here’s a few of the conversation/activity starters we have done:
1. How wide can we make it where it all ends up in one finale?
2. How tall can we make one?  (She loves to stand on our hearth to reach the top.)
3. Can we build a square tube?
4. Can we build a triangle tube?
5. Can we set up two runs and see which is the fastest?  (Tip: For our run races, I write a number in Sharpee on each marble so we can track which ones are the winners.  She gets three marbles and I get three marbles.  She gets to design her track, and I design mine.  I try to keep mine about the same height as hers, but obviously use different pieces, then have her guess which one will win.  She always guesses that hers will win.  And sometimes she’s right!)
6. Which pieces of the track does the marble roll fastest/slowest down?
7. Estimate how many clear holders we need to fill the spaces between the track pieces?  (Fyi: Becca won’t estimate.  She was wrong once.  So don’t force this subject, but for your kiddos who enjoy estimating, this is a fabulously fun and easy way to estimate with small numbers.)