Melting Crayons for Earth Day… part two… making the crayons!

Well, my intent was to post this yesterday, but life happened! Again! It has a way of doing that… 🤪

So we collected all those hundreds of crayons. And the first step is to sort them out. Over the years I have learned that Crayola brand crayons are next to impossible to peel. Something about the glue they use. So since we had a LOT of crayons to pick from, I opted to set those aside to give to our school’s art teacher. Because art teachers can ALWAYS use more crayons!!

Our crayon collecting campaign was a huge success thanks to our posters made with materials from my partners at Clear Path Paper!

Our art teacher will also be getting all the paper peelings from this project- because they are PERFECT for using to make new paper. They water down and mash into pulp really well because they are super thin and already torn into small pieces. So if you’re interested in recycling the wrappers as well, definitely look into how you can make your own paper! Last year we made some really awesome seed paper in her art class that would be amazing to make with your crayon peelings! This website has great directions on how to make your own seed paper!

Check out all these beautiful wrappers!

After you’ve peeled all your crayons, you’ll get out your pans. I HIGHLY recommend silicone molds over metal, unless you want to spend a good bit of time banging the pan to get the finished crayons to unmold. Any silicone molds you get will work- whether they’re fancy ones intended for chocolates that you get from the craft store, or they might be cheap ice cube molds from your local dollar store. Silicone just makes it easier to unmold them. The more basic the design, the better, as small points and details may break off when you remove the crayon from the mold.

Peeled unwanted crayons… just waiting to be made into something new and amazing!!

Pre-heat your oven to 250F and begin breaking your crayons into small pieces. Kids love lots of colors melted together, so feel free to melt brights like yellow and darks like black together. The colors will NOT melt into each other and all become one. They will maintain their own color integrity, making some really cool color swirls. I like to use warm colors together and cool colors together. Last year, I even used green, blue, and white together to make crayons that looked like Planet Earth. As you can see further down, this year I put yellows and oranges together with greens to make pineapples, which the kids thought were super fun. I also made some wacky pineapples mixing some weird neon crayons we were given alongside blacks and grays. The boys especially LOVED them!
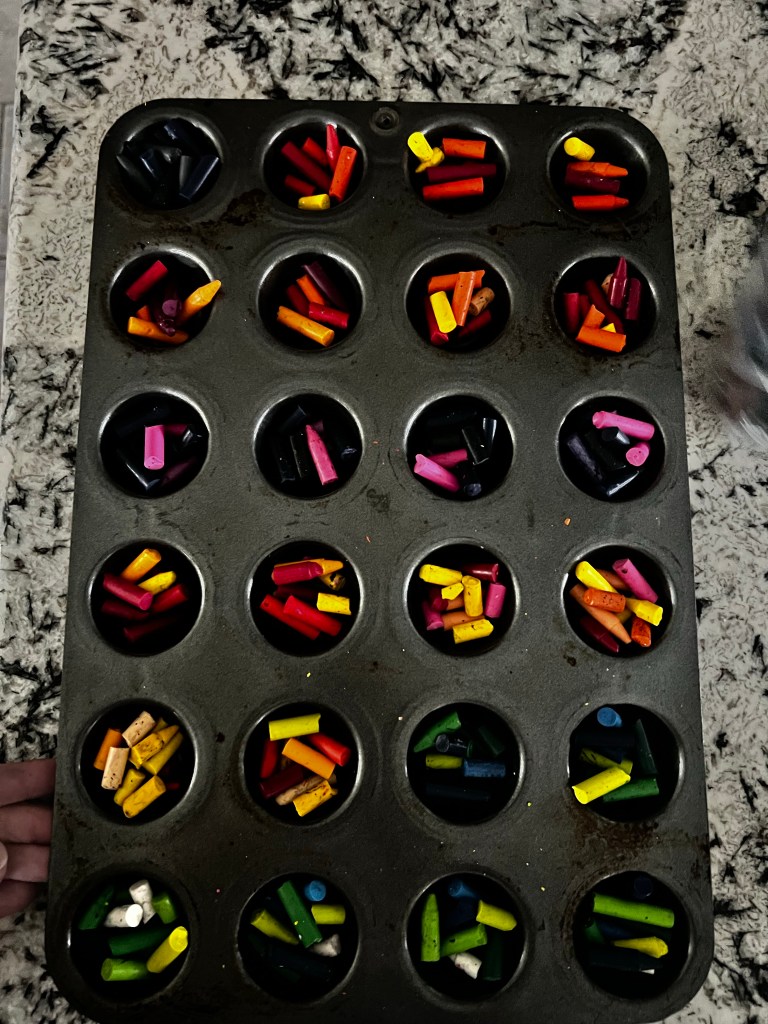
I love doing mixed colors! Warms together and cools together is always a safe bet if you’re nervous about mixing them on your first go-round.

Once you feel like your colors are together like you want, and the bottom of each mold is covered, then stick them in the oven. Silicone molds need to go on top of a metal cookie sheet so that when you get them out, you’ll be steady and won’t accidentally spill the hot wax and burn yourself.

A metal sheet pan is your friend! And don’t try candy molds with spots for sticks. That just makes a mess. 🤦🏻‍♀️

The time really varies on how long to bake them, depending on how deep you’ve layered your wax. Just check on them every ten minutes or so. The little round ones I made in my metal pan (never again on the metal, I swear!) are nice and smooth and thin for doing leaf rubbings, and they only took about 12 minutes to be all liquid. In contrast, the pineapples were deeper molds that I filled a lot more, and they took almost thirty minutes to be all liquid. This process will make your house or school smell like a crayon factory! Ha!

The colors maintain their integrity even as a liquid, they won’t mix together. Here, you can see green below yellow, which is beside orange.

I miss being able to use the oven at school to make these, where the kids could actually watch their crayons melt. If you have the opportunity to do that, it’s so so awesome for your students to experience. Either way, this is a fabulous video to share so they can see the similarities and differences of how crayons are originally made, vs how they are recycled in your own oven!

These were semi-cooled. See how some parts were still dark? They’ll be completely solid on top when they are cooled. Note- I really DO NOT recommend using a metal pan. Removal is h-e-double-hockey-sticks!

Once the wax is completely liquid, pull them out of the oven and let them cool COMPLETELY. (This could be another 30-45 mins.) Once cooled, you can remove them from their molds and start coloring! These are super fun for kids to experiment with and see how many different colored marks they can make from their one crayon! Mine loved how the tops of the pineapples can make multiple lines on the paper at once, and if you have a smooth bottom on the crayon, leaf or embossing sleeve rubbings are super simple and fun!

I am just in love with how these pineapples turned out!

This activity is great for kids of all ages, and even my 6th grader still gets excited every year about recycling crayons. It’s just a super fun project that any child can participate in. (And the peeling of the papers step is fabulous for working on fine motor skills as well as building stamina for a project that takes time and has multiple steps!)

Let me know if you try this with your own kids/students! Happy recycling! -Christy

Melting Crayons for Earth Day… part one- the posters

Y’all! It’s been forever and a day. Or a year. Or more! How long since I last posted? Well that’s too long! Ha! Teaching truly has been all-consuming. It’s been real and it’s been fun and it’s been real fun… but I’m ready for summer!! How bout y’all?

Here we are on Earth day, and I’m doing a project I have come to LOVE! Every year, my students and I collect up crayons that are broken and/or unwanted, and we jazz them up and melt them into something new and amazing for Earth day… as a true, physical picture of how you can really reuse and renew something that seems old and broken and ready to throw away!

This year our project reached new heights thanks to my partnership with the folks at Clear Path Paper! They hooked us up with some BEYOND BEAUTIFUL paper to make posters to spread around the school! We hung them up, our counselor helped with announcements, and the crayons rolled in. Seriously, y’all… I’m gonna be making LOTS of new crayons. More than I can make in just one day!!

But back to the beginning- the thing that made us so successful was our posters. For our posters, my partners over at Clear Path Paper hooked us up with some GORGEOUS Earth and water toned paper. Check out what we got:

I was able to print heart shapes right onto the mirror blue with no problem on our copy machine (just be sure to use the bypass tray and select thick paper b/c the machine handles it differently than regular cardstock). I printed some on the mirror side just to see if it showed up, but I cut those myself b/c it was a little dark on the blue to see. The kids were easily able to cut the ones with the lines on the back (white) side of the mirror paper. One even commented that it was easier (compared to regular copy paper) to cut that paper because it’s easier to hang onto the thicker paper while cutting. They also LOVED how pretty the mirror paper is, and totally thought it looked like ocean water. ❤

Then they tried to cut the recycling signs (printed on Kiwi Green) to look like islands, which they glued onto the water. Each poster got two oceans with islands, and then each student colored a “Recycle Your Crayons” print-out (again, on Kiwi Green) to color with as many colors of their crayons as they could. They loved that even white crayon would show up since the paper was green!

We hung our signs proudly all over the school, and they were a great success! The kids were even heard telling GenEd kids at a bathroom break- “did you see our crayon signs? We need broken crayons if you have any!”

Come back Monday for part two of this post- the “how to/recipe” for melting your own crayons! 🙂 -Christy

Click here to check out all the amazing papers available from Clear Path Paper!

Ready for part two? Click here!

Learning With Duplo

Processed with MOLDIV
Learning with Duplo

I have several parents of students I’ve been sharing with recently about various ways for kiddos to use Duplo for learning… so I thought I would share a few ideas here that could benefit everyone!

Processed with MOLDIV
Write letters on Duplo!

Did you know – you can write on Duplo with sharpie marker, and it can be erased with a Mr. Clean Magic Eraser or finger nail polish remover?  So you can put whatever letters you’d like on blocks and kids can use them to practice reading sight words, or building even more difficult spelling words!  This idea can last all the way up through elementary or middle school as a more interactive way to practice words!

Plus, check out THIS idea for using Duplo to build sight words in a whole different way!

Processed with MOLDIV
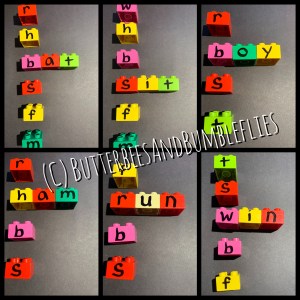
Practice word families/rhyming!

You can have your child create word family/rhyming words with Duplo, too!

Processed with MOLDIV
Build sentences and even stories!

By writing whole words on blocks, and adding punctuation, your child can start building complete sentences and even making short stories with their Duplo blocks!  Have your older child help you think of words to write on the blocks – practice which words are nouns, adjectives, adverbs, verbs, pronouns, etc… and after you write the words, your student can sort them by word types!  This is also a great way to practice labeling sentence parts, etc!  So many things you can do with this to meet many needs.

Processed with MOLDIV
Add, subtract, and even multiply & divide!

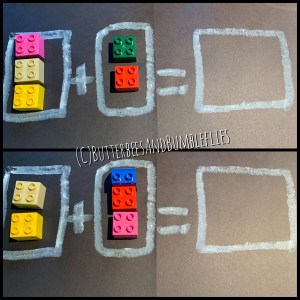
Looking to use Duplo with math?  Here’s an easy idea for using the dots to add, but you can also easily use Duplo to teach multiplication concepts, as well!  And of course, you can always take away Duplo for math as well!!  And just think – you could use it for non-standard measurement, sorting by colors or size, patterning, counting by twos, graphing,  and fractions, too!

The possibilities are truly endless.

And don’t forget to let your kiddos play with Duplo to build their creativity!  🙂

ENJOY, and please – share with me any ideas you and your kiddos come up with!

blog signature

Boy child

Where do I begin? Yall, I LOVE teaching. I always have. It was my dream from 8th grade on. I’ve worked hard for first a bachelor’s and then a master’s, and now three certifications. And I have soaked up knowledge from countless professional development sessions. I have read countless books (despite hating non-fiction) to help me perfect my craft. I seriously love teaching. I love watching light bulbs flicker and then stay on as a child learns to read or count or add or tell time. I love watching kids observe nature with excitement. I simply love what I do.

But this? This school at home thing is about to break me to my very core. In a way different than I have ever been broken. Because Grayson was not made for homeschooling. He doesn’t WANT me to be his teacher. He wants me to be his snuggly mama bear who reads TO him and snuggles him and only makes him do chores, which he can put up with because there are snuggles on either side. He does NOT want to read to me. He does NOT want to do any school work. He has informed me that I am NOT his teacher and I can’t begin to count how many times he has asked if he HAS to do … xyz thing.

I’m over it.

He is normally sweet and helpful and kind and a super loving big brother to Elle. Now he is disrespectful and laughs about it and looks to see what I’m gonna do. Picks physical fights with her and then gets MAD because she fights back! (Good for her!!) He whines and complains about every. Single. Dang. Thing. He is asked to do!

He has given up on riding his bike because it’s not easy. So he plays on a scooter that is Elle’s size and half the time fights me on wearing his helmet. My kid who used to be the one grabbing everybody’s helmets and making SURE they were all on. I can still hear him saying, “safety first!” My kid who was riding a bike so well last summer we could have taken the training wheels off then!

What has happened to my child?!?

Stress. Change. Sorrow.

Despite the fact that we have a schedule that we’re sticking to at home that is very predictable and gives him the structure he needs, it’s not HIS schedule. He desperately misses his teacher and friends. Despite being a shy kid who takes a bit to open up (nothing like the social butterflies his sisters are!), it’s April! His classmates are his world. And they were suddenly snatched away from him. He loves his teacher fiercely. And she’s gone. Might as well be on another planet.

And he’s sad. He cries every day multiple times a day. Ask him why, and he doesn’t know. But he’s just tired all the time, and he doesn’t know why. I know his tired. It’s depression. It’s anxiety weighing down his shoulders. I carry that tired on me. But I’m an adult. It saddens me to see him carrying that weight. No, it doesn’t just sadden me. It breaks my heart.

The girls are thriving. And their bond is even stronger than ever before. And then there’s him. He’s stuck somewhere in the middle- in limbo. An outcast. And his own behaviors keep it that way. I try to make him see what he’s doing, but it’s impossible.

Lord, you know all of these things. You see his tiny confused heart and you know it well. You loved him first- before I even knew he was in my womb, you knit him together. You knew these days would drive him crazy and drive me to the end of my rope. Lord, give him peace. Give him comfort. Help him to feel your love. Give me to words to say and the calm of spirit to handle his outbursts. You know my tired. Carry my burdens. You know I have so much experience, but none with this. Teach me your ways. Give me your wisdom for how to handle his heart gently, but his behavior firmly. I need help. Nothing has prepared me for this. I want, no I NEED my sweet boy to come home. I miss him desperately. I see him when he sleeps. Can he come back to stay? Please?

What We’re Doing to Survive… School at Home #COVIDChronicles

If you’re anything like me, you have gone through a wide array of emotions this week as you struggle to figure out how to handle all of this stuff.  It’s just a crazy mess.  But the bright side is, all of the teachers out there are working hard to come up with great ideas and find resources to help you with your kiddos at home!!  I’ve stolen some ideas from others, and come up with a few things on my own that are hopefully super helpful to yall as you’re stuck at home!!!

So first up is Stained Glass Window Painting!  A friend of Gray’s from school and church enjoyed doing this at home and his mama posted on Facebook… so we tried it!!  It was SO MUCH FUN that now we’re contemplating doing the bottom half of the kid’s bedroom windows, too!  Here’s how I did it:
Get some Crayola Washable Paint (you can get the little pots on Amazon if you’re not venturing to Walmart these days, but even with Prime shipping they are about a week out on delivering… just fyi!).  You’re going to mix the paint with dish soap and water.  The proportions I used were kinda just by feel, but I mixed approx half of the little paint pot with two (small) pumps of dish soap and probably about 2-3 Tbsp of water, and mixed thoroughly.
To prepare, I used painter’s tape and some construction paper pieces of colors we don’t use much to mask off the window sill and sides.  Even though the paint is very washable, I didn’t want to have to stress.  I also talked to the kids a lot about wiping their brush on the side of the pot before painting so that it wouldn’t drip on other shapes below.  (But they still dripped, and it’s thankfully super easy to wipe off and fix!)
Lesson learned… we did one window one day, and the other one the next day.  So I discovered that if you kinda let the first coat dry and then add another coat, they look much brighter!  You can also try fun brush strokes – try doing some straight, some swirly, some zigzag, etc – because the brush strokes WILL show when it dries.  Then, because you’re using water in the paint, be sure you LEAVE the tape and paper up for several HOURS to insure it dries and you don’t have runs into your blank spaces.  It is a super fun and easy project, and DOES wash easily off of skin AND out of clothes.
(ALSO!  A couple different friends have shared similar ideas using painters tape and sidewalk chalk on a fence – that looks super fun, too!)

Processed with MOLDIV


Another super fun activity that we borrowed from a coworker friend of mine was playing with Magnatiles on the Garage Door!  This was a super fun activity (and also a good lesson on gravity vs the strength of a magnet for the big kids) that we tried out yesterday morning, and this morning the littles are having fun doing the Magnatiles on the freezer drawer inside!  Elle got super excited about this activity, too, and created Arendelle (“Adondell!”) and Elsa’s castle (“Elsa’s cast-tell!”) all on her own!

Processed with MOLDIV


Trying to figure out what to do with the papers that your kids are doing for school at home?  Try making this easy Recycled Cereal Box Paper Holder!  Simply take a large cereal box (we get the family size boxes), completely unfold it, and let your child decorate the blank sides!  I wrote on them first and had them use stickers (because we have MILLIONS of stickers!) to decorate where I didn’t write.  But you could have your child paint, draw, doodle, or even make a collage on the box.  Then, tape it back together!  I have a roll of clear contact paper, so since we used stickers that I didn’t want to fall off over time, I covered the boxes in clear contact paper.  I’m keeping the kids’ work in folders, but they are rapidly filling.  So after I take pictures of their work for the week to send to their teachers, I’ll be sticking that finished work into their boxes, which easily fit on the shelf in the closet!

Processed with MOLDIV


And now for a couple other ideas that you can purchase relatively inexpensively on Amazon!  (Reminder – I am no longer an affiliate, these links are just to help you out… please remember to always shop on Smile.Amazon so that you are helping out your favorite charity with every purchase!!!)

Processed with MOLDIV

This Water Doodle Mat is super fun for all three of my kids (3rd grade, kinder, and 2 yrs), and was only $24.  WELL worth it!  They have used it multiple times a day since it arrived, and I love that the water pens are interchangeable with our Melissa and Doug Water WOW! Books that we have gotten from my friend Casey over at Munchkin Land Kids!  (Yall please go and check out all of her awesome stuff… now is the time to support small businesses!!!!)

We also seriously LOVE Paint By Sticker Kids books, which you can get off of Amazon.  We have done SEVERAL of their books, but the ones I got for the kids for right now are Unicorns & Magic (full of LOTS of sparkly fun stickers!) and Beautiful Bugs.  They are $10 a piece and worth every penny!  Great for number matching/recognition practice, and fabulous fine motor / hand eye coordination practice!  They also make fabulous story starters for your kiddos who need some inspiration to get WRITING!!!

I also shared in that last graphic a photo from Natalie Grant and Charlotte Gambill… remember through all of this, mama… the struggle is real.  Make sure to let your faith rule over your fear.


WE CAN DO THIS!

blog signature